
Building a Travel Photo Sharing iOS App
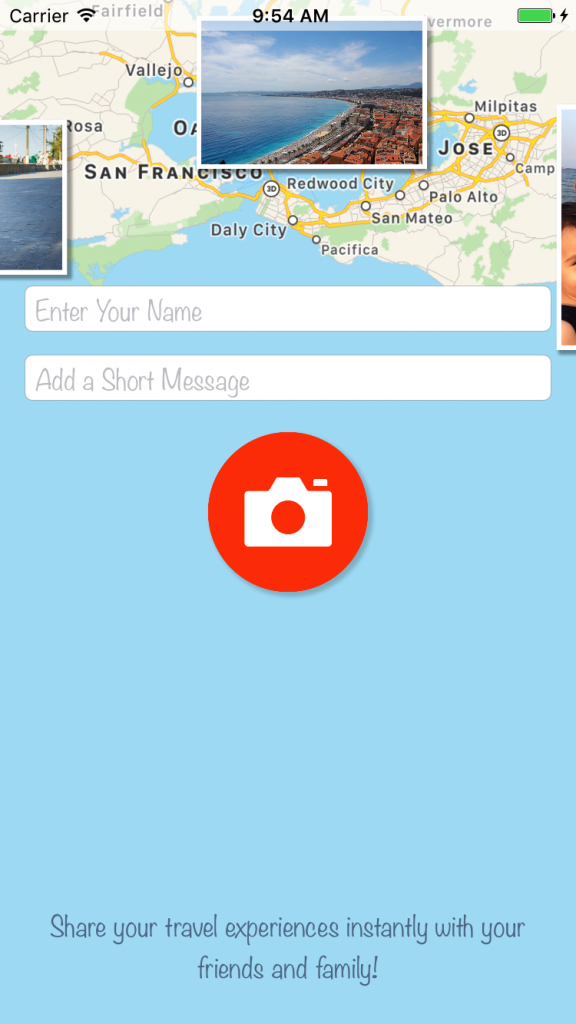
Hello! I want to show you how to build a relative simple photo sharing app with a twist: your images will be placed on a map background of your current location. You will also be able to add a short message and your name, to end up with an image looking like this (so you can brag to your friends with what you visited in the awesome vacation you have):

To follow this tutorial you need an Apple computer with xCode installed and an Apple developer account.
Create the Project
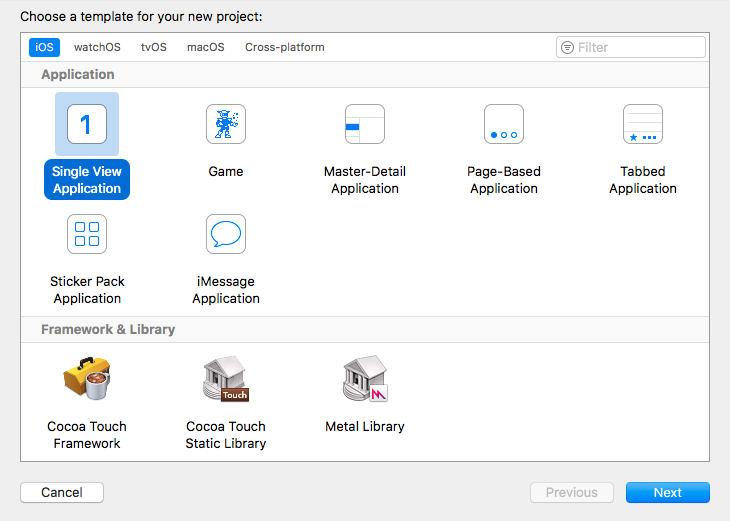
Open xCode and create a new project named PicTravel. Choose the Single View Application template:
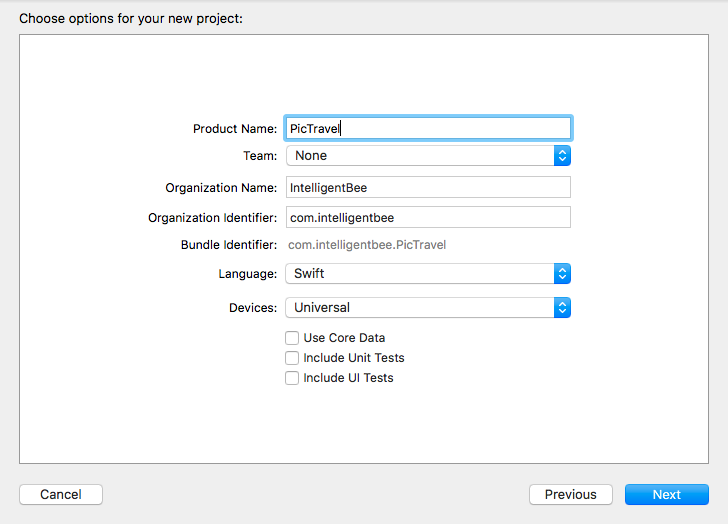
Give the project a name, we chose PicTravel but you ca choose what other name you like. Also fill in the organization name and the organization identifier for your project:
The last step is to save the newly created project in your Developer folder.
Building the Interface
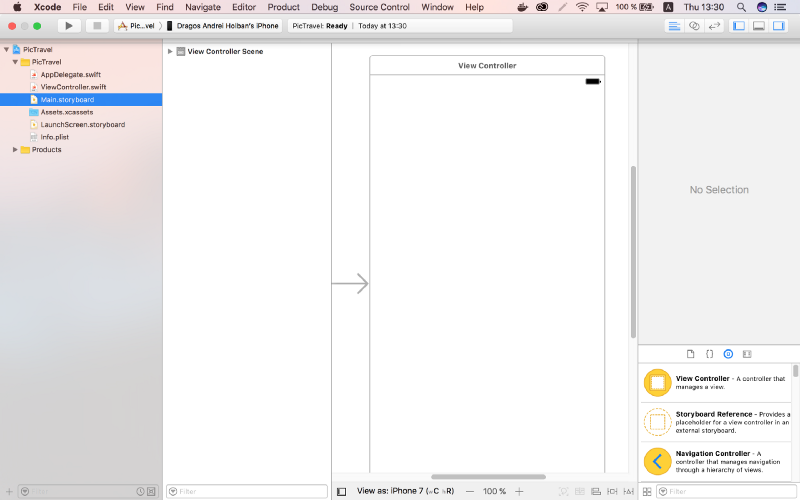
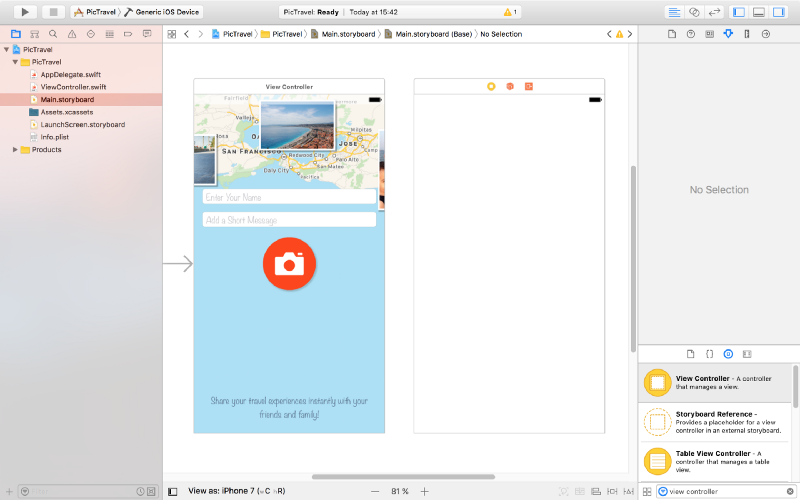
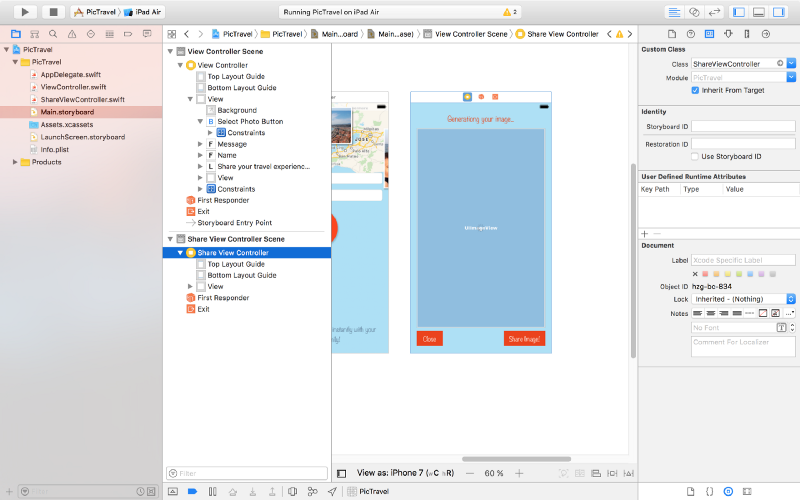
From the left panel, open the Main.storyboard. This is where we will build our app interface.
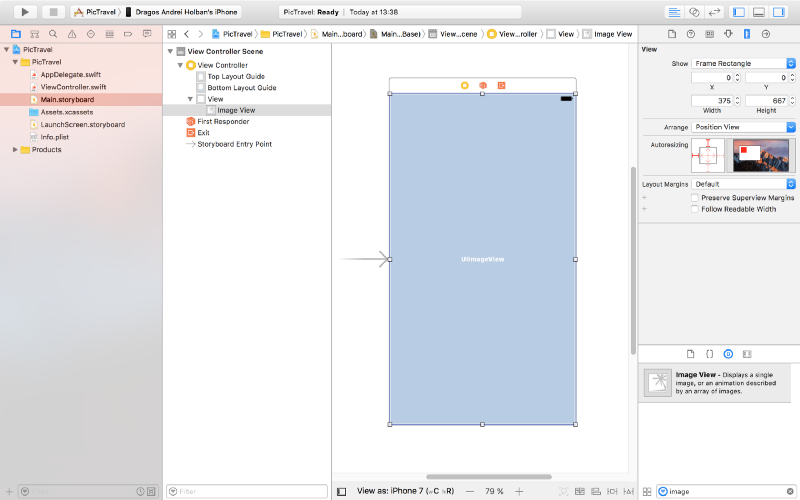
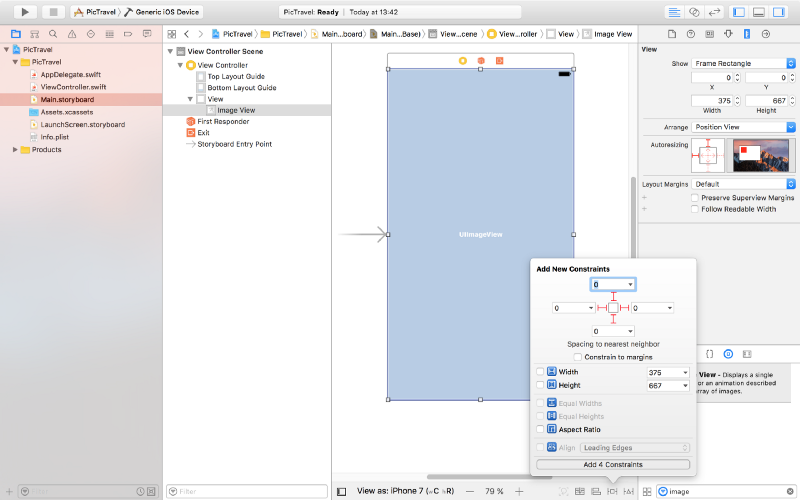
From the right panel, the bottom part, drag an ImageView and place it in the center of the scene. Resize it so it covers everything (snap it to the blue lines that appear).
Pin the ImageView to the scene margins using the constraints dialog like you see in the image below:
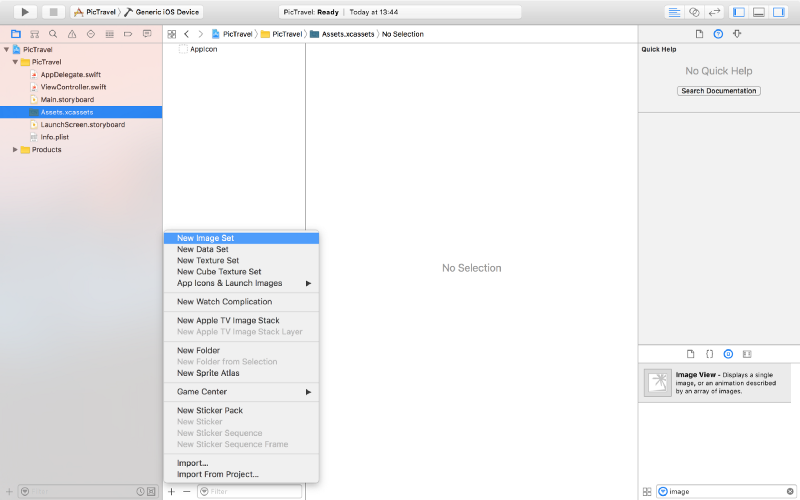
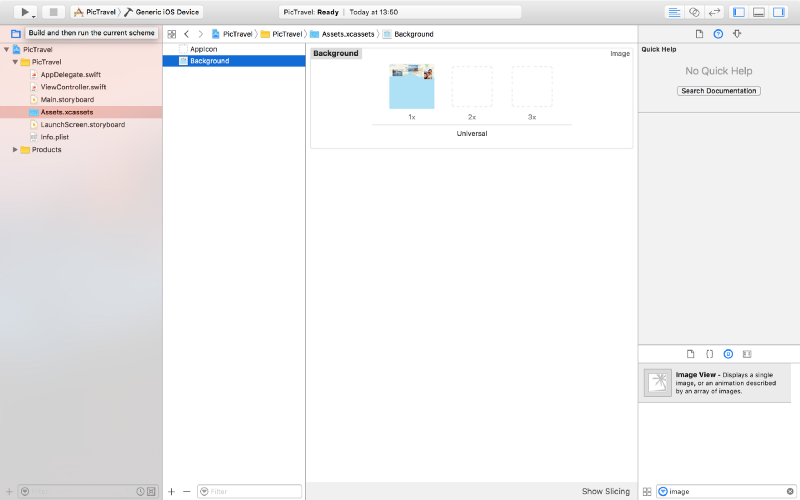
We will use this to put a background image for our app’s main screen. Download the background image from here then open the Assets.xcassets item from the left panel, click on the “+” button from the bottom and add a new image set named Background.
Drag the downloaded image to the “1x” placeholder to end up with something like this (we will not use the “2x” and “3x” placeholder for this tutorial, but you can add bigger resolution images to it if you want).
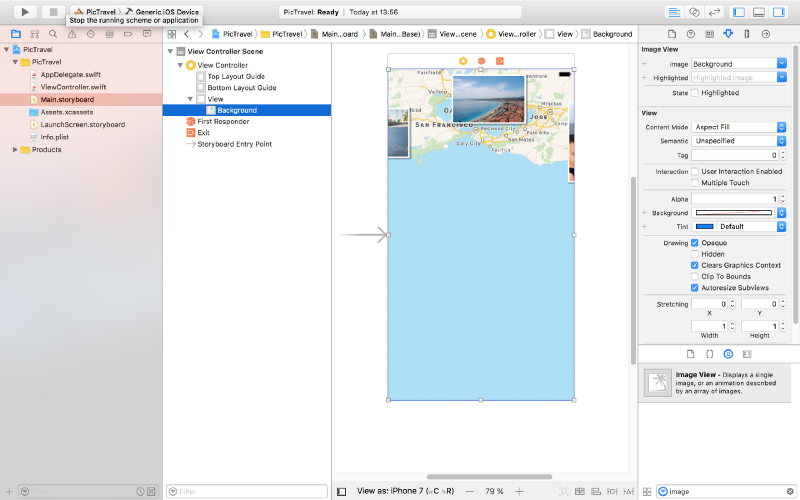
Now, back to the Main.storyboard, select the ImageView and, from the Attributes Inspector, select the Background image and set the Content Mode to Aspect Fill.
It’s time to add a new image to our assets that we will use for the take a photo button we are about to add. Download the image from here, create a new Image Set named Button in the Assets.xcassets and drag the image into the 1x placeholder like we did earlier with the background.
Next, in the Main.storybord, drag a button to the center of the scene. Set it’s Type to Custom, clear the Title and set the Background to the Button image we just created. From the Size Inspector, set the button with and height to 115.
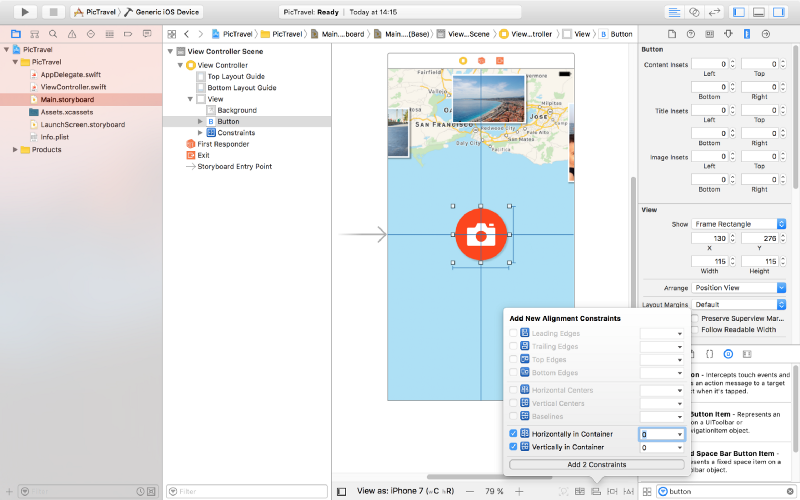
Add two new constraints for the button’s with and heigh (115 each), then, from the Alignment Constriants, align the button horizontally and vertically in the container.
Now let’s add two text fields for the user’s name and message. Place them like in the image below, with the constraints listed below. Don’t forget the blue guides that make the placement easier for you. To create constrains between two elements you can Ctrl+drag from one to another and select the type of constraint you want from the popup that appears.
For the message text field:
- Top Space to the name text field:
15 - Bottom Space to the button:
15 - Width <=
500 - Align Center X to superview
- Trailing Space to superview:
0with a Priority of900- that’s very important as it will keep the text field pinned to the margin on iPhones but on bigger devices the width constraint will be stronger so it will not grow larger than 500. - Leading Space to superview:
0with a Priority of900
For the name field:
- Bottom Space to the message text field:
15 - Width <=
500 - Align Center X to superview
- Trailing Space to superview:
0with a Priority of900 - Leading Space to superview:
0with a Priority of900
Set the placeholders for each of the text fields to “Enter Your Name” and “Add a Short Message” so the user knows what to do. Set the Font to Noteworthy Light with a size of 17 for both.
Also, for the name field set the Capitalization to Words, Correction and SpellChecking, both to No. For the message field set the Capitalization to Sentences.
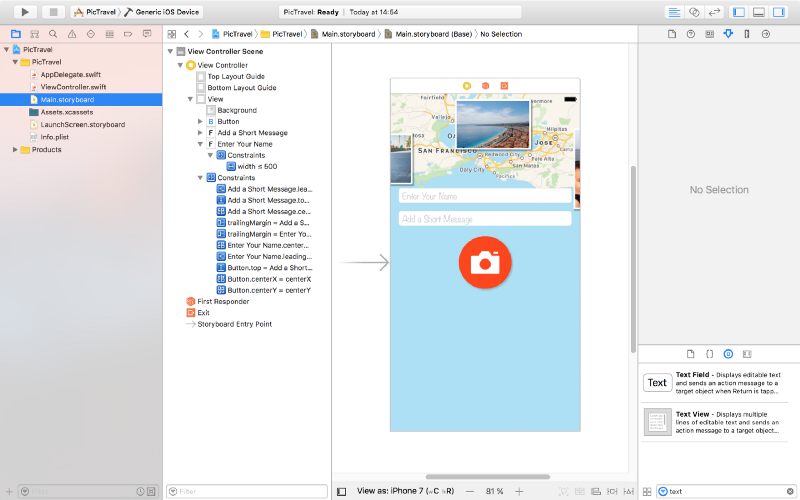
Here’s the result:
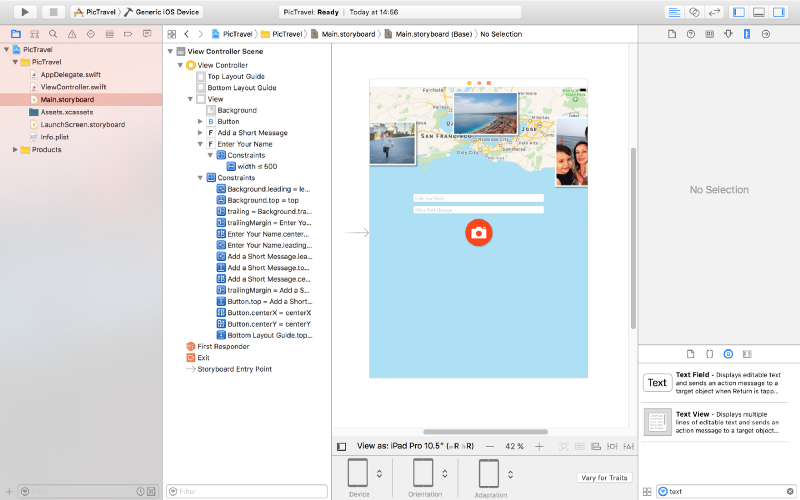
And here’s how it looks on an iPad (you can use the bottom bar under the scene to select on what device you want to preview the interface):
There are two more small elements to add and our main screen will be finished.
Add a label at the bottom with the following text: “Share your travel experiences instantly with your friends & family!”. Set it’s Font to Noteworthly Light 17, Alignment to center, Color to #5E7A96 and Lines to 0. Use the following constrains:
- Trailing Space to superview’s margins:
0 - Leading Space to superview’s margins:
0 - Bottom Space to Bottom Layout:
20 - Height:
64
Finally, add a new view at the top, having a white background with a opacity of 60%. Constrains used are:
- Trailing Space to superview:
0 - Leading Space to superview:
0 - Bottom Space to Top Layout:
20 - Height:
20
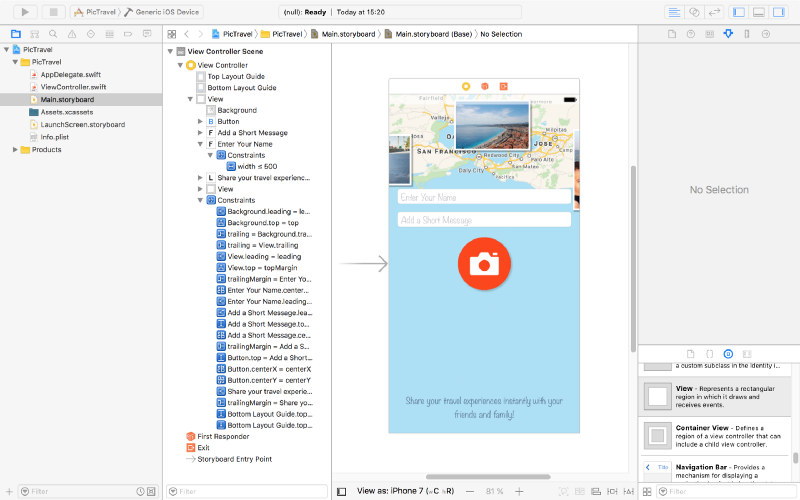
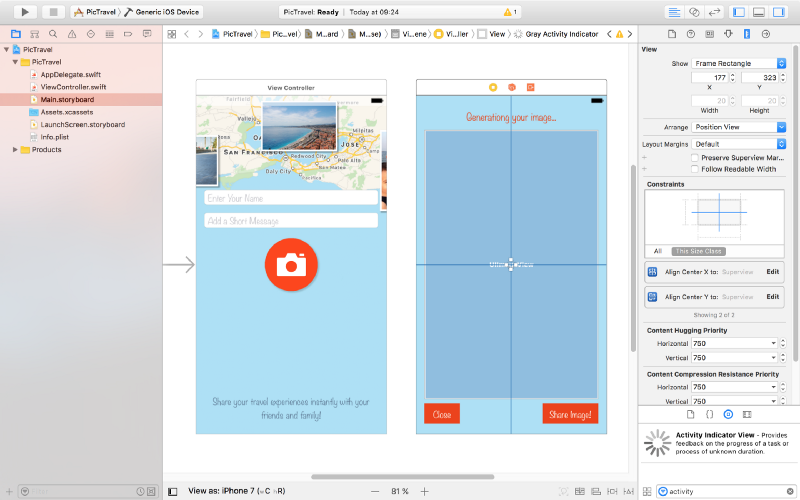
Here is the final design:
We will use this screen to get the user’s name and message and open the camera or photo library to take a photo. But after we gel all we need from the user, we need a new screen to show the final image and let him share it. So let’s add a new screen to our app.
From the Object Library, drag a new View Controller near the first one:
Set the background for the view of this new View Controller to #ACE0F6.
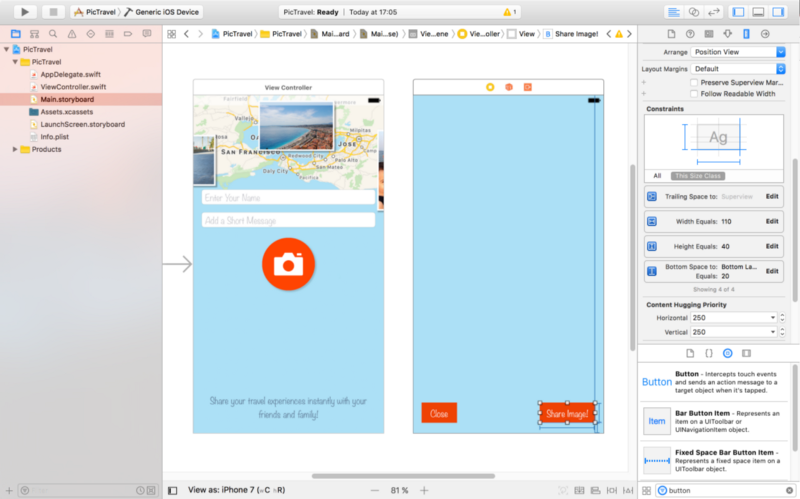
Next, add two buttons like in the image below. Type is custom, background color is #EE4205, font Noteworthy Light 17. Height 40, width 70 and 110. They are pinned to the bottom layout + 20, left or right of the container and also have constraints on with and height.
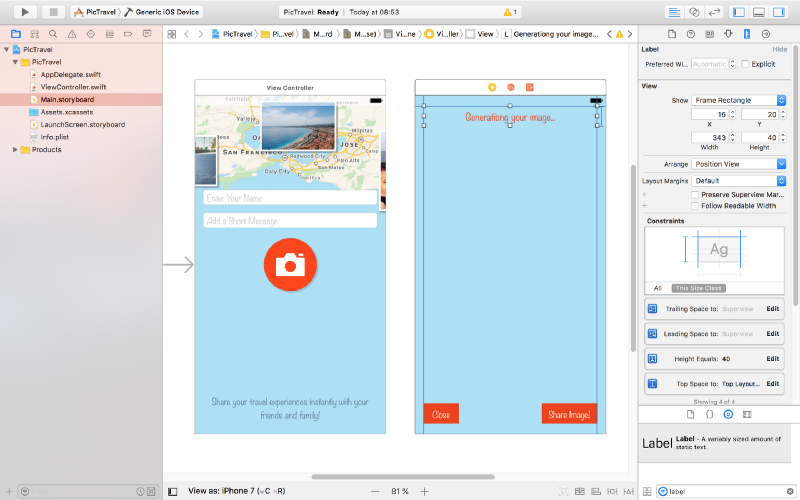
At the top, add a label to show the current status of the app to the user. Pin it to the top, left and right margins using constrains with a height of 40. Set the font to Noteworthy Light 19 and color to #EE4205. The initial text will be “Generating your image…” center aligned.
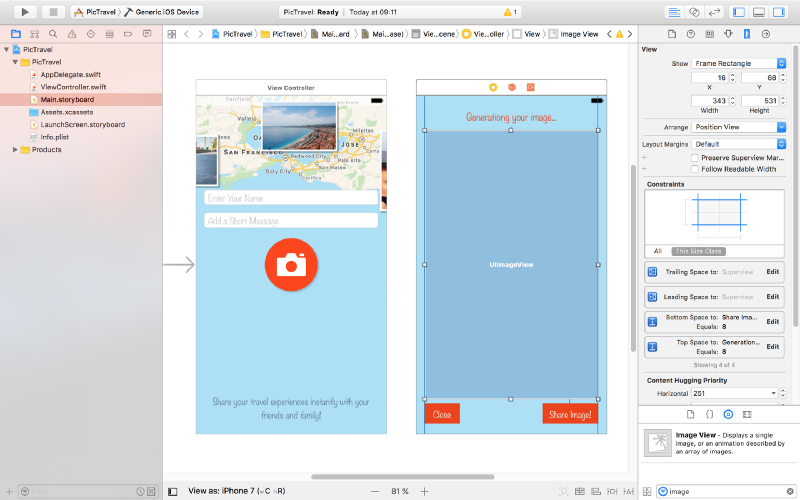
To show the generated image we need an Image View. Drag it to the center of the second screen and create the following constraints for it:
- Top Space to “Generating your image…” label:
8 - Bottom Space to “Share Image!” button:
8 - Leading Space to superview margin:
0 - Trailing Space to superview margin:
0
Also set it’s Content Mode to Aspect Fit
The last piece of the puzzle is an Activity Indicator View that we will use to visually inform the user that something happens behind the scenes (final image generation) and he has to wait for a few seconds.
Drag it from the Object Library and place it in the middle of the screen. Add constraints to center it horizontally and vertically in the container and set its Behavior to Animating and Hides When Stopped.
That’s it, our app’s interface is done. Run the app in the simulator to see how it looks.
Now it’s time to write some code.
Taking a Photo
With the main.storyboard still open, select the button from the first screen then open the Assistant editor and be sure you have the ViewController.swit file open on the right side. Use the manual mode if you have in case the Assistant editor has a problem figuring this out.
Now, Ctrl+drag from the button to the code to create a new action (be sure to select Action as the Connection , set the Name to selectPhotoClicked and the Type to UIButton):
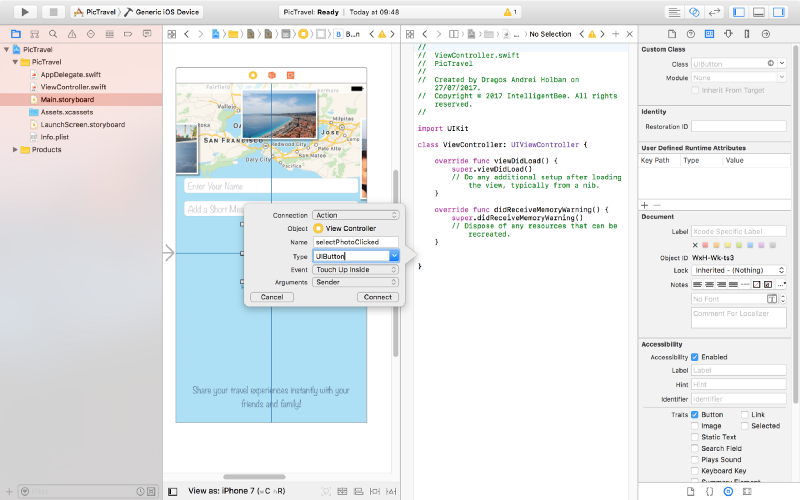
@IBAction func selectPhotoClicked(_ sender: UIButton) {

}
Also Ctrl+drag from the two text fields and the button to the code and create three outlets:
@IBOutlet weak var name: UITextField!
@IBOutlet weak var message: UITextField!
@IBOutlet weak var selectPhotoButton: UIButton!
Now let’s start with the most interesting part, choosing a photo. The user will be given a choice to take a photo using the camera or to choose one from the photo library. For this we will use an action sheet.
Edit the selectPhotoClicked method to add the code for this:
@IBAction func selectPhotoClicked(_ sender: UIButton) {
    let picker = UIImagePickerController()
    picker.delegate = self
    let alert = UIAlertController(title: nil, message: nil, preferredStyle: .actionSheet)
    alert.addAction(UIAlertAction(title: "Camera", style: .default, handler: {action in
        picker.sourceType = .camera
        self.present(picker, animated: true, completion: nil)
    }))
    alert.addAction(UIAlertAction(title: "Photo Library", style: .default, handler: { action in
        picker.sourceType = .photoLibrary
        self.present(picker, animated: true, completion: nil)
    }))
    alert.addAction(UIAlertAction(title: "Cancel", style: .cancel, handler: nil))
    self.present(alert, animated: true, completion: nil)
}
To make this code work we need to make our ViewController a delegate for both UIImagePickerControllerDelegate and UINavigationControllerDelegate. To do this change the line defining the ViewController class to the following:
class ViewController: UIViewController, UIImagePickerControllerDelegate, UINavigationControllerDelegate {If you test now the app will crash with an error like “This app has crashed because it attempted to access privacy-sensitive data without a usage description…”. That’s because the app has to ask the user’s permission to access the photo library or the camera and we have to provide a reason for this, reason that will be presented to the user. To do this open the Info.plist file and add a two new items:
Privacy - Photo Library Usage Descriptionwith a string value ofAccess to the photo library is needed in order to be able to choose a photo to be shared by the app.Privacy - Camera Usage Descriptionwith a string value ofAccess to the camera is needed in order to be able to take a photo to be shared by the app.
Also, if you try to choose the “camera” option in the simulator, the app will crash again because the simulator has no camera (“Source type 1 not available”). We need to add a test for this and only present the option if the camera is available:
if UIImagePickerController.isSourceTypeAvailable(.camera) {
    alert.addAction(UIAlertAction(title: "Camera", style: .default, handler: {action in
        picker.sourceType = .camera
        self.present(picker, animated: true, completion: nil)
    }))
}
One more thing to fix before we start handling the actual images: try to run the app on an iPad (in the simulator or on a real device). The app crashes one more time :(
Your application has presented a UIAlertController of style UIAlertControllerStyleActionSheet. The modalPresentationStyle of a UIAlertController with this style is UIModalPresentationPopover. You must provide location information for this popover through the alert controller’s popoverPresentationController. You must provide either a sourceView and sourceRect or a barButtonItem. If this information is not known when you present the alert controller, you may provide it in the UIPopoverPresentationControllerDelegate method -prepareForPopoverPresentation.
That’s because the UIAlertController on an iPad is presented like a popover (UIModalPresentationPopover) and it needs a position to be shown at. To do this we will have to test if we have a popoverPresentationController in the alert and, if true, set it’s sourceView and sourceRect (we are using an Swift optional for this, as the code after the question mark will be executed only if the popoverPresentationController is not nil):
alert.addAction(UIAlertAction(title: "Cancel", style: .cancel, handler: nil))
// on iPad this is a popover
alert.popoverPresentationController?.sourceView = self.view
alert.popoverPresentationController?.sourceRect = selectPhotoButton.frame
self.present(alert, animated: true, completion: nil)
We also need to make the photo selection from the library to be shown as a popover on an iPad:
alert.addAction(UIAlertAction(title: "Photo Library", style: .default, handler: { action in
    picker.sourceType = .photoLibrary
    // on iPad we are required to present this as a popover
    if UIDevice.current.userInterfaceIdiom == .pad {
        picker.modalPresentationStyle = .popover
        picker.popoverPresentationController?.sourceView = self.view
        picker.popoverPresentationController?.sourceRect = self.selectPhotoButton.frame
    }
    self.present(picker, animated: true, completion: nil)
}))
Now everything should be fine. Let’s see how to handle the image the user chooses.
We already added a View Controller in the Main.storyboard to show the final image to the user but we need an associated view controller class for it so we have a place to write the code involved in the process.
From the File menu select New -> File… then choose the Cocoa Touch Class option and click Next. Name the new class ShareViewController and be sure to set it as a subclass of UIViewController, no XIB, Swift language.
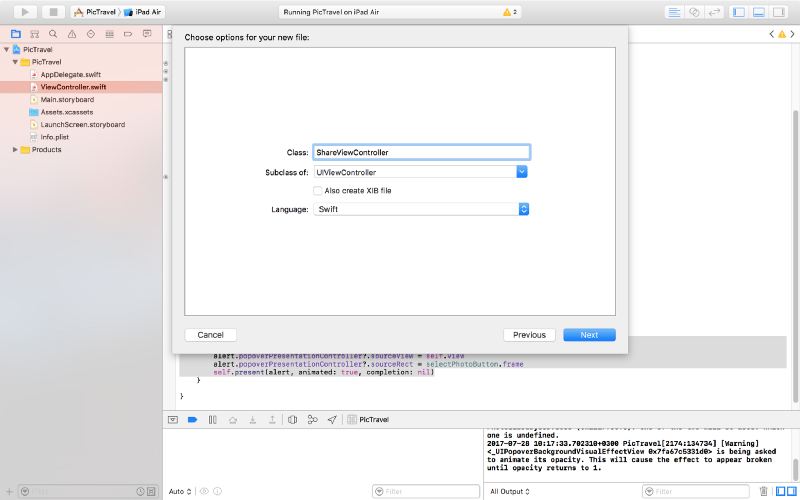
Click Next one more time and be sure to have the PicTravel Group selected and PicTravel target checked. Then Create the file.
Go back to the Main.storyboard and select the second view controller and set it’s class to the new ShareViewController we just created (you can do this from the Identity inspector, the Class dropdown).
Now, with the view controller still selected, open the assistant editor and make sure it is set to automatically open the associated file. This should be the ShareViewController class. Ctrl+drag from the Image View, Activity Indicator and the Label to the class to create outlets for them:
@IBOutlet weak var imageView: UIImageView!
@IBOutlet weak var activityIndicator: UIActivityIndicatorView!
@IBOutlet weak var titleLabel: UILabel!

Also add some new variables for the user’s image, name and message:
var image: UIImage!
var name: String!
var message: String!
So, here’s what we will do next: when the user chooses an image, we instantiate the ShareViewController, set its image, name and message properties to the user’s data then present the ShareViewController.
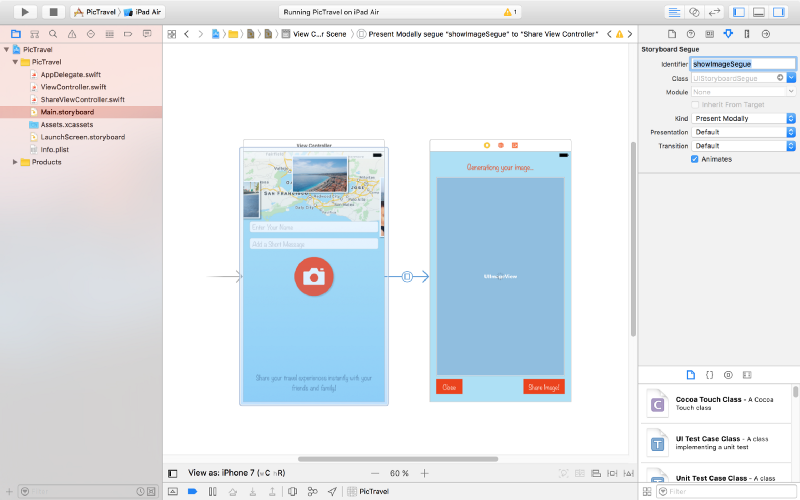
To do this we need to create a segue (transition). Close the assistant editor then, in the Main.storyboard, Ctrl+drag from the first “View Controller” (click on the yellow symbol from the top-right) to the “Share View Controller” and define a “Present Modally” segue. then click on the created segue and set it’s identifier to showImageSegue (we will need this later in the code to identify this specific segue).
Now open our ViewController class. Add a new method to be called when the user selects an image (this is part of the UIImagePickerControllerDelegate):
func imagePickerController(_ picker: UIImagePickerController, didFinishPickingMediaWithInfo info: [String : Any]) {
    dismiss(animated: true, completion: nil)
    image = info[UIImagePickerControllerOriginalImage] as! UIImage
    performSegue(withIdentifier: "showImageSegue", sender: self)
}
Here’s what this method does:
- dismiss the image picker controller
- get the image in a class variable
- present the ShareViewController by performing the
showImageSeguesegue
For this we need a new image variable to be defined in our ViewController class:
var image: UIImage!
To send the data to the ShareViewController, we will use a method that is called just before the segue to the new view controller happens:
override func prepare(for segue: UIStoryboardSegue, sender: Any?) {
    if segue.identifier == "showImageSegue" {
        if let shareViewController = segue.destination as? ShareViewController {
            shareViewController.image = self.image
            shareViewController.name = name.text ?? ""
            shareViewController.message = message.text ?? ""
        }
    }
}
Now run the app. After the user selects an image, the second view controller should be presented to the user. But… we have no way to close it. Let’s do this next.
Still in the ViewController, create an action that will be called when the ShareViewController will exit (here we will also set the image to nil to free the memory because we don’t need it anymore):
@IBAction func exit(unwindSegue: UIStoryboardSegue) {
    image = nil
}
Back to the Main.storyboard, Ctrl+drag from the Close button to the exit symbol from the top-right of the ShareViewController and select the exit method when prompted.
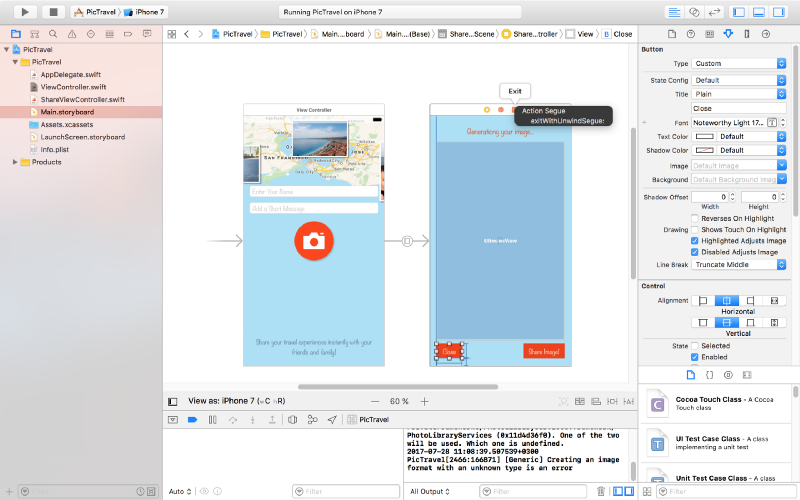
This should solve our problem of closing the second screen.
Let’s get now to the main objective of our app: get the user’s location, generate a map image and put the photo the user selected on top of it together with the name, location and message.
To continue, add some constants to the ShareViewController class that will be used in the code that follows:
// some constants used to generate the final image
let finalImageMaxDimension: CGFloat = 2048
let finalImageBorderWidth: CGFloat = 4
let userImageMaxDimension: CGFloat = 1200
let userImageBorderWidth: CGFloat = 20
let userImageX: CGFloat = 100
let userImageY: CGFloat = 160
let mapRegionDistance: CLLocationDistance = 600
let rotateContentByDegrees: CGFloat = -4
let userMessageMaxLength = 100
let textMargin: CGFloat = 280
let userMessageTopMargin: CGFloat = 60
let userNameTopMargin: CGFloat = 80
let userNameHeight: CGFloat = 120
Getting Current User Location
First we need to add a new key to Info.plist, Privacy - Location When In Use Usage Description with the value of Current location is needed to generate a map image of your location.
Now we need to import CoreLocation into our ShareViewController:
import UIKit
import CoreLocation
Declare a new locationManager variable:
var locationManager:CLLocationManager!
Add a new method that will start the process of finding the user location:
func getCurrentLocation() {
    locationManager = CLLocationManager()
    locationManager.delegate = self
    locationManager.desiredAccuracy = kCLLocationAccuracyNearestTenMeters
    locationManager.requestWhenInUseAuthorization()
    if (CLLocationManager.authorizationStatus() == .denied) {
        showError(title: "Location Access Denied", message: "The location permission was not authorized. Please enable it in Privacy Settings to allow the app to get your location and generate a map image based on that.")
    }

    if CLLocationManager.locationServicesEnabled() {
        locationManager.startUpdatingLocation()
    }
}
For this to work we need to implement the CLLocationManagerDelegate protocol:
class ShareViewController: UIViewController, CLLocationManagerDelegate {We also need to define the showError function:
func showError(title: String, message: String)
{
    let alert = UIAlertController(title: title, message: message, preferredStyle: .alert)
    let action = UIAlertAction(title: "OK", style: .default, handler: { _ in
        self.dismiss(animated: true, completion: nil)
    })
    alert.addAction(action)

    present(alert, animated: true, completion: nil)
}
Now implement the method of the CLLocationManagerDelegate protocol that is called when we get a location update:
func locationManager(_ manager: CLLocationManager, didUpdateLocations locations: [CLLocation]) {
    let location = locations[0]
    manager.stopUpdatingLocation()

    // get city & country name
    let geocoder = CLGeocoder()
    geocoder.reverseGeocodeLocation(location, completionHandler: { placemarks, error in
        if error != nil {
            self.showError(title: "Whoops...", message: error!.localizedDescription)
        } else {
            let placemark = placemarks?[0]
            self.locationString = (placemark?.administrativeArea ?? "") + ", " + (placemark?.country ?? "")
            self.generateMapImage(location: location)
        }
    })
}
This method will receive the user’s location, stop the location updates (because we don’t need them anymore) and calls a generateMapImage function (that we’ll define later) with the retrieved location as an argument. It also uses the Apple’s geocoder service to find out the city and country name for the retrieved location and puts them in a new class variable locationString:
var locationString = ""
Generate the Map Image
To generate the map image we will use the following function:
func generateMapImage(location userLocation: CLLocation) {
    let mapSnapshotOptions = MKMapSnapshotOptions()

    // Set the region of the map that is rendered.
    let location = CLLocationCoordinate2DMake(userLocation.coordinate.latitude, userLocation.coordinate.longitude)
    let region = MKCoordinateRegionMakeWithDistance(location, mapRegionDistance, mapRegionDistance)
    mapSnapshotOptions.region = region

    // Set the size of the image output.
    mapSnapshotOptions.size = calculateMapImageSize(image: self.image)

    let snapShotter = MKMapSnapshotter(options: mapSnapshotOptions)
    snapShotter.start(completionHandler: { snapShot, error in
        if error != nil {
            self.showError(title: "Whoops1...", message: error!.localizedDescription)
        } else {
            self.mapImage = snapShot?.image
            self.activityIndicator.stopAnimating()
            self.generateFinalImage()
        }
    })
}
You need to import MapKit into ShareViewController:
import MapKit
Also a new class variable is used:
var mapImage: UIImage!
To calculate the map size we used another function, calculateMapImageSize that returns a CGSize object to be used when generating the map image:
func calculateMapImageSize() -> CGSize  {
    let maxSize = finalImageMaxDimension - 2 * finalImageBorderWidth
    if image.size.width > image.size.height {
        return CGSize(width: maxSize, height: round(maxSize * image.size.height / image.size.width))
    } else {
        return CGSize(width: round(maxSize * image.size.width / image.size.height), height: maxSize)
    }
}
Building the Final Image
The last thing we need to do is to generate the final image with all the pieces put together:
func generateFinalImage() {
let size = CGSize(width: mapImage.size.width + 2 * finalImageBorderWidth, height: mapImage.size.height + 2 * finalImageBorderWidth)
let userImageSize = calculateUserImageFinalSize()
// start drawing context
UIGraphicsBeginImageContextWithOptions(size, true, 0.0)
let context = UIGraphicsGetCurrentContext()
// draw the white background
let bgRectangle = CGRect(x: 0, y: 0, width: mapImage.size.width + 2 * finalImageBorderWidth, height: mapImage.size.height + 2 * finalImageBorderWidth)
context!.saveGState()
context!.setFillColor(UIColor.white.cgColor)
context!.addRect(bgRectangle)
context!.drawPath(using: .fill)
context!.restoreGState()
// draw the map
mapImage.draw(in: CGRect(x: finalImageBorderWidth, y: finalImageBorderWidth, width: mapImage.size.width, height: mapImage.size.height))
// draw a semitransparent white rectage over the map to dim it
let transparentRectangle = CGRect(x: finalImageBorderWidth, y: finalImageBorderWidth, width: mapImage.size.width, height: mapImage.size.height)
context!.saveGState()
context!.setFillColor(UIColor(colorLiteralRed: 255, green: 255, blue: 255, alpha: 0.3).cgColor)
context!.addRect(transparentRectangle)
context!.drawPath(using: .fill)
context!.restoreGState()
// rotate the context
context!.rotate(by: (rotateContentByDegrees * CGFloat.pi / 180))
// draw white rectangle
let rectangle = CGRect(x: userImageX, y: userImageY, width: userImageSize.width + 2 * userImageBorderWidth, height: userImageSize.height + 2 * userImageBorderWidth)
context!.saveGState()
context!.setFillColor(UIColor.white.cgColor)
context!.setShadow(offset: CGSize(width: userImageBorderWidth, height: userImageBorderWidth), blur: 8.0)
context!.addRect(rectangle)
context!.drawPath(using: .fill)
context!.restoreGState()
// draw user image
image.draw(in: CGRect(x: userImageX + userImageBorderWidth, y: userImageY + userImageBorderWidth, width: userImageSize.width, height: userImageSize.height))
// draw message
var truncatedMessage = message
if (message.distance(from: message.startIndex, to: message.endIndex) > userMessageMaxLength) {
truncatedMessage = message.substring(to: message.index(message.startIndex, offsetBy: userMessageMaxLength))
}
let messageFont = UIFont(name: "Noteworthy-Bold", size: 80)!
let messageFontAttributes = [
NSFontAttributeName: messageFont,
NSForegroundColorAttributeName: UIColor.black,
] as [String : Any]
let messageSize = sizeOfString(string: truncatedMessage!, constrainedToWidth: Double(size.width - textMargin), attributes: messageFontAttributes)
truncatedMessage!.draw(in: CGRect(x: userImageX + userImageBorderWidth, y: userImageY + userImageBorderWidth + userImageSize.height + userMessageTopMargin, width: size.width - textMargin, height: messageSize.height), withAttributes: messageFontAttributes)
// draw name, location & date
let nameFont = UIFont(name: "Noteworthy", size: 58)!
let nameFontAttributes = [
NSFontAttributeName: nameFont,
NSForegroundColorAttributeName: UIColor.black,
] as [String : Any]
let dateFormatter = DateFormatter()
dateFormatter.dateStyle = .long
dateFormatter.timeStyle = .none
var nameString = ""
if(name != "") {
nameString = name + " - " + dateFormatter.string(from: Date()) + ", " + locationString
} else {
nameString = dateFormatter.string(from: Date()) + ", " + locationString
}
nameString.draw(in: CGRect(x: userImageX + userImageBorderWidth, y: userImageY + userImageBorderWidth + userImageSize.height + messageSize.height + userNameTopMargin, width: size.width - textMargin, height: userNameHeight), withAttributes: nameFontAttributes)
// get final image
let finalImage = UIGraphicsGetImageFromCurrentImageContext()
// end drawing context
UIGraphicsEndImageContext()
// show the final image to the user & update tha status label
imageView.image = finalImage
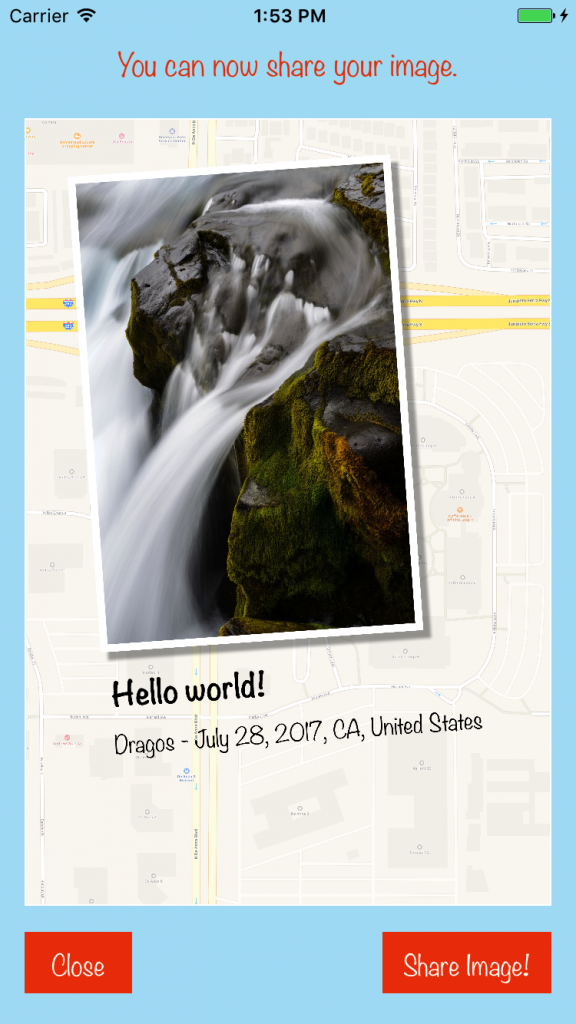
titleLabel.text = "You can now share your image."
}Here we used two helper methods, calculateUserImageFinalSize and sizeOfString. The last one deserves a little attention because it will return a CGSize object with the dimensions needed to draw a text with specific attributes.
func calculateUserImageFinalSize() -> CGSize  {
    if image.size.width > image.size.height {
        return CGSize(width: userImageMaxDimension, height: round(userImageMaxDimension * image.size.height / image.size.width))
    } else {
        return CGSize(width: round(userImageMaxDimension * image.size.width / image.size.height), height: userImageMaxDimension)
    }
}

func sizeOfString (string: String, constrainedToWidth width: Double, attributes: [String: Any]) -> CGSize {
    let attString = NSAttributedString(string: string,attributes: attributes)
    let framesetter = CTFramesetterCreateWithAttributedString(attString)

    return CTFramesetterSuggestFrameSizeWithConstraints(framesetter, CFRange(location: 0,length: 0), nil, CGSize(width: width, height: .greatestFiniteMagnitude), nil)
}
Now that we have everything in place, we need to start the whole process when the ShareViewController is loaded and presented to the user:
override func viewDidAppear(_ animated: Bool) {
    super.viewDidAppear(animated)
    getCurrentLocation()
}
Test the app. Enter your name, a short message and select a photo. You should get the following result:
Sharing the Final Image
Ok, now let’s see how do we share the resulted image. To do this we will use an UIActivityViewController.
Add a new shareImage action for the Share Image! button using Ctrl+drag into the ShareViewController like we did earlier for the photo button:
@IBAction func shareImage(_ sender: UIButton) {
}
The code for the actual sharing is pretty simple:
@IBAction func shareImage(_ sender: UIButton) {
    let activityViewController = UIActivityViewController(activityItems: [image], applicationActivities: nil)
    activityViewController.popoverPresentationController?.sourceView = self.view
    present(activityViewController, animated: true, completion: nil)
}
Try it! Now you can save the image or share it with your friends & family using the installed apps on your device.
Final Touches
To finish the app we need to do two more things:
- add an app icon
- make the startup screen look good
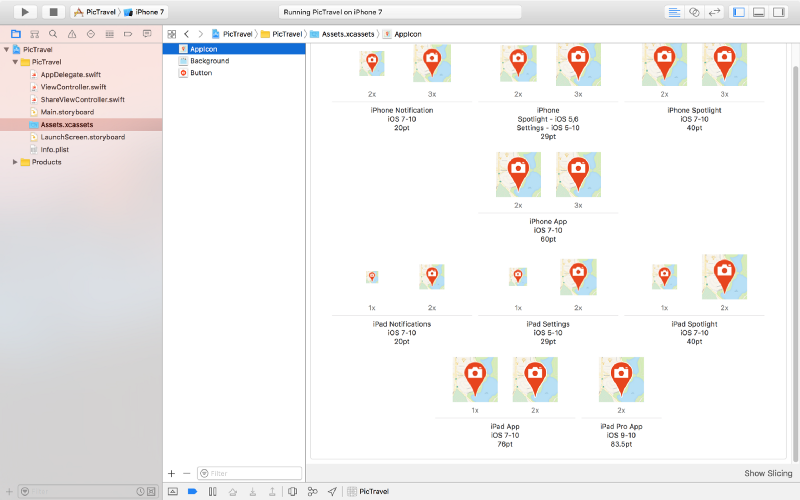
To add an app icon, first download the images from here, then open the Assets.xcassets from the left panel, select the AppIcon item and drag&drop downloaded images to their respective placeholders.
To change the startup screen , which is white right now, open the LaunchScreen.storyboard from the left panel and drag an Image View to it. Add constraints so it covers the entire screen, select the Background Image and set the Content Mode to Aspect Fill (it will look exactly like our main app's screen background).
That’s it! You can now run the app and even install it on your device to take it out in the wild.
The code for this app is available on github: https://github.com/intelligentbee/PicTravel
You can also download the final app from the App Store: https://itunes.apple.com/us/app/pictravel/id1263495901?mt=8

OOP in Golang vs C++
Before I started to learn Go, every online opinion I would read about the language complained about the lack of generics and how OOP was dumbed down and so on.
It made me put off learning it for quite some time, more than I would like to admit. Coming from a C++ background, OOP, generics and meta-programming was my daily bread.
It wasn't until I had to actually learn Go that I saw what it offered me in terms of OOP and it was just enough. As such, I wanted to put a side-by-side comparison of typical C++ code that deals with classes, and it's corresponding implementation in Go that does more or less the same thing.
This is by no means an exhaustive list of examples, but I thought it might prove useful for someone trying to figure out Go.
To run all Go examples, copy them to a file and run go run filename.go .
To run all C++ examples, copy them to a file and run g++ -o filename filename.cpp -std=c++14 && ./filename .
Class declaration
In C++:
#include <iostream>
#include <memory>
#include <string>

class MyClass {
    private:
        std::string property1;

        void Method1(std::string param1, int param2);

    public:
        std::string property2;

        MyClass(std::string constructor_argument);
        int Method2(int param);
};

MyClass::MyClass(std::string constructor_argument) {
    this->property1 = constructor_argument;
}

void MyClass::Method1(std::string param1, int param2) {
    std::cout << param1 << std::endl << param2 << std::endl;
    std::cout << this->property2 << std::endl;
}

int MyClass::Method2(int param) {
    this->Method1(this->property1, param);

    return param + 1;
}

int main(int argc, char *argv[]) {
    auto obj = std::make_unique<MyClass>("property 1 value");

    obj->property2 = "property 2 value";

    std::cout << obj->Method2(4) << std::endl;

    return 0;
}
Go equivalent:
package main

import "fmt"

type MyClass struct {
	// properties that start with a lowercase character are private
	property1 string
	// properties that start with an uppercase character are public
	Property2 string

	/*
		Keep in mind that public and private in Golang actually
		means exported by package. Code from the same package
		can access a structure's private properties and methods.
	*/
}

func NewMyClass(constructor_argument string) *MyClass {
	return &MyClass{property1: constructor_argument}
}

func (mc *MyClass) method1(param1 string, param2 int) {
	fmt.Printf("%s\n%d\n", param1, param2)
	fmt.Printf("%s\n", mc.property1)
}

func (mc *MyClass) Method2(param int) int {
	mc.method1(mc.property1, param)

	return param + 1
}

func main() {
	obj := NewMyClass("property 1 value")

	obj.Property2 = "property 2 value"

	fmt.Printf("%d\n", obj.Method2(4))

	// No return needed
}
Inheritance (sort of)
In C++:
#include <iostream>
#include <memory>
#include <string>

class BaseClass {
    public:
        std::string property1;
        void method1();
};

void BaseClass::method1() {
    std::cout << this->property1 << std::endl;
}

class DerivedClass : public BaseClass {
    public:
        std::string property2;
        void method2();
};

void DerivedClass::method2() {
    std::cout << this->property2 << std::endl;
}

int main(int argc, char *argv[]) {
    auto obj = std::make_unique<DerivedClass>();
    obj->property1 = "property 1 value";
    obj->property2 = "property 2 value";

    obj->method1();
    obj->method2();

    return 0;
}
Go equivalent:
package main

import "fmt"

type BaseClass struct {
	Property1 string

	// no need for method declaration here
}

func (bc *BaseClass) Method1() {
	fmt.Printf("%s\n", bc.Property1)
}

type DerivedClass struct {
	BaseClass // this is actually composition

	Property2 string
}

func (dc *DerivedClass) Method2() {
	fmt.Printf("%s\n", dc.Property2)
}

func main() {
	obj := &DerivedClass{}
	obj.Property1 = "property 1 value"
	obj.Property2 = "property 2 value"

	obj.Method1()
	obj.Method2()

	// no need to return
}
Interfaces
In C++:
#include <iostream>
#include <memory>
#include <string>

class MyInterface {
    public:
        virtual void method() = 0;
};

class Class1 : public MyInterface {
    public:
        void method() override;
};

void Class1::method() {
    std::cout << "Class 1" << std::endl;
}

class Class2 : public MyInterface {
    public:
        void method() override;
};

void Class2::method() {
    std::cout << "Class 2" << std::endl;
}

std::shared_ptr<MyInterface> NewClass1() {
    return std::make_shared<Class1>();
}

std::shared_ptr<MyInterface> NewClass2() {
    return std::make_shared<Class2>();
}

int main(int argc, char *argv[]) {
    auto obj1 = NewClass1();
    auto obj2 = NewClass2();

    obj1->method();
    obj2->method();

    return 0;
}
Go equivalent:
package main

import "fmt"

type MyInterface interface {
	Method()
}

type Class1 struct {
}

func (c1 *Class1) Method() {
	fmt.Println("Class 1")
}

type Class2 struct {
}

func (c2 *Class2) Method() {
	fmt.Println("Class 2")
}

func NewClass1() MyInterface {
	return &Class1{}
}

func NewClass2() MyInterface {
	return &Class2{}
}

func main() {
	obj1 := NewClass1()
	obj2 := NewClass2()

	obj1.Method()
	obj2.Method()
}
Conclusion
There are basic equivalences between traditional OOP languages like C++ and the syntax and functionality that Golang provides.
In it's own simple way, Golang provides ways to implement encapsulation, inheritance and polymorphism. In my humble opinion, these mechanisms are enough for most object-oriented projects.

Introduction to React Native
React Native is a framework for building native apps using React made by Facebook. With React Native, you don't build a “mobile web app”, an “HTML5 app”, or a “hybrid app”. You build a real mobile app that's indistinguishable from an app built using Objective-C or Java. React Native uses the same fundamental UI building blocks as regular iOS and Android apps. You just put those building blocks together using JavaScript and React. - from https://facebook.github.io/react-native/
In the following lines we will take a short tour of React Native to help you familiarize with the platform and hopefully get you started in your React Native development career.
We will create a simple app called RandomNumbers that will pick some numbers from a pool, numbers that you can use later at anything you need (for example playing the lottery).
Install React Native
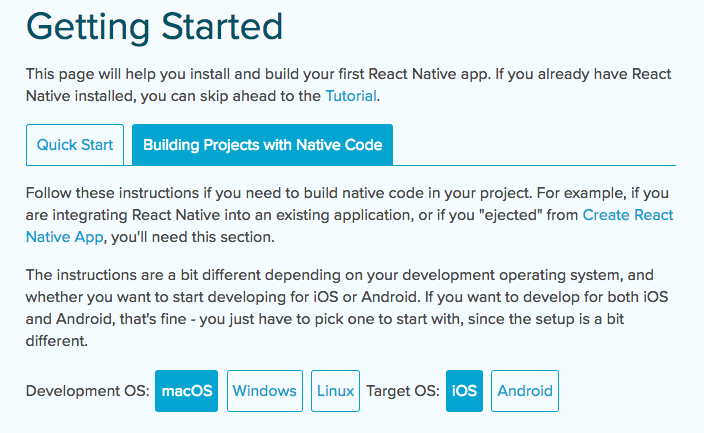
You will need to install Node, Watchman, the React Native command line interface, a JDK, and Xcode or Android Studio (or both). You can find details on how exactly do to this, depending on your platform, here: https://facebook.github.io/react-native/docs/getting-started.html. Select the "Building Projects with Native Code" tab and then follow the instructions.
When you’re done, create a new project with the react-native init RandomNumbers command then cd into the newly created RandomNumbers folder.
The above command created an empty React Native project that you can immediately run on your device using the react-native run-ios or react-native run-android commands (you need to have an Android emulator already started for the last command to work).
Make Your First Change
Open the RandomNumbers folder in an code editor of your choice. Here you will find some files and folders, the most important ones being the index.ios.js and index.android.js files that contain our starting point of the app.
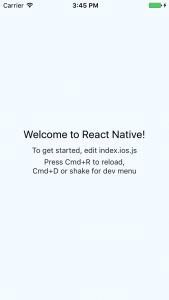
Edit one (or both) of the files above, depending on the platform you are testing, to the following:
// ...

export default class RandomNumbers extends Component {
  render() {
    return (
      <View style={styles.container}>
        <Text style={styles.welcome}>
          Random Numbers
        </Text>
      </View>
    );
  }
}

// ...
Save the edited file, then, in the emulator, press Cmd+R to reload the app. It will refresh itself to reflect the changes, no recompiling needed. Isn’t this cool?
React Native Components
Just like in React, a React Native app is made up by several components that work together to achieve the ultimate goal of the app. To see the list of available components visit https://facebook.github.io/react-native/docs/getting-started.html and scroll to the Components section in the left menu.
We will start by making the two React Native starting points (from the index.ios.js and index.android.js files) to load a single component called App.
Create a new App.js file with the following content:
import React, { Component } from 'react';
import {
    View,
    Text,
    StyleSheet
} from 'react-native';

export default class App extends Component {
    render() {
        return (
            <View style={styles.container}>
                <Text style={styles.welcome}>
                    Random Numbers
                </Text>
            </View>
        );
    }
}

const styles = StyleSheet.create({
    container: {
        flex: 1,
        justifyContent: 'center',
        alignItems: 'center',
        backgroundColor: '#F5FCFF',
    },
    welcome: {
        fontSize: 20,
        textAlign: 'center',
        margin: 10,
    },
});
Now change the index.ios.js and index.android.js to the following (both will have the same content):
import React, { Component } from 'react';
import {
  AppRegistry
} from 'react-native';
import App from './App';

export default class RandomNumbers extends Component {
  render() {
    return (
       <App />
    );
  }
}

AppRegistry.registerComponent('RandomNumbers', () => RandomNumbers);
We just removed everything from them and loaded the App component so we now have a common starting point for both platforms.
Generate a Random Number
Let’s add a Button that will trigger the number generator of our app. First import the Button component, then add the actual button to the render method (in App.js):
// ...

import {
    View,
    Text,
    Button,
    StyleSheet
} from 'react-native';

export default class App extends Component {
    render() {
        return (
            <View style={styles.container}>
                <Text style={styles.welcome}>
                    Random Numbers
                </Text>
                <Button onPress={this.generateRandomNumber} title="Generate!" />
            </View>
        );
    }
}

// ...
For this to work we need to define a new method generateRandomNumber:
// ...

export default class App extends Component {
    generateRandomNumber = () => {
        let random = Math.floor(Math.random() * 100);
        console.log(random);
    }

// ...
Now if you click on the Generate! button, a random number between 0 and 100 will be generated and printed to the console.
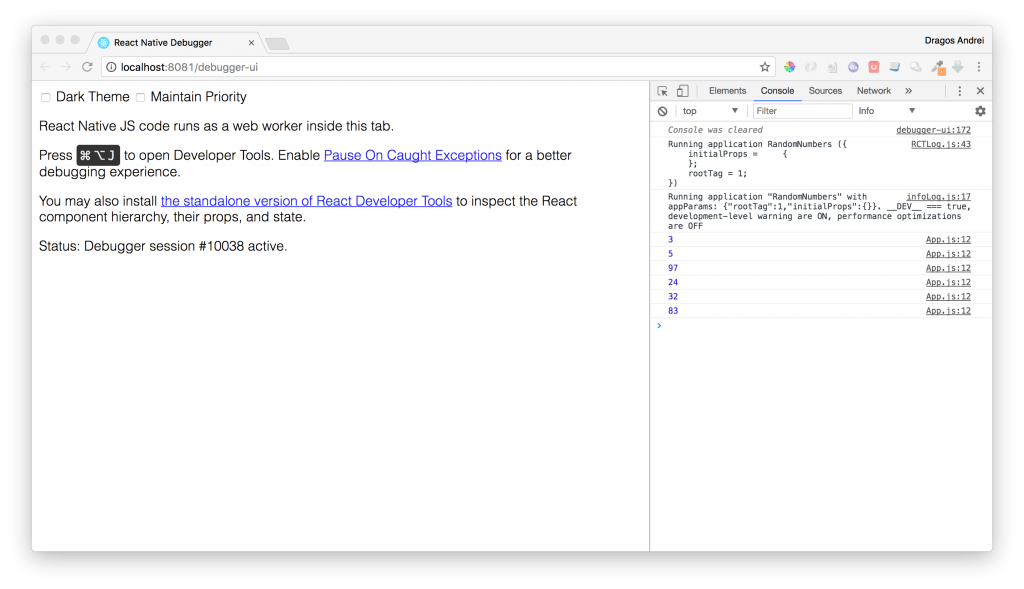
To see the console output open the developer menu in your app by pressing Cmd+D and select Debug JS Remotely. A new browser window will open and there you can check the console output like you normally do when developing for the web.
Output Data to the Screen
Now we have our generated random number, but how can we show it to the user? For this we will use the state concept of React. The are two fundamental concepts of React that you need to understand: the state and props.
There are two types of data that control a component: props and state. Props are set by the parent and they are fixed throughout the lifetime of a component. For data that is going to change, we have to use state.
You can read more about this topic here:
- https://facebook.github.io/react-native/docs/props.html
- https://facebook.github.io/react-native/docs/state.html
Start by creating a constructor for our App component that sets the initial state:
// ...

export default class App extends Component {
    constructor(props) {
        super(props);

        this.state = {
            random: null
        };
    }

// ...
In the generateRandomNumber method, change the state to contain the newly generated number:
// ...

generateRandomNumber = () => {
    let random = Math.floor(Math.random() * 100);
    this.setState({random: random});
}

// ...
Finally add a new Text component in the render() method that will show the random number from the app’s state:
// ...

render() {
    return (
        <View style={styles.container}>
            <Text style={styles.welcome}>
                Random Numbers
            </Text>
            <Text>{this.state.random}</Text>
            <Button onPress={this.generateRandomNumber} title="Generate!" />
        </View>
    );
}

// ...
Now, every time you click the Generate! button a new random number will appear on the screen.
How Many Numbers?
What if you need more than one number, extracted from a pool of numbers?
To define the pool of numbers we will use a slider with values from 1 to 100. To define how many numbers do we need to be extracted from the pool, we will use a picker with values from 1 to 10. This way we can configure the app to do what we need at run-time.
Import the Slider component then add it to the app:
<Text style={styles.welcome}>
    Random Numbers
</Text>
<Slider style={{width: '100%'}} minimumValue={1} maximumValue={100} />
<Text>{this.state.random}</Text>
We need to show the current slider value to the user so we will add it to the state of our app:
this.state = {
    random: null,
    pool: 1
};
When the slider moves, we have to update the state:
<Slider style={{width: '100%'}} minimumValue={1} maximumValue={100} onValueChange={(value) => this.setState({pool: Math.round(value)})} />Add a new text component to show it to the user (and an informative label):
<Text style={styles.welcome}>
    Random Numbers
</Text>
<Text>Pool of numbers:</Text>
<Text>{this.state.pool}</Text>
Now to select how many numbers we need, let’s try a picker:
<Picker selectedValue={this.state.amount} style={{width: '100%'}} onValueChange={(itemValue, itemIndex) => this.setState({amount: itemValue})}>
    <Picker.Item label="1" value="1" />
    <Picker.Item label="2" value="2" />
    <Picker.Item label="3" value="3" />
    <Picker.Item label="4" value="4" />
    <Picker.Item label="5" value="5" />
    <Picker.Item label="6" value="6" />
    <Picker.Item label="7" value="7" />
    <Picker.Item label="8" value="8" />
    <Picker.Item label="9" value="9" />
    <Picker.Item label="10" value="10" />
</Picker>
For this we added amount to the state:
this.state = {
    random: null,
    pool: 1,
    amount: 1
};
Now let’s change the generateRandomNumbers method to take in account the new settings:
generateRandomNumber = () => {
    // build the pool of numbers
    var pool = [];
    for(let i = 1; i <= this.state.pool; i++) {
        pool.push(i);
    }

    // generate random numbers
    var randomString = '';
    for(let i = 1; i <= this.state.amount; i++) {
        let index = Math.floor(Math.random() * pool.length);
        let random = pool[index];
        pool.splice(index, 1);
        randomString = randomString + (randomString ? ", " : "") + random;
    }
    this.setState({random: randomString});
}
What if you try to generate 10 numbers out of 5? Or something like this? We will have to tell the user that’s not possible using an alert.
generateRandomNumber = () => {
    if(this.state.amount > this.state.pool) {
        Alert.alert("Error", "The pool must not be smaller than the amount of numbers you want to generate!");
        return;
    }

    // ...
That’s all we had to do for our app functionality. Try it!
... but, to be honest, it doesn't look so good :(
Making the App Look Good
Let’s start by adding a nice background to our app. First download the image from here and save it to your project folder. Then replace the root <View> with an <Image> component (also be sure to include the Image component at the beginning of the file):
<Image source={require('./background.png')} style={styles.container}>
…
</Image>
Update the container style to this:
container: {
    flex: 1,
    padding: 15,
    backgroundColor: '#fff',
    alignItems: 'center',
    justifyContent: 'space-between',
    width: null,
    height: null
}
Now, let’s take care of the button. We will remove the <Button> component because it’s not as customizable as we need and replace it with a <TouchableOpacity> (don’t forget to include this component too and remove the <Button> from the includes because we will not use it anymore). Also get the button background image from here.
<TouchableOpacity onPress={this.generateRandomNumber}>
    <Image style={styles.button} source={require('./button.png')}>
        <Text style={styles.buttonText}>Generate!</Text>
    </Image>
</TouchableOpacity>
Next we will use some styling for the rest of the components, here is all the render() code and styles:
render() {
    return (
        <Image source={require('./background.png')} style={styles.container}>
            <Text style={styles.textTitle}>Random Numbers</Text>
            <Text style={styles.text}>Pool of numbers:</Text>
            <Text style={styles.text}>{this.state.pool}</Text>
            <Slider
                style={styles.slider}
                minimumValue={1}
                maximumValue={100}
                onValueChange={(value) => this.setState({pool: Math.round(value)})}
                minimumTrackTintColor="#a0a0a0"
                maximumTrackTintColor="#a0a0a0"
                thumbTintColor="#ff0000"
                thumbImage={require('./thumb.png')}
            />
            <Text style={styles.resultText}>{this.state.random}</Text>
            <Picker
                selectedValue={this.state.amount}
                style={styles.picker}
                itemStyle={styles.pickerItem}
                onValueChange={(itemValue, itemIndex) => this.setState({amount: itemValue})}>
                <Picker.Item label="1" value="1" color="#FF6600" />
                <Picker.Item label="2" value="2" color="#FF6600" />
                <Picker.Item label="3" value="3" color="#FF6600" />
                <Picker.Item label="4" value="4" color="#FF6600" />
                <Picker.Item label="5" value="5" color="#FF6600" />
                <Picker.Item label="6" value="6" color="#FF6600" />
                <Picker.Item label="7" value="7" color="#FF6600" />
                <Picker.Item label="8" value="8" color="#FF6600" />
                <Picker.Item label="9" value="9" color="#FF6600" />
                <Picker.Item label="10" value="10" color="#FF6600" />
            </Picker>
            <TouchableOpacity onPress={this.generateRandomNumber}>
                <Image style={styles.button} source={require('./button.png')}>
                    <Text style={styles.buttonText}>Generate!</Text>
                </Image>
            </TouchableOpacity>
        </Image>
    );
}
const styles = StyleSheet.create({
container: {
flex: 1,
padding: 15,
backgroundColor: '#fff',
alignItems: 'center',
justifyContent: 'space-between',
width: null,
height: null
},
textTitle: {
color: '#ffffff',
backgroundColor: '#00000000',
fontSize: 28
},
text: {
color: '#ffffff',
backgroundColor: '#00000000'
},
resultText: {
color: '#ffffff',
backgroundColor: '#00000000',
fontSize: 18
},
slider: {
width: '100%'
},
picker: {
width: '100%',
backgroundColor: '#000000C0',
borderRadius: 10,
borderWidth: 2,
borderColor: '#000000'
},
pickerItem: {
color: '#ffffff'
},
button: {
flexDirection: 'row',
alignItems: 'center',
justifyContent: 'center',
width: 175,
height: 60
},
buttonText: {
color: '#ffffff',
fontWeight: 'bold',
backgroundColor: '#00000000'
}
});You will also need the slider thumb images from here and here.
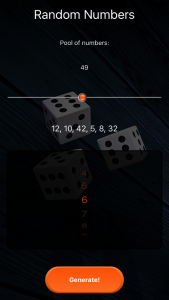
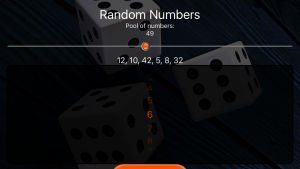
If you run the app now, you will find a much better interface:
The images used in this tutorial were downloaded from pixabay.com then edited using Photoshop:
- https://pixabay.com/en/cube-play-random-luck-points-1979775/
- https://pixabay.com/en/button-click-hit-web-element-2155595/
- https://pixabay.com/en/buttons-gloss-round-circle-colors-150235/
Getting Your App Ready to Be Published
So our app is done, how do we publish it to the AppStore and Google Play Store?
First, let's fix one small problem: if you rotate your emulator screen (Cmd+Left or Right Arrow) you will see that the app will go into landscape and it will not be usable anymore :(
Too lock the app to portrait we need to go "native".
For iOS, open xCode then open the project found in the randomNumbers/ios folder. Select the project in the left pane then, under Deployment Info, uncheck Landscape Left and Landscape Right Device Orientation so we are only left with the Portrait orientation.
For Android, you can just open the android/app/src/AndroidManifest.xml and add android:screenOrientation="portrait" under the activity section:
<activity
    android:name=".MainActivity"
    android:label="@string/app_name"
    android:configChanges="keyboard|keyboardHidden|orientation|screenSize"
    android:screenOrientation="portrait"
    android:windowSoftInputMode="adjustResize">
    <intent-filter>
        <action android:name="android.intent.action.MAIN" />
        <category android:name="android.intent.category.LAUNCHER" />
    </intent-filter>
</activity>
Now, to see those changes, you have to relaunch the app again. Not just reload, relaunch with the react-native run-ios or react-native run-android commands and try to rotate the emulator. Everything should be fine this time.
Now back to our main task, getting the app ready to be published.
iOS
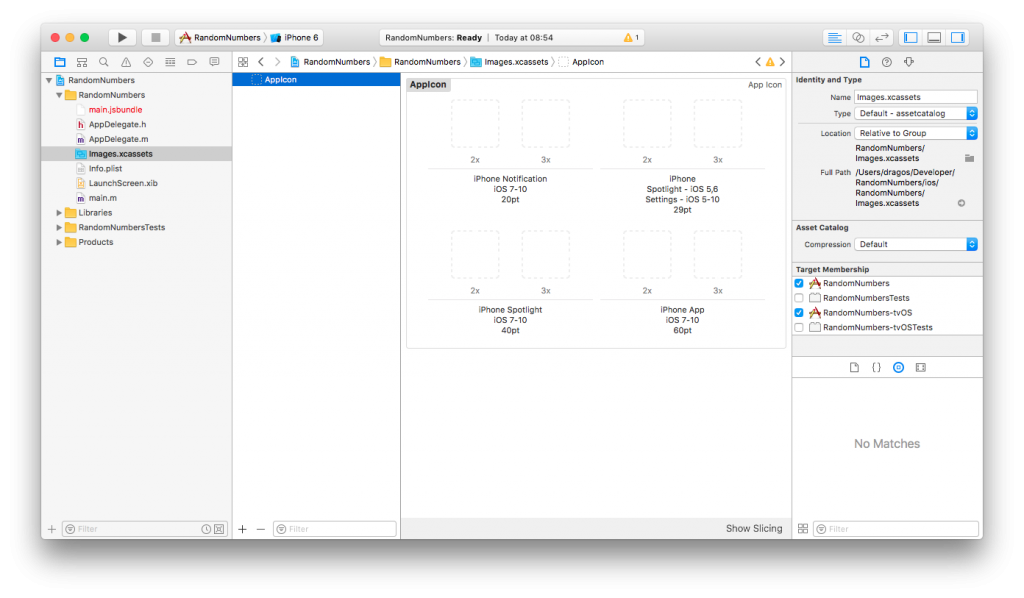
First let's add the app's icons. Open the xCode project and select Images.xcassets from the left panel. Then select the AppIcon item and drag each icon image to its corresponding placeholder. Download the icons from here.
When you're done, select Product -> Archive from the menu to build the iOS package (it only works with a Generic iOS Device selected or a real device, no emulators).
Android
To add app icons in Android, you have to put them in the android/app/src/main/res/mipmap* folders (overwrite the existing ic_launcher.png). You can get the icons from here.
Now you need to generate a signing key then a signed APK. I found the walkthrough from the React Native documentation to be pretty good so you just follow it: https://facebook.github.io/react-native/docs/signed-apk-android.html
Final Words
That's it! You now have your first React Native application ready to be sent into the wild. I hope you had fun doing this, please let us know in the comments how it worked for you. Oh, and you can find the final code here.
Have a nice mobile developer life! :)

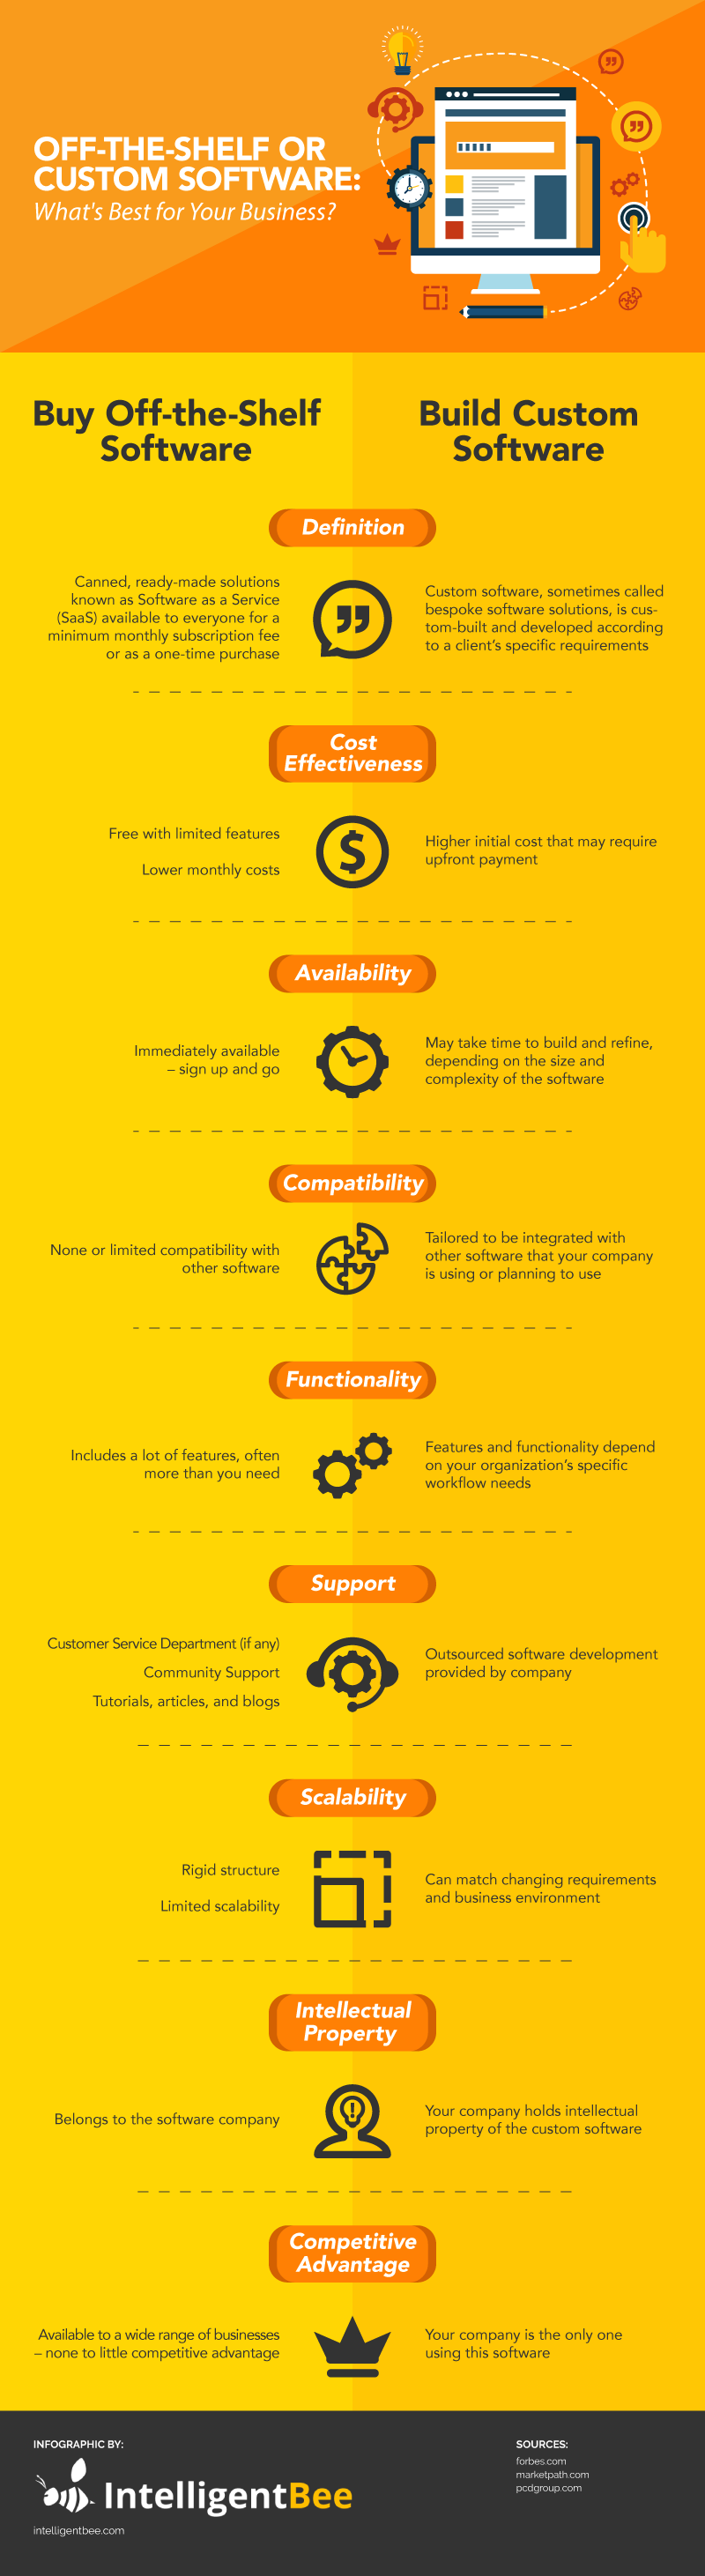
Off-the-Shelf or Custom Software: What's Best for Your Business? [Infographic]
In the ever-evolving digital landscape and competitive business environment, companies are in constant pursuit of perfecting processes to help them deliver the best value and experience to clients and potential customers. Accordingly, businesses have unique and specific workflows that can be automated and streamlined with software, from productivity, collaboration, reporting, messaging, and other tools. This is where the question of whether to buy off-the-self software or customize your own arise.
Balancing your company’s short-term needs and long-term plans is fundamental to the success of your business. Often, it can be tricky and daunting. How, then, do you choose between buying off-the-shelf software solutions and outsourcing software development builders?
Many business owners and managers often face this dilemma. To help you decide, we’ve outlined the pros and cons of buying off-the-shelf software and building custom software solutions.
Share this Image On Your Site
Some organizations are perfectly content with off-the-shelf software or canned software solutions to improve their workflow. There are software and tools in various categories from productivity, collaboration, messaging, office solutions, conferencing, marketing, sales, and many more. These are immediately available to individuals and businesses for a one-time fee or a monthly subscription fee. Some are even free, with limited features available.
On the other hand, some companies have very particular challenges that they need to address with custom-built software, so they either hire dedicated developers or outsource software developers to build one from the ground up. Costs for custom software development may vary from company to company.
Cost-Effectiveness
Off-the-shelf software is generally cheaper than custom-built software. Some offer it for free with limited features or you can get premium features by paying a one-time fee or a low monthly subscription fee.
For most startups and small businesses, the free software works, until such time that they need the full set of features. They can then choose to upgrade once they decide that the software fits their needs.
Custom software development may incur high upfront costs, especially if you choose to hire an in-house team of developers. Outsourcing software development is more cost-effective for bespoke software solutions.
Availability
Off-the-shelf software solutions are readily available. It’s as simple as signing up, placing your payment information, and you can immediately start using the service. On the other hand, custom software development may take months to develop, depending on your specific requirements.
Compatibility
Most off-the-shelf software can be integrated with other popular tools. However, there may be limitations. You may encounter a canned solution that perfectly addresses your challenges, but it’s not compatible with the current systems you have in place.
If you have a custom software, developers can ensure that it will work for your current infrastructure. Should there be a new software that your company needs to be incorporated into the workflow, you can ask your in-house or outsourced development team to work on it.
Functionality
Off-the-shelf software offers a wide variety of features and functionality to cater to the needs of a large market base. Sometimes, you’ll be surprised to find an additional feature helpful to your process. But often, there are more features than you need, which can make the product more complicated and hard to use.
This affects the performance of your team, making it difficult to get them onboard the new workflow and software. Your team members are the end-users of the software, and at the end of the day, it’s what’s easiest for them to use that matters.
On the other hand, a fully customized software guarantees to meet all your business needs, as it is tailored to match your specific requirements. Should there be an additional function that you would like to add in the future, you can ask your outsourced software developers to update your software.
Support
Customer support is usually provided for premium users of SaaS. However, customer support is limited to community support forums for free software users. If your growing business needs prompt attention to an issue, your options may be limited.
This is not the case for custom software. At IntelligentBee, we provide warranty for our code, and our software developers will work on bugs and issues on the spot, at no extra charge. Maintenance programs are also available to ensure a continuous focus on your custom software features and functionality.
Scalability
When choosing between off-the-shelf software solutions and fully customized software development, ask yourself this – can this software grow with your business? Scalability is an important consideration.
SaaS providers often roll out new features and updates without increasing their subscription fees, but these new features are not tailored to what your business specifically requires as your grow bigger. You can submit a feature request, but it may be ignored or rejected if it doesn’t fit the needs of a larger consumer base.
With a fully customized software, you can scale up the features whenever you need to or however you want to. You can start with your minimum business requirements, and slowly add features as your business grows.
Intellectual Property
Your company owns the intellectual property rights of the custom software built for your business. This can be considered an investment for your company. Factor in the added value that your custom software offers your business and your end-customers.
Competitive Advantage
With off-the-shelf software solutions, you’re basically using the same software that other businesses in the same niche use. It would be difficult for your organization to outperform your competitors if you employ the same workflow and tools.
Obviously, when you own custom software, this provides your company competitive advantage over your competitors. You use and own a tool that none of your other competitors have, giving your business a leg up in your industry.
Think of the value that your custom software can potentially offer your end-customers. By designing a software solution that meets all your unique business needs, your team will be more efficient, you can gain insight into the customer journey, and be able to improve your product and service, optimizing the customer experience.
Every business, small or large, has unique needs. Carefully considering the relevant factors when choosing between off-the-shelf and custom software is paramount to an organization’s efficiency, productivity, success, and eventual growth.
Ultimately, every organization’s goal is to improve performance and deliver the highest value to your customers. Custom software development for web and mobile applications can help you gain a competitive edge in today’s demanding market.
At IntelligentBee, we have a team of experienced software developers who can take your business to the next level with customized business solutions that can meet your every need.

How Custom Software Can Improve Your Business Performance
Each business has its own software needs for their processes and activities to run smooth. However, not all solutions are provided in software available in the market, also known as off-the-shelf software.
The crucial thing with off-the-shelf software is that it can only address your concerns up to a certain level. It doesn’t go to the nitty gritty of things where most problems emerge. Also, there are off-the-shelf software features that could go to waste as you may not need them. This means that you could end up paying for features that won’t be of use to your business.
It’s always better to have a software that can adjust to you instead of you changing your ways for the software. Hence, custom software.
Anything customized has a higher percentage of efficiency and effectivity, as it is designed to cater to your business’ problems and activities. Plus, using a software made for the mass market won’t get you far and different from your competitors. If you want a competitive advantage, custom software is the way to go.
Improve Your Business with Custom Software
Building your custom software can propel your business to success by bringing these benefits:
1. Automating Workflows for Improved Efficiency
Operational costs are reduced by simplifying complicated workflows. Instead of multiple people working in one line of work, one custom software alone can do all the tasks just by itself. It can cut the time spent on transferring from one person to another including the training and briefing of a specific task.
By having the extra time on tasks previously done manually, the workforce can focus on highly important tasks. This doesn’t only bring better productivity to your employees but also ensures quality in your business requirements.
Also, automated workflows let you identify the pain points in the process. You can better gauge if a certain task will be carried out on time. At the end of it all, you can save in cost and invest in productivity while making sure it’s done at the optimum.
2. Accelerating Reporting to Reduce Time Costs
Preparing reports is one of the most time-consuming tasks. Even when a person can master the processes over time, a custom software can still do it faster, as it can deliver your data in a snap.
Because a single software does the process from top to bottom, the information becomes centralized, making it easier for analysis. You don’t have to deal with different information coming from different tools and fit them all like puzzle pieces. In other words, you’ll have a database rich with information.
Furthermore, reports sometimes need data from its previous versions. Customized software can do the searching from your history and show results of relevant information.
3. Streamlining Communication
In any business, getting transferred from one person to another for a single piece of information doesn’t sound efficient. You must take into consideration the availability and reachability of the person you’re looking for.
Custom software can provide platforms for team members or departments to communicate fast and efficiently. By simply providing a communication channel where exchange of information can be done quickly, your business performance as well as your team’s output can improve by a mile.
4. Strengthening Security
Placing all your data in one system can pose a threat to security. Custom software addresses this by putting extra importance in keeping your data safe from hackers that would want to steal your information.
In fact, off-the-shelf software is more vulnerable to hacking as it is available to the mass market. It’s easier for hackers to study off-the-shelf software and find its loopholes. With custom software, hackers are challenged due to the software’s exclusivity and intricacies. Hence, external threats are minimized.
5. Providing Custom-Made Solutions
Because a custom software is designed for specific needs, it provides appropriate solutions to address problems the way you want it. And since you have full control of your technology, you can make tweaks each time you encounter new challenges or see rooms for improvement.
So, there’s no need to wait for updates and patches from off-the-shelf software. With your own custom software, you can come up with real-time solutions.
As they say, customizing is now the name of the game in every industry. A well-tailored software can undoubtedly give you an edge over your competitors.
Of course, you cannot stop from the first version of your custom software. Formulate a schedule of your updates to enhance its functionality. By outsourcing software development firms or professionals, you can be guided and assisted well from building your custom software to doing checks and improvements.

IB2.0 - Decision making: stand out as a company
What I realized is that most of our people see and distinguish as decisions only those that have a big impact . These are usually seen as the important decisions. You know, a decision that comes from a superior and is communicated in some sort of official medium like a meeting or an email.
After it is communicated and only then it’s usually perceived as a decision, making it look like it’s a rather short process. Also, I noticed that after the decision is made, there are lots of times when everyone is somehow relieved. Like something just finished, as in “oh that’s good, finally we decided about this, let’s celebrate”.
I think there’s more about a decision that this.
We see two important steps in a decision making process. First is documenting and debating and second is implementing.
Step 1 — Debating and making the decision
The action here is the process of gathering the information needed so that the decision maker can actually make a good decision. As documented as possible.
Step 2 — Implementing the decision
That is the most overlooked part but sadly it’s not less important than the decision itself. It’s actually the work put in by the team to make things happen. I liked the expression read once : it’s putting the meat on the bones.
What we’ve learned
After focusing the attention on the decision making process itself , we were surprised to find out that things were not actually going the ideal way in IntelligentBee.
The way I see it there are 2 speeds you want to have at the steps above. Slow and Fast.
Fast - Slow
If it’s Fast-Slow , it means that the debate and decision making is happening fast, and the implementation is slow. This results in quick decisions that are not always the correct ones due to lack of time for research. We’re already starting with half-chances of success here. And it’s getting even worse. After making the let’s-pray-this-is-a-good-one decision then here comes the implementation phase that starts late and happens slow. That kills the momentum, people forget why we’re doing the things we’re doing. They don’t usually perceive it as a whole, ruining the chance of success even more. In short, we don’t want to be there.
Fast - Fast
If it’s Fast-Fast it means that the debating and making the decision happens quickly and implementation fast. It may look we’re in a slightly different position, but actually we’re not. It’s because there was not enough time to make a good decision: gather all data, see alternatives, buy-in. As a result, the implementation will eventually be slow because the outcome desired was not thought over and the work needed to get there is often not estimated correctly.
Where you want to be: Slow - Fast
If you ever fired a rifle you know that the ready-steady-aim process should be a slow one if you want to hit the bullseye. You don’t actually want to have a cowboy shooting when you’re making decisions in your company.
The debating and making the decision should be a through step. All the options are carefully studied and debated. All people affected by the outcome are involved and committed.
The implementation step should be a lightning fast one. There was a time to research, a time to debate, a time for talks and analyzing. Now there is time to act. After lots of conflict, there is perfect alignment. Everyone is committed to execute as fast and as good as possible the decision that is now made. There is no room for changing minds and certainly no place to bring out the arguments used above, in the debating phase.
All team act as one and everyone is aware that what’s making a company stand out is not the speed at which they make decisions, but the speed and quality they execute against every decision made.

5 Considerations When Hiring a Custom Software Development Company
Once you have decided that your business needs custom software to meet specific goals, the next plan of action is to hire dedicated developers who can build your stepping stone to growth.
A custom software is like a suit tailored for your business. It is built with special features for exceptional demands, which off-the-shelf software cannot provide you. Not only does it's customized, it also allows your team to perform at their best.
A caveat though: one can easily make wrong decisions when hiring or outsourcing software development professionals. You may find a pool of talents out there, but not everyone has the required skill set, experience, expertise, and promptness that you need to build your custom software.
Avoid burning money on bad hires. Take time to consider the following key points when hiring a custom software developer or firm.
Things to Consider When Hiring a Custom Software Developer
Project Timeline: Can They Deliver on Time?
At the end of the day, what you want is someone that can deliver your custom software with the best quality within a reasonable deadline. According to a study by PM Solutions, 37% of IT projects are at risk of failure each year. One reason is the inability to meet the delivery schedule.
The percentage of success should be one of the first things to look for in a custom software company or developer. Be sure to check the history and portfolio of your candidates for telltale signs of reliability and work ethic.
Make the most of your investment by ensuring that no additional costs are incurred due to failure to deliver on time. Settle only for the option that can keep risks at a minimum.
Your Business Needs: What Do You Want to Achieve?
Of course, arriving at the appropriate software solutions can only begin by determining your business problems. Identify the specific demands that you require, which a custom software can only solve.
Do you need a specific feature that will simplify your complicated workflows? Or do you want a platform that will centralize your team communication? Knowing what needs to be done can guide you on what to look for when hunting for the perfect hire.
Budget: How Much Are You Willing to Pay?
All projects entail costs, and it’s a significant factor that can influence your hiring decision. Determine your budget through a cost estimation, which includes hardware and software costs, travel and training costs, as well as effort costs, among others.
Developing a custom software can be more cost-efficient than buying off-the-shelf software. In fact, a study by Forrester reported that IT shops spend about 27% of their software budget on custom software development compared to 35% spent on packaged application software. This means 8% lower budget.
However, be wary of unreasonably low budgets, as it could lead you to bad hires and compromise the quality of custom software that you want to develop.
Technological Expertise: How Technologically Proficient Are They?
When hiring a custom software developer or firm, consider the kind of technology and methodology required to build the tool you need. Some developers are proficient in Java technology while others are experts in .Net applications. It's important to pick one that can execute the right methodology to minimize costs while maximizing gains.
Remember, custom software development is not limited to one programming or scripting language. There is a plethora of variations out there, with different tools and frameworks to be used for specific circumstances. So, look at technological expertise, versatility, and capability to mix various tools to get the job done – whether it’s cutting edge software or legacy applications.
Technical Support: Can They Provide Tech Support After the Development Stage?
Your custom software will have issues and bugs over time, and that’s inevitable. A good custom software developer is someone who can provide technical support even after the development stage. Find those who communicate in a friendly, professional manner and can assist you with any issues. This will give you more time to focus on the core processes of your business.
On the other hand, an unfriendly and unsupportive custom developer firm could potentially sabotage your business, and lead to project failure.
Last Thoughts
Consider these key points to make a more accurate choice when choosing a custom software developer or firm that will execute the project you need. Hiring software development teams like IntelligentBee due to its friendly team of developers, proven fast delivery, and a wide range of software and technological expertise is an advantage to your business.
Give yourself time and do your research in advance to find the perfect custom software developer or firm that will achieve your desired result.

8 Tips On How To Handle Angry Customers Without Losing Your Cool
Hi there, reader! :) This article presents some tips on how you can handle those customers who are a little more difficult to handle, based on my own experience.
Whether you're planning to chat or write emails, below are my top suggestions on how to create the best interaction with your customers, even if they are not so nice.
1. Don't take it personally
One of the most difficult tasks in maintaining your calm when dealing with angry customers is to not take their frustration personally. You shouldn't do that as they know that you did not cause the problem. Listening to what they have to say without interrupting and then finding a way to help them out will cool down the situation.
Also, as a professional customer service specialist, you shouldn't argue back. If they become abusive, let them know that you understand their situation and you are there to help.
2. Empathize
This would be the most important rule which I often associate with the law of attraction - if you act with patience and empathize, you'll receive gratitude even though the problem is not solved.
Some customers keep coming back. Asking questions as "How are you today?" or "How is it going?" will help in creating that special bond between you and your customer which will lead you to know them as people and not just simple buyers.
3. Be patient
Patience is a virtue especially when dealing with angry customers. Some of them may get angrier as the live chat continues, but if you stay in control and redirect the conversation to a happy resolution, things may move in the right direction. Each customer is different and being patient with each of them will improve the quality of conversation.
4. Inform the customer when he needs to wait while you're investigating
Often times and usually when I chat with customers, the investigation requires time and they have to wait. Phrases such as "I appreciate your patience while I'm investigating your case." or " Just a moment please while I am looking for more details" will make it clear to the customer when he needs to wait and also avoid the repeated "Are you there?". Asking questions regarding their problem will also help you take back control and extract the information you need to get to the bottom of their situation.
Also, if I'm caught in multiple investigations, I usually tell them that I'm helping other customers as well and my reply can be delayed. However, always assure them that they will receive feedback from your side.
5. Knowing when and how to apologize
I know that it is difficult being truly sincere when you are trying to keep your cool, but an apology at the right moment can calm down the customer. Depending on situation, there are a few different ways you can apologize to your customers such as:
"I'm sorry you are so frustrated. I understand your situation and I will do my best to help you"
"I am really sorry that I misunderstood your problem."
"I apologize for the inconvenience this may cause you and your team."
6. Solve the problem
If you applied the rules from above, your customer should be finally relaxed. This means that you can work with him in order to find a resolution that satisfies both sides.
7. End the conversation with a happy note
It is very important to end a chat session on a high note. Instead of giving an "abrupt goodbye", you can ask your customer if there's anything else you can do for them and reminding that you are right there for them if they require any assistance. Also, wishing them a wonderful day and a sunny weather should give the "goodbye" a "talk to you soon" meaning, which is great.
8. Relax, take it easy
Let the anger go away with your customer. Always remember that a focused mind requires a relaxed state, so don't forget to take a break when you cannot concentrate. Take a walk to the kitchen, drink a cup of tea while enjoying the view, play a game with your colleague or listen to Mika’s song (Relax, take it easy) as it will help you to relieve the stress. Also, it is scientifically proven that taking a deep breath multiple times will help you concentrate even more.
I believe that these tips aren't only for customer support. You can practice them every day of your life, as communication is the key to good relations between the people. Knowing how to communicate will allow building connections and a great success.
...and at the end, no matter what, don't forget to smile! :)