GlusterFS - Replicate a volume over two nodes
When you are using a load balancer with two or more backend nodes(web servers) you will probably need some data to be mirrored between the two nodes. A high availability solution is offered by GlusterFS.
Within this article, I am going to show how you can set volume replication between two CentOS 7 servers.
Let's assume this:
- node1.domain.com - 172.31.0.201
- node2.domain.com - 172.31.0.202
First, we edit /etc/hosts of each of the servers and append this:
172.31.0.201     node1.domain.com     node1
172.31.0.202     node2.domain.com     node2
We should now be able to ping between the nodes.
PING node2.domain.com (172.31.0.202) 56(84) bytes of data.
64 bytes from node2.domain.com (172.31.0.202): icmp_seq=1 ttl=64 time=0.482 ms
64 bytes from node2.domain.com (172.31.0.202): icmp_seq=2 ttl=64 time=0.261 ms
64 bytes from node2.domain.com (172.31.0.202): icmp_seq=3 ttl=64 time=0.395 ms

--- node2.domain.com ping statistics ---
3 packets transmitted, 3 received, 0% packet loss, time 2001ms
rtt min/avg/max/mdev = 0.261/0.379/0.482/0.092 ms
Installation:
Run these on both nodes:
yum -y install epel-release yum-priorities
Add priority=10 to the [epel]section in /etc/yum.repos.d/epel.repo
[epel]
name=Extra Packages for Enterprise Linux 7 - $basearch
#baseurl=http://download.fedoraproject.org/pub/epel/7/$basearch
mirrorlist=https://mirrors.fedoraproject.org/metalink?repo=epel-7&arch=$basearch
failovermethod=priority
enabled=1
priority=10
gpgcheck=1
gpgkey=file:///etc/pki/rpm-gpg/RPM-GPG-KEY-EPEL-7
Update packages and install:
yum -y update
yum -y install centos-release-gluster
yum -y install glusterfs-server
Start glusterd service, also enable it to start at boot:
service glusterd start
systemctl enable glusterd
You can use service glusterd status and glusterfsd --version to check all is working properly.
Remember, all the installation steps should be executed on both servers!
Setup:
On node1 server run:
[root@node1 ~]# gluster peer probe node2
peer probe: success.
[root@node1 ~]# gluster peer status
Number of Peers: 1

Hostname: node2
Uuid: 42ee3ddb-e3e3-4f3d-a3b6-5c809e589b76
State: Peer in Cluster (Connected)
On node2 server run:
[root@node2 ~]# gluster peer probe node1
peer probe: success.
[root@node2 ~]# gluster peer status
Number of Peers: 1

Hostname: node1.domain.com
Uuid: 68209420-3f9f-4c1a-8ce6-811070616dd4
State: Peer in Cluster (Connected)
Other names:
node1
[root@node2 ~]# gluster peer status
Number of Peers: 1

Hostname: node1.domain.com
Uuid: 68209420-3f9f-4c1a-8ce6-811070616dd4
State: Peer in Cluster (Connected)
Other names:
node1
We need to create now the shared volume, and this can be done from any of the two servers.
[root@node1 ~]# gluster volume create shareddata replica 2 transport tcp node1:/shared-folder node2:/shared-folder force
volume create: shareddata: success: please start the volume to access data
[root@node1 ~]# gluster volume start shareddata
volume start: shareddata: success
[root@node1 ~]# gluster volume info

Volume Name: shareddata
Type: Replicate
Volume ID: 30a97b23-3f8d-44d6-88db-09c61f00cd90
Status: Started
Snapshot Count: 0
Number of Bricks: 1 x 2 = 2
Transport-type: tcp
Bricks:
Brick1: node1:/shared-folder
Brick2: node2:/shared-folder
Options Reconfigured:
transport.address-family: inet
nfs.disable: on
This creates a shared volume named shareddata, with two replicas on node1 and node2 servers, under /shared-folder path. It will also silently create the shared-folder directory if it doesn't exist.If there are more servers in the cluster, do adjust the replica number in the above command. The "force" parameter was needed, because we replicated in the root partition. It is not needed when creating under another partition.
Mount:
In order for the replication to work, mounting the volume is needed. Create a mount point:
mkdir /mnt/glusterfs
On node1 run:
[root@node1 ~]# echo "node1:/shareddata    /mnt/glusterfs/  glusterfs       defaults,_netdev        0 0" >> /etc/fstab
[root@node1 ~]# mount -a
[root@node1 ~]# df -h
Filesystem                       Size  Used Avail Use% Mounted on
/dev/mapper/VolGroup00-LogVol00   38G  1.1G   37G   3% /
devtmpfs                         236M     0  236M   0% /dev
tmpfs                            245M     0  245M   0% /dev/shm
tmpfs                            245M  4.4M  240M   2% /run
tmpfs                            245M     0  245M   0% /sys/fs/cgroup
/dev/sda2                       1014M   88M  927M   9% /boot
tmpfs                             49M     0   49M   0% /run/user/1000
node1:/shareddata                 38G  1.1G   37G   3% /mnt/glusterfs
On node2 run:
[root@node2 ~]# echo "node2:/shareddata    /mnt/glusterfs/  glusterfs       defaults,_netdev        0 0" >> /etc/fstab
[root@node2 ~]# mount -a
[root@node2 ~]# df -h
Filesystem                       Size  Used Avail Use% Mounted on
/dev/mapper/VolGroup00-LogVol00   38G  1.1G   37G   3% /
devtmpfs                         236M     0  236M   0% /dev
tmpfs                            245M     0  245M   0% /dev/shm
tmpfs                            245M  4.4M  240M   2% /run
tmpfs                            245M     0  245M   0% /sys/fs/cgroup
/dev/sda2                       1014M   88M  927M   9% /boot
tmpfs                             49M     0   49M   0% /run/user/1000
node2:/shareddata                 38G  1.1G   37G   3% /mnt/glusterfs
Testing:
On node1:
touch /mnt/glusterfs/file01
touch /mnt/glusterfs/file02
on node2:
[root@node2 ~]# ls /mnt/glusterfs/ -l
total 0
-rw-r--r--. 1 root root 0 Sep 24 19:35 file01
-rw-r--r--. 1 root root 0 Sep 24 19:35 file02
This is how you mirror one folder between two servers. Just keep in mind, you will need to use the mount point /mnt/glusterfs in your projects, for the replication to work.
How To Install A .pxf Windows SSL Certificate On Your Linux Web Server
Windows uses .pfx for a PKCS #12 file. PFX stands for Personal eXhange Format. This is like a bag containing multiple cryptographic information. It can store private keys, certificate chains, certificates and root authority certificates. It is password protected to preserve the integrity of the contained data.
In order to install it on our apache/nginx web server we need to convert it PEM.
Upload first the .pfx to your linux server. You will need OpenSSL installed.
On Centos run:
yum install openssl
On Ubuntu run:
sudo apt-get update
sudo apt-get install openssl
To decript the .pfx use:
openssl pkcs12 -in cert.pfx -out cert.pem
You will be prompted for the password that was used to encrypt the certificate. After providing it, you will need to enter a new password that will encrypt the private key.
The .pem file resulted will contain the encrypted public key, the certificate and some other information we will not use.Copy the key from inside and paste it to a new .key file.
Also copy the certificate from the .pem and put it in a new .cert file.
Remember to copy the whole blocks, including the dashed lines.
The private key file is still encrypted, so we have to decrypt it with:
openssl rsa -in cert.key -out cert.key
You will now be prompted for the password you set to encrypt the key. This will decrypt the private key file to itself.
To install the certificate to Nginx, you will need to import your .key and .cert in Nginx configuration file like this:
ssl_certificate /path/to/your/cert.pem;
ssl_certificate_key /path/to/your/cert.key;
For Apache use:
SSLCertificateFile /path/to/your/cert.pem;
SSLCertificateKeyFile /path/to/your/cert.key;

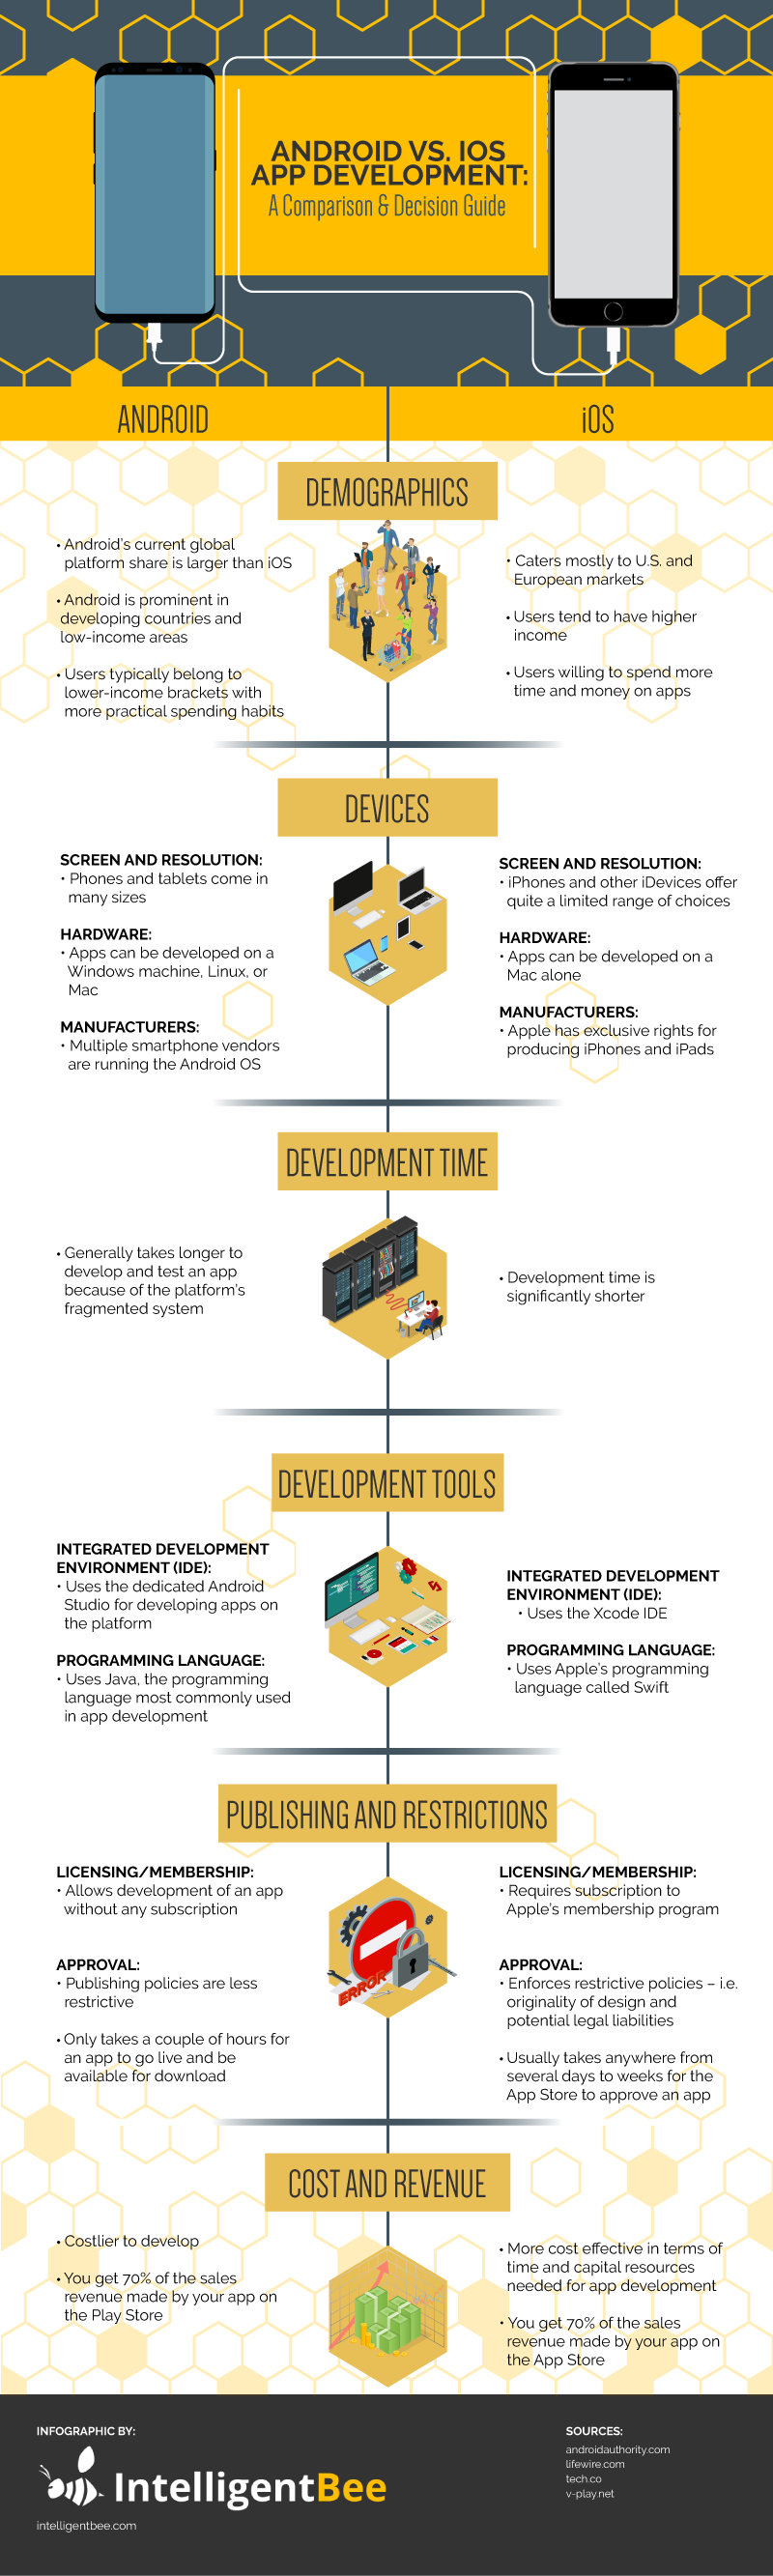
Android vs. iOS App Development: A Comparison & Decision Guide [Infographic]
There’s a revolution in mobile app development happening right now with the number of apps available for download in major app stores being at an all-time high. App developers are burying themselves in work, creating the latest software applications for mobile devices and hoping that their creations make enough money for them at Apple’s App Store and the Google Play Store. Apparently, the numbers are more than encouraging.
As of March 2017, the App Store had slightly more apps available at 2.2 billion compared with Play Store’s 2.8 million apps. Also in Q1 2017, combined iOS and Android app downloads were up 15% year-over-year, reaching a total of about 25 billion new downloads globally.
With re-installs, these numbers could go much higher. In terms of in-app purchases, revenue likewise increased 45% year-over-year for a staggering $15 billion across the iOS and Android systems running worldwide.
It’s definitely a good time for mobile app companies to continue hiring app developers to work on a wide array of mobile app products—from mobile music apps to instant messaging and mobile game apps. These apps are forecast to generate close to $200 billion in in-app and in-advertising revenues in less than three years’ time. But the question is, should you develop Android or iOS apps?
The following infographic gives you a comprehensive comparison between Android and iOS app development services in terms of demographics, the range of devices, time frame of development, hardware, publishing and restrictions, cost, and revenue. These are the factors you will need to consider as you decide whether to develop on the Android or iOS platform.
Share this Image On Your Site
The Android and iOS platforms both provide a venue for your mobile app development, but they have very distinct functionalities on their own. Sometimes, you get a clear-cut distinction between the two. However, there are also areas where they go neck and neck so you’ll have to rely on your judgment and preference when choosing the appropriate platform to develop your ware.
Demographics
Market share-wise, Android has a greater reach than its competitor, although iOS users’ income levels and spending capabilities may balance things out in the overall picture.
Devices
Screen and Resolution
The operating systems of Android and iOS differ from one another to a great extent. In designing your app, you need to factor in how your app will run given a particular device’s screen and resolution, the hardware compatible with the platform, and the individual features and capabilities of various phone models.
It might be a little more challenging to develop apps on the Android platform since you’ll be designing for different screen sizes and resolution. Meanwhile, iOS has a more uniform size range so that may free you up from having too many considerations to worry about.
Manufacturers
With Android, you’re developing not only for one Android-based device but thousands of other devices produced by different vendors. Since Android has an open nature system, you can leverage it to run your apps not just on mobile phones but also on smart TVs, wearables, or media streaming devices.
Since different Android devices have different capabilities that are unique from one another, your apps should be designed to allow compatibility with all Android devices. You have to consider the whole Android family—from low-range to mid- and high-range iterations when developing and designing your apps. Otherwise, you might be leaving out a large portion of the Android market from running your apps.
On the other hand, developing your apps for iOS means you’ll have fewer configurations to make, as you only have a limited lineup of gadgets at your disposal. This also means you’ll have fewer fragmentation issues developing your apps within the iOS system.
Development Time
As a developer, you’re naturally concerned about how much time it will take you to develop your app and put it on the App Store or the Play Store. Spending more time on app development may cause a dent on your resources and your chance to generate revenue for the company.
Testing your app across Android’s wide range of devices will naturally require more time as you look for and fix issues on one device after another. If the app works well on one Android device but not on another, you have to make the necessary modifications to the app.
Development Tools
Integrated Development Environment (IDE):
Android Studio replaced Eclipse, the previous iteration of Android’s IDE. Although Android Studio has been padded with improvements, iOS’s Xcode is deemed more mature. Specifically, in terms of debugging capability, the mobile simulator, which you use to build a prototype of your app for mobile, of iOS is deemed better than that of the Android simulator. However, Android Studio makes up for this by having a better autocomplete functionality for your coding work.
Programming Language
Java and Swift have a fairly similar structure. What differentiates them is that the former may be a bit complex if you’re just beginning to code, while the latter is based on Objective-C and touted to be generally error-free.
Publishing and Restrictions
From membership application all the way to submitting and publishing an app, it would seem like you’ll have to do a look-for-a-needle-in-the-haystack sort of thing with iOS apps, with no certainty whether your app will get approved on the App Store. In contrast, you can readily publish your app on the Play Store just by signing up and uploading your APK.
The strict quality standards of iOS may benefit users on the one hand but may scare freelance developers off on the other. That said, you’re more likely to have a better experience with Android’s mobile development policies, especially if you’re a startup developer and you’re not willing to spend on annual fees.
Cost and Revenue
Both the Play Store and the App Store put developers on equal footing when it comes to revenue generation, but the interplay of cost and revenue seems to favor iOS more. This may be attributed to iOS users’ willingness to spend on app purchases. Thus, iOS would seem to be the better choice over Android cost- and revenue-wise since it’s faster and less complicated to develop on the iOS platform.
Apple devices are known to be of premium quality and work well with a wide range of peripherals. These factors make the iOS platform effective for mobile app development as you need a shorter time to design, test, and release your app.
And the Winner Is?
After pitting Android and iOS against each other, both fared fairly the same.
Android may be your go-to platform in terms of compatibility with any hardware, more lenient rules for membership and approval of apps, and affordability of publishing fees. On the other hand, iOS shows better mileage in terms of uniformity in the screen size and resolution of devices for which the apps are intended, a more streamlined interface, shorter time frame of development, and cost and revenue model.
It’s a draw between Android and iOS when you consider market demographics, IDE features, and the nature of programming language used.
With all things considered, no one can claim to be better than the other. What one lacks, the other compensates for in another area of app development. It’s really your own choice to make, depending on your business goals and availability of resources.

How to Setup Docker for Your Symfony Project
As you probably know, I am a big Symfony fan :) In the last few years I used Vagrant to set up my Symfony development environment more or less as described here. But we now have Docker and it’s time to move forward with a new setup. Docker containers are generally more lightweight than Vagrant virtual machines, so starting and stopping them is extremely fast. They also take a lot less disk space.
To setup a Docker container you need a Dockerfile file and to combine several containers we use the docker-compose.yml file. For our environment we will need two containers, one with the latest Ubuntu LTS to host the web server and our project files and one for MySQL.
The first container is defined in the Dockerfile file as below:
FROM ubuntu:16.04
ADD . /app
RUN apt-get update
RUN apt-get install -y php apache2 libapache2-mod-php7.0 php-mysql php-intl git git-core curl php-curl php-xml composer zip unzip php-zip
# Configure Apache
RUN rm -rf /var/www/* \
    && a2enmod rewrite \
    && echo "ServerName localhost" >> /etc/apache2/apache2.conf
ADD vhost.conf /etc/apache2/sites-available/000-default.conf
# Install Symfony
RUN mkdir -p /usr/local/bin
RUN curl -LsS https://symfony.com/installer -o /usr/local/bin/symfony
RUN chmod a+x /usr/local/bin/symfony
# Add main start script for when image launches
ADD run.sh /run.sh
RUN chmod 0755 /run.sh
WORKDIR /app
EXPOSE 80
CMD ["/run.sh"]
Add this file in a new folder. We also need the vhost.conf and run.sh files used in the code from above.
The vhost.conf file is used to configure the apache virtual host:
<VirtualHost *:80>
    ServerName localhost
    DocumentRoot /app/my_project/web
    <Directory /app/my_project/web>
        Options -Indexes
        AllowOverride All
        Require all granted
    </Directory>
</VirtualHost>
The run.sh file runs when the container starts and just makes sure that the cache and logs folders are set up before launching the apache web server:
#!/bin/bash
mkdir -p my_project/app/cache my_project/app/logs
touch my_project/app/logs/prod.log
touch my_project/app/logs/dev.log
chgrp -R www-data .
chmod -R g+w my_project/app/cache my_project/app/logs
source /etc/apache2/envvars
tail -F /var/log/apache2/* my_project/app/logs/prod.log my_project/app/logs/dev.log &
exec apache2 -D FOREGROUND
That’s all for our main Ubuntu container, we now need to create the docker-compose.yml file:
version: "2"
services:
    mysql:
        image: mysql:5.7
        container_name: mysqldb
        ports:
            - "4000:3306"
        expose:
            - "3306"
        environment:
            MYSQL_ROOT_PASSWORD: yourrootpassword
    site:
        build: .
        container_name: myproject
        ports:
            - "8080:80"
        expose:
            - "80"
        depends_on:
            - mysql
        volumes:
          - .:/app
This will tell Docker to first start an MySQL 5.7 container, then our Ubuntu container that will be able to access the MySQL container using the mysql host name.
Start everything with the docker-compose up command.
When it’s done, open a new terminal (let the latest docker compose command run, do not stop it) and use the docker ps command to see the running containers:
![]()
Now, you can take the id of the Ubuntu container and ssh into it:
docker exec -t -i [ID] bash
Here you will start a new Symfony project as always (you will have to delete the my_project folder created by Docker first):
rm -rf my_project
symfony new my_project 2.8
If you name you project something else (yes, you will probably do that) just replace the all my_folder occurrences in the files and commands above with the actual name of your project.
After you created the new Symfony project, it is better to rebuild the Docker containers so the setup of the cache and logs folders will be as intended. In the terminal window where you launched Docker, press Ctrl+C to stop it then run docker-compose up again.
That’s it! You can now access your new Symfony project using the following URL: http://localhost:8080/. To connect to MySQL you will use the mysql host name:
parameters:
    database_host: mysql
    database_port: null
    database_name: symfony
    database_user: root
    database_password: yourrootpassword
Thank you! Please let me know in the comments if you have any suggestions to improve this setup or problems running it.

How to Get Nearby Locations from MySQL Database
If you have a MySQL table with locations (latitude and longitude columns) you can get a list of locations near a specific point using the following query:
SELECT *, ((ACOS(SIN(<latitude> * PI() / 180) * SIN(latitude * PI() / 180) + COS(<latitude> * PI() / 180) * COS(latitude * PI() / 180) * COS((<longitude> - longitude) * PI() / 180)) * 180 / PI()) * 60 * 1.1515 * 1.609344) as distance FROM locations HAVING distance <= <distance> ORDER BY distance ASC
In this query we have noted the latitude of the reference point with <latitude>, its longitude with <longitude> and the maximum distance to search for with <distance> (in kilometers).
To make this calculate the distance in miles, just remove the * 1.609344 from the end of the calculation:
SELECT *, ((ACOS(SIN(<latitude> * PI() / 180) * SIN(latitude * PI() / 180) + COS(<latitude> * PI() / 180) * COS(latitude * PI() / 180) * COS((<longitude> - longitude) * PI() / 180)) * 180 / PI()) * 60 * 1.1515) as distance FROM locations HAVING distance <= <distance> ORDER BY distance ASC
You can test the results using Google Maps. To measure distances in Google Maps you need to right-click and choose “Measure distance” from the popup menu.
How to Get Nearby Locations in Symfony with Doctrine
If you’re like me and use Symfony a lot, here’s how you can add a repository method for your entity to return objects ordered by distance from a specific location:
<?php
namespace AppBundle\Entity;
class LocationRepository extends \Doctrine\ORM\EntityRepository
{
    public function findClosest($lat, $lng) {
        $qb = $this->createQueryBuilder('l');
        $qb->addSelect('((ACOS(SIN(:lat * PI() / 180) * SIN(l.latitude * PI() / 180) + COS(:lat * PI() / 180) * COS(l.latitude * PI() / 180) * COS((:lng - l.longitude) * PI() / 180)) * 180 / PI()) * 60 * 1.1515) as HIDDEN distance');
        $qb->orderBy('distance');
        $qb->setParameter('lat', $lat);
        $qb->setParameter('lng', $lng);

        return $qb->getQuery()->getResult();
    }
}
To make this work we need to add the ACOS, SIN, COS and PI functions to Doctrine’s DQL as it does not have them by default.
First create 4 new classes in a new AppBundle/DQL folder, one for each function we need to define.
AppBundle/DQL/Acos.php
<?php
namespace ApiBundle\DQL;
use Doctrine\ORM\Query\AST\Functions\FunctionNode,
    Doctrine\ORM\Query\Lexer;
class Acos extends FunctionNode
{
    public $arithmeticExpression;
    public function getSql(\Doctrine\ORM\Query\SqlWalker $sqlWalker)
    {
        return 'ACOS(' . $sqlWalker->walkSimpleArithmeticExpression(
                $this->arithmeticExpression
        ) . ')';
    }
    public function parse(\Doctrine\ORM\Query\Parser $parser)
    {
        $parser->match(Lexer::T_IDENTIFIER);
        $parser->match(Lexer::T_OPEN_PARENTHESIS);
        $this->arithmeticExpression = $parser->SimpleArithmeticExpression();
        $parser->match(Lexer::T_CLOSE_PARENTHESIS);
    }
}
AppBundle/DQL/Sin.php
<?php
namespace ApiBundle\DQL;
use Doctrine\ORM\Query\AST\Functions\FunctionNode,
    Doctrine\ORM\Query\Lexer;
class Sin extends FunctionNode
{
    public $arithmeticExpression;
    public function getSql(\Doctrine\ORM\Query\SqlWalker $sqlWalker)
    {
        return 'SIN(' . $sqlWalker->walkSimpleArithmeticExpression(
                $this->arithmeticExpression
        ) . ')';
    }
    public function parse(\Doctrine\ORM\Query\Parser $parser)
    {
        $parser->match(Lexer::T_IDENTIFIER);
        $parser->match(Lexer::T_OPEN_PARENTHESIS);
        $this->arithmeticExpression = $parser->SimpleArithmeticExpression();
        $parser->match(Lexer::T_CLOSE_PARENTHESIS);
    }
}
AppBundle/DQL/Cos.php
<?php
namespace ApiBundle\DQL;
use Doctrine\ORM\Query\AST\Functions\FunctionNode,
    Doctrine\ORM\Query\Lexer;
class Cos extends FunctionNode
{
    public $arithmeticExpression;
    public function getSql(\Doctrine\ORM\Query\SqlWalker $sqlWalker)
    {
        return 'COS(' . $sqlWalker->walkSimpleArithmeticExpression(
                $this->arithmeticExpression
        ) . ')';
    }
    public function parse(\Doctrine\ORM\Query\Parser $parser)
    {
        $parser->match(Lexer::T_IDENTIFIER);
        $parser->match(Lexer::T_OPEN_PARENTHESIS);
        $this->arithmeticExpression = $parser->SimpleArithmeticExpression();
        $parser->match(Lexer::T_CLOSE_PARENTHESIS);
    }
}
AppBundle/DQL/Pi.php
<?php
namespace ApiBundle\DQL;
use Doctrine\ORM\Query\AST\Functions\FunctionNode,
    Doctrine\ORM\Query\Lexer;
class Pi extends FunctionNode
{
    public $arithmeticExpression;
    public function getSql(\Doctrine\ORM\Query\SqlWalker $sqlWalker)
    {
        return 'PI()';
    }
    public function parse(\Doctrine\ORM\Query\Parser $parser)
    {
        $parser->match(Lexer::T_IDENTIFIER);
        $parser->match(Lexer::T_OPEN_PARENTHESIS);
        $parser->match(Lexer::T_CLOSE_PARENTHESIS);
    }
}
The next and the last step is to add the above definitions to your app’s config.yml file:
doctrine:
    dbal:
        # ...
    orm:
        auto_generate_proxy_classes: '%kernel.debug%'
        naming_strategy: doctrine.orm.naming_strategy.underscore
        auto_mapping: true
        dql:
            numeric_functions:
                acos: ApiBundle\DQL\Acos
                sin: ApiBundle\DQL\Sin
                cos: ApiBundle\DQL\Cos
                pi: ApiBundle\DQL\Pi
That’s it. Now it will all work as expected. If you need to add more specific functions to DQL, just look at the above classes and make your own.
Using Negroni middleware in Golang for specific routes with httprouter
In the last days I’ve played a little bit with negroni middleware and httprouter router. I found that the documentation about how can we use negroni middlewares for specific routes with httprouter is pretty poor. So I decided to write this article to share with you what I’ve found.
Negroni is an idiomatic approach to web middleware in Golang which will help you build and stack middleware very easily. It comes with some default middlewares like:
- negroni.Recovery - Panic Recovery Middleware.
- negroni.Logger - Request/Response Logger Middleware.
- negroni.Static - Static File serving under the "public" directory.
But it also letting you create your own middlewares very easily:
func MyMiddleware(rw http.ResponseWriter, r *http.Request, next http.HandlerFunc) {
    // do some stuff before
    next(rw, r)
    // do some stuff after
}

…
n := negroni.New()
n.Use(negroni.HandlerFunc(MyMiddleware))
Negroni is BYOR (Bring your own Router) so we can use it with httprouter.
Httprouter is a Golang lightweight and high performance HTTP request router which is fast and has low memory consumption. TLDR: it is one of the fastest routers.
Here you have an example on how a simple route can be added when using httprouter:
router := httprouter.New()
router.POST("/login", loginHandler)
Where loginHandler will look like:
func loginHandler(w http.ResponseWriter, r *http.Request, params httprouter.Params) {
    // login controller logic
}
Now lets suppose you want to access GET profile endpoint but you need to be authenticated.
We will start by creating an authentication middleware:
// auth middleware
func auth(rw http.ResponseWriter, r *http.Request, next http.HandlerFunc) {
    // do some stuff before
    log.Println("auth middleware -> before executing controller")

    // call endpoint handler
    next(rw, r)

    // do some stuff after
    log.Println("auth middleware -> after the controller was executed")
}
Then we will create a handler which will return profile information after the authentication will be done. This handler will be sent to the auth middleware as a callback using "next" parameter:
func profileHandler(w http.ResponseWriter, r *http.Request) {
    fmt.Fprintf(w, "This is the content of the profile controller\n")
    log.Println("executing profile controller")
}
Now let’s send everything to the router:
nProfile := negroni.New()
// set the middleware
nProfile.Use(negroni.HandlerFunc(auth))
// set the handler
nProfile.UseHandlerFunc(profileHandler)
// attach negroni middleware and handler to our route
router.Handler("GET", "/profile", nProfile)
That was simple, but now if we have a route which contains parameters inside it (like /hello/:name) we cannot access it from our handler function. To solve that, I’ve written the following functions which will help us call the handler with the parameters:
// callwithParams function is helping us to call controller from middleware having access to URL params
func callWithParams(router *httprouter.Router, handler func(w http.ResponseWriter, r *http.Request, ps httprouter.Params)) func(w http.ResponseWriter, r *http.Request) {
    return func(w http.ResponseWriter, r *http.Request) {
        params := getUrlParams(router, r)
        handler(w, r, params)
    }
}

// getUrlParams function is extracting URL parameters
func getUrlParams(router *httprouter.Router, req *http.Request) httprouter.Params {
    _, params, _ := router.Lookup(req.Method, req.URL.Path)

    return params
}
And will be used like this:
router := httprouter.New()
nHello := negroni.New()
// add auth middleware
nHello.Use(negroni.HandlerFunc(auth))
// add handler using callWithParams function so we can access the URL parameters in handler
nHello.UseHandlerFunc(callWithParams(router, helloHandler))
router.Handler("GET", "/hello/:name", nHello)

n.UseHandler(router)

log.Fatal(http.ListenAndServe(":8080", n))
The full working example can be found here.

Symfony OAuth Authentication for Your Mobile Application
Let’s say you built an API using Symfony and you need to access it from a mobile application using authenticated requests on behalf of your users.
Here’s how to make this work using Symfony 2.8 and Doctrine.
Install FOSOAuthServerBundle
We will use the FOSOAuthServerBundle to implement this feature. Install it using the following command:
composer require friendsofsymfony/oauth-server-bundle
Next, enable the bundle in the AppKernel.php file:
public function registerBundles()
{
    $bundles = array(
        // ...
        new FOS\OAuthServerBundle\FOSOAuthServerBundle(),
    );
}
Create OAuth model classes
To create the OAuth model classes just add the following files to your project. Here we already have FOSUserBundle installed and set up to use the ApiBundle\Entity\User class.
src/ApiBundle/Entity/Client.php
<?php
namespace ApiBundle\Entity;

use FOS\OAuthServerBundle\Entity\Client as BaseClient;
use Doctrine\ORM\Mapping as ORM;

/**
 * @ORM\Entity
 */
class Client extends BaseClient
{
    /**
     * @ORM\Id
     * @ORM\Column(type="integer")
     * @ORM\GeneratedValue(strategy="AUTO")
     */
    protected $id;

    public function __construct()
    {
        parent::__construct();
        // your own logic
    }
}
src/ApiBundle/Entity/AccessToken.php
<?php
namespace ApiBundle\Entity;

use FOS\OAuthServerBundle\Entity\AccessToken as BaseAccessToken;
use Doctrine\ORM\Mapping as ORM;

/**
 * @ORM\Entity
 */
class AccessToken extends BaseAccessToken
{
    /**
     * @ORM\Id
     * @ORM\Column(type="integer")
     * @ORM\GeneratedValue(strategy="AUTO")
     */
    protected $id;

    /**
     * @ORM\ManyToOne(targetEntity="Client")
     * @ORM\JoinColumn(nullable=false)
     */
    protected $client;

    /**
     * @ORM\ManyToOne(targetEntity="User")
     */
    protected $user;
}
src/ApiBundle/Entity/RefreshToken.php
<?php
namespace ApiBundle\Entity;

use FOS\OAuthServerBundle\Entity\RefreshToken as BaseRefreshToken;
use Doctrine\ORM\Mapping as ORM;

/**
 * @ORM\Entity
 */
class RefreshToken extends BaseRefreshToken
{
    /**
     * @ORM\Id
     * @ORM\Column(type="integer")
     * @ORM\GeneratedValue(strategy="AUTO")
     */
    protected $id;

    /**
     * @ORM\ManyToOne(targetEntity="Client")
     * @ORM\JoinColumn(nullable=false)
     */
    protected $client;

    /**
     * @ORM\ManyToOne(targetEntity="User")
     */
    protected $user;
}
src/ApiBundle/Entity/AuthCode.php
<?php
namespace ApiBundle\Entity;

use FOS\OAuthServerBundle\Entity\AuthCode as BaseAuthCode;
use Doctrine\ORM\Mapping as ORM;

/**
 * @ORM\Entity
 */
class AuthCode extends BaseAuthCode
{
    /**
     * @ORM\Id
     * @ORM\Column(type="integer")
     * @ORM\GeneratedValue(strategy="AUTO")
     */
    protected $id;

    /**
     * @ORM\ManyToOne(targetEntity="Client")
     * @ORM\JoinColumn(nullable=false)
     */
    protected $client;

    /**
     * @ORM\ManyToOne(targetEntity="User")
     */
    protected $user;
}
Configure FOSOAuthServerBundle
Import the routing configuration in your app/config/routing.yml file:
fos_oauth_server_token:
    resource: "@FOSOAuthServerBundle/Resources/config/routing/token.xml"
fos_oauth_server_authorize:
    resource: "@FOSOAuthServerBundle/Resources/config/routing/authorize.xml"
Add FOSOAuthServerBundle settings in app/config/config.yml:
fos_oauth_server:
    db_driver: orm       # Drivers available: orm, mongodb, or propel
    client_class:        ApiBundle\Entity\Client
    access_token_class:  ApiBundle\Entity\AccessToken
    refresh_token_class: ApiBundle\Entity\RefreshToken
    auth_code_class:     ApiBundle\Entity\AuthCode
    service:
        user_provider: fos_user.user_provider.username
Back to the models
Generate a migration and migrate the database:
php app/console doctrine:migrations:diff
php app/console doctrine:migrations:migrate
…or, if you’re not using migrations, just update the database schema:
php app/console doctrine:schema:update --force
Configure your application’s security
Edit your app/config/security.yml file to add FOSOAuthServerBundle specific configuration:
# ...

    firewalls:
        oauth_token: # Everyone can access the access token URL.
            pattern: ^/oauth/v2/token
            security: false

        api:
            pattern:    ^/api
            fos_oauth:  true
            stateless:  true
            anonymous:  true # can be omitted as its default value

    # ...

    access_control:
        - { path: ^/api, role: IS_AUTHENTICATED_FULLY }
Create a client
Before you can generate tokens, you need to create a Client using the ClientManager. For this, create a new Symfony command:
<?php
namespace ApiBundle\Command;

use Symfony\Bundle\FrameworkBundle\Command\ContainerAwareCommand;
use Symfony\Component\Console\Input\InputInterface;
use Symfony\Component\Console\Output\OutputInterface;

class OAuthAddClientCommand extends ContainerAwareCommand
{
    protected function configure()
    {
        $this
            ->setName('oauth:add-client')
            ->setDescription("Ads a new client for OAuth")
        ;
    }

    protected function execute(InputInterface $input, OutputInterface $output)
    {
        $redirectUri = $this->getContainer()->getParameter('router.request_context.scheme') . "://" . $this->getContainer()->getParameter('router.request_context.host');
        $clientManager = $this->getContainer()->get('fos_oauth_server.client_manager.default');
        $client = $clientManager->createClient();
        $client->setRedirectUris(array($redirectUri));
        $client->setAllowedGrantTypes(array('refresh_token', 'password'));
        $clientManager->updateClient($client);
    }
}
Now run the above command to generate your first OAuth client:
php app/console oauth:add-client
This client will be able to generate tokens and refresh tokens using the user’s username and password. You can find it’s data in the database client table. The token endpoint is at /oauth/v2/token by default.
Document using NelmioApiDocBundle
If you use the NelmioApiDocBundle to document your API, you can add these OAuth methods too. Create a new YAML file in src/ApiBundle/Resources/apidoc/oauth.yml:
grant_type_password:
    requirements: []
    views: []
    filters: []
    parameters:
        grant_type:
            dataType: string
            required: true
            name: grant_type
            description: Grant Type (password)
            readonly: false
        client_id:
            dataType: string
            required: true
            name: client_id
            description: Client Id
            readonly: false
        client_secret:
            dataType: string
            required: true
            name: client_secret
            description: client Secret
            readonly: false
        username:
            dataType: string
            required: true
            name: username
            description: Username
            readonly: false
        password:
            dataType: string
            required: true
            name: password
            description: Password
            readonly: false
    input: null
    output: null
    link: null
    description: "Get OAuth token for user using username and password"
    section: "OAuth"
    documentation: null
    resource: null
    method: "POST"
    host: ""
    uri: "/oauth/v2/token"
    response:
        token:
            dataType: string
            required: true
            description: OAuth token
            readonly: true
    route:
        path: /oauth/v2/token
        defaults:
            _controller: FOS\UserBundle\Controller\SecurityController::checkAction
        requirements: []
        options:
            compiler_class: Symfony\Component\Routing\RouteCompiler
        host: ''
        schemes: []
        methods: [ 'POST' ]
        condition: ''
    https: false
    authentication: false
    authenticationRoles: []
    cache: null
    deprecated: false
    statusCodes: []
    resourceDescription: null
    responseMap: []
    parsedResponseMap: []
    tags: []

grant_type_refresh_token:
    requirements: []
    views: []
    filters: []
    parameters:
        grant_type:
            dataType: string
            required: true
            name: grant_type
            description: Grant Type (refresh_token)
            readonly: false
        client_id:
            dataType: string
            required: true
            name: client_id
            description: Client Id
            readonly: false
        client_secret:
            dataType: string
            required: true
            name: client_secret
            description: client Secret
            readonly: false
        refresh_token:
            dataType: string
            required: true
            name: refresh_token
            description: Refresh token
            readonly: false
    input: null
    output: null
    link: null
    description: "Get new OAuth token using refresh token"
    section: "OAuth"
    documentation: null
    resource: null
    method: "POST"
    host: ""
    uri: "/oauth/v2/token"
    response:
        token:
            dataType: string
            required: true
            description: OAuth token
            readonly: true
    route:
        path: /oauth/v2/token
        defaults:
            _controller: FOS\UserBundle\Controller\SecurityController::checkAction
        requirements: []
        options:
            compiler_class: Symfony\Component\Routing\RouteCompiler
        host: ''
        schemes: []
        methods: [ 'POST' ]
        condition: ''
    https: false
    authentication: false
    authenticationRoles: []
    cache: null
    deprecated: false
    statusCodes: []
    resourceDescription: null
    responseMap: []
    parsedResponseMap: []
    tags: []
Add a new NelmioApiYmlProvider.php file in src/ApiBundle/Service folder:
<?php

namespace ApiBundle\Service;

use Nelmio\ApiDocBundle\Annotation\ApiDoc;
use Nelmio\ApiDocBundle\Extractor\AnnotationsProviderInterface;
use Symfony\Component\Finder\Finder;
use Symfony\Component\Routing\Route;
use Symfony\Component\Yaml\Yaml;

/**
 * Generate annotations for vendor routes to be displayed in Nelmio ApiDoc.
 */
class NelmioApiYmlProvider implements AnnotationsProviderInterface
{
    private $vendorFolder;

    public function __construct($vendorFolder)
    {
        $this->vendorFolder = $vendorFolder;
    }
    /**
     * {@inheritdoc}
     */
    public function getAnnotations()
    {
        $annotations = [];
        $configDirectories = array($this->vendorFolder);

        $finder = new Finder();

        $finder->files()->in($configDirectories);

        if (count($finder) == 0) {
            return $annotations;
        }

        foreach ($finder as $file_) {
            $data = Yaml::parse(file_get_contents($file_));

            $vendors = array_keys($data);
            foreach ($vendors as $vendor) {
                $apiDoc = new ApiDoc($data[$vendor]);
                $route = new Route(
                    $data[$vendor]['route']['path'],
                    $data[$vendor]['route']['defaults'],
                    $data[$vendor]['route']['requirements'],
                    $data[$vendor]['route']['options'],
                    $data[$vendor]['route']['host'],
                    $data[$vendor]['route']['schemes'],
                    $data[$vendor]['route']['methods'],
                    $data[$vendor]['route']['condition']
                );

                $apiDoc->setRoute($route);
                $apiDoc->setResponse($data[$vendor]['response']);
                $annotations[] = $apiDoc;
            }
        }

        return $annotations;
    }
}
Add a new service in src/ApiBundle/Resources/config/services.yml file:
services:
    nelmio_api_doc.yml_provider.api_yml_provider:
        class: ApiBundle\Service\NelmioApiYmlProvider
        arguments:
            folder: %kernel.root_dir%/../src/ApiBundle/Resources/apidoc
        tags:
            - { name: nelmio_api_doc.extractor.annotations_provider }
You’ll find now two /oauth/v2/token methods with different parameters listed in the api/doc section of your project.
That’s all! You can now use the generated client to authenticate your users in your mobile app using OAuth.
How to use the FOSOAuthServerBundle
First you will need to get an access token by making a POST request to the /oauth/v2/token endpoint with the following parameters:
grant_type=password
client_id=[client's id from the database followed by '_' then the corresponding random id]
client_secret=[client's secret]
username=[user's username]
password=[users's password]
You should get back something like this:
{
  "access_token": "ZDgxZDlkOWI2N2IyZWU2ZjlhY2VlNWQxNzM0ZDhlOWY2ZTIwOTBkNGUzZDUyOGYxOTg1ZTRjZGExOTY2YjNmNw",
  "expires_in": 3600,
  "token_type": "bearer",
  "scope": null,
  "refresh_token": "MDQ3MGIwZTk5MDkwOGM5NjhkMzk5NTUyZDJjZmYwM2YzZWViZDFhZjk0NTIyZmNjNzkyMDM0YjM4ODQ2N2VhNg"
}
Use the access token for authenticated requests by placing it in the request header:
Authorization: Bearer ZDgxZDlkOWI2N2IyZWU2ZjlhY2VlNWQxNzM0ZDhlOWY2ZTIwOTBkNGUzZDUyOGYxOTg1ZTRjZGExOTY2YjNmNw
When the access token expires, you can get a new one using the refresh_token grant type at the same /oauth/v2/token endpoint:
grant_type=refresh_token
client_id=[client's id from the database followed by '_' then the corresponding random id]
client_secret=[client's secret]
refresh_token=[refresh token received earlier]
The response should be similar to:
{
  "access_token": "MjE1NjRjNDc0ZmU4NmU3NjgzOTIyZDZlNDBiMTg5OGNhMTc0MjM5OWU3MjAxN2ZjNzAwOTk4NGQxMjE5ODVhZA",
  "expires_in": 3600,
  "token_type": "bearer",
  "scope": null,
  "refresh_token": "YzM2ZWNiMGQ5MDBmOGExNjhmNDI1YjExZTkyN2U0Mzk5ZmM4NzcwNDdhNjAzZDliMjY3YzE0ZTg5NDFlZjg3MQ"
}Mysqldump Through a HTTP Request with Golang
So, in a previous post I explained how one can backup all databases on a server, each in its own dump file. Let's take it to the next level and make a Golang program that will let us run the dump process with a HTTP request.
Assuming you already have Go installed on the backup server, create first a project directory in your home folder for example. Copy the mysql dump script from here and save it as dump.sh in your project folder. Modify ROOTDIR="/backup/mysql/" inside dump.sh to reflect current project directory.
We will create a Golang script with two functions. One will launch the backup script when a specific HTTP request is done. The other one will put the HTTP call behind a authentication, so only people with credentials will be able to make the backup request.
package main

import (
	"encoding/base64"
	"fmt"
	"log"
	"net/http"
	"os"
	"os/exec"
	"strings"
)

var username = os.Getenv("DB_BACKUP_USER")
var password = os.Getenv("DB_BACKUP_PASSWORD")

func BasicAuth(w http.ResponseWriter, r *http.Request, user, pass string) bool {
	s := strings.SplitN(r.Header.Get("Authorization"), " ", 2)
	if len(s) != 2 {
		return false
	}
	b, err := base64.StdEncoding.DecodeString(s[1])
	if err != nil {
		return false
	}
	pair := strings.SplitN(string(b), ":", 2)
	if len(pair) != 2 {
		return false
	}
	return pair[0] == string(user) && pair[1] == string(pass)
}
func handler(w http.ResponseWriter, r *http.Request) {
	if BasicAuth(w, r, username, password) {
		cmd := exec.Command("bash", "dump.sh")
		stdout, err := cmd.Output()
		if err != nil {
			log.Fatal(err)
		}
		fmt.Fprintf(w, string(stdout))
		return
	}
	w.Header().Set("WWW-Authenticate", `Basic realm="Protected Page!!! "`)
	w.WriteHeader(401)
	w.Write([]byte("401 Unauthorized\n"))
}

func main() {
	http.HandleFunc("/backup", handler)
	http.ListenAndServe(":8080", nil)
}
This uses DB_BACKUP_USER and DB_BACKUP_PASSWORD that you will have to set as environment variables. Just append this to your ~/.bashrc file
export DB_BACKUP_USER="hello"
export DB_BACKUP_PASSWORD="password"
Now run source ~/.bashrc to load them.
Build the executable with go build http-db-backup.go where http-db-backup.go is the name of your Go file. Now you need to run the executable with sudo, but while preserving the environment: sudo -E ./http-db-backup
Now if you open your browser and open http://111.222.333.444:8080/backup (where 111.222.333.444 is your backup machine IP) the backup process will start, and you will get the output of the dump.sh in your browser when backup finishes.
We can furthermore add another function to list the directory in browser, so you can download the needed backup or backups.
func lister(w http.ResponseWriter, r *http.Request) {
	if BasicAuth(w, r, username, password) {
		http.FileServer(http.Dir(".")).ServeHTTP(w, r)
		return
	}
	w.Header().Set("WWW-Authenticate", `Basic realm="Protected Page!!! "`)
	w.WriteHeader(401)
	w.Write([]byte("401 Unauthorized\n"))
}
All you need to do is to add http.HandleFunc("/", lister) to your main() and navigate to http://111.222.333.444:8080/ . You will be able to navigate the backup directory to download the dump files.

Best Solutions to Top Mobile App Development Challenges
More than half of the world’s population now uses a smartphone. As the price of data plans continue to decrease all over the world, web traffic coming from mobile devices increases year by year. In fact, more than half of today’s global internet traffic comes from mobile devices.
People are spending more time on their mobile devices, thereby increasing the demand for mobile apps. Recent statistics show that 52% of the time individuals spend on digital media is on mobile apps. In 2016, global mobile app revenues amounted to 88.3 billion U.S. dollars, and it’s forecasted that by 2020, global mobile app revenues from app stores and in-app advertising will reach 188.9 billion U.S. dollars.
Indeed, mobile app development is a lucrative business, given the mobile and digital revolution.
But, for every venture comes a challenge. It’s important to know the potential challenges you may face and how to address them before hiring an app developer.

Tight Market Competition
The app market is overcrowded, and it’s becoming a challenge for a mobile application to get noticed. Apple’s App Store has over 2.2 billion apps and Google’s Play Store has over 2.8 million apps as of March 2017. That doesn’t even include the apps in Windows Phone Store and BlackBerry App World.
Solution! Define your target market and the main goal of the app. These two details are fundamental to the overall design, UI, and UX of your mobile app.
Make sure to do your market research to study the apps that already offer similar functionality. Determine your unique selling point, and make sure that your app features a beautiful design and an easy-to-use interface.
Funding
So, you’ve already come up with a solid app idea, and you’re sure that it’s going to be a hit. It’s time to get the funding to get it built.
Mobile app development can be costly, depending on the design, function, and interface of the app. Prepare the funding before you hire an app developer to avoid delays in the launch. You should also take into consideration the cost of marketing your new app.
Solution! If you can’t personally fund your mobile app idea, there are many ways to get funding. You can try crowdfunding websites like GoFundMe, Kickstarter, AppBackr, and the like. You can also ask your relatives or friends to partner up with you. If you want your mobile app to be a solo venture, then you can try for a bank loan or personal loan from people in your social circle.

Screen Size and Device Compatibility
Users have a wide variety of devices that run on different screen sizes, operating systems and platforms. Make sure that your mobile app developer understands the importance of a responsive design. Your mobile app should work for devices of all screen sizes, from the smallest smartphone to the largest tablet computer.
Solution! OS is another aspect to consider. iOS, Android and Windows has its own UI and algorithms. Be prepared to encounter bugs and errors along the way. For this reason, it’s highly recommended to release a beta version.
Interactive UI and User-Friendliness
Poor user experience is one of the top reasons why a lot of mobile apps don’t succeed simply because it turns off users. Your mobile app must be easy to use and understand. It doesn’t need to have a wide plethora of unnecessary features.
Solution! Include a tutorial that users can go back to within the app itself. Also, mobile devices nowadays include high-tech sensors and hardware that offers a range of opportunities for creating an interactive app. Explore the possibilities, but stay true to the goal and function of your mobile app.

Development Approach
There are numerous app development approaches that you can utilize, such as hybrid app development, cross-platform, native app development, or platform specific native app development. Also, you don’t want to waste time and additional resources in developing an app that wouldn’t work for multiple devices and platforms.
Solution! Strategize and decide on the tools and frameworks to use according to the UI and UX needs of your app. Platforms like OpenSourceSDK offers the ability to develop apps using C/C++ or HTML5. It also allows developers to incorporate single API across multiple platforms. Then, there are cross-platform developer tools that you can leverage for your mobile app venture, such as RhoMobile, PhoneGap, Appcelerator, Mosync, and WidgetPad.
Managing Mobile Content
Content is the life of a mobile app. Today’s mobile users demand rich content, image, and animation. However, you need to consider internet speed and bandwidth. Oftentimes, wireless network connection contributes to the failed delivery of mobile app content. As a result, users find it too bothersome to use mobile apps that don’t load quickly.
Solution! Choose a mobile content management system that simplifies content and optimizes bandwidth, such as AirWatch, Alfresco, and MobileIron. These tools can help you deliver rich content reliably.

Balancing Performance and Battery Life
It’s a big challenge to design a well-performing and bug-free app that contains rich media yet doesn’t consume too much battery life. Pokemon Go, for instance, is a great game with rich AR graphics and features. Users were hooked the moment they downloaded the app. But, most users are complaining that the game drains their smartphone quickly. Graphics, animation, content, and function should not compromise battery consumption.
Solution! Run tests to monitor the performance of your app.
Marketing and Promotion
Your mobile app is now among the millions of apps listed in the Apple’s App Store or Google’s Play Store. How do users find it? Branding, marketing and promotions play a huge role in the success of your mobile app.
Solution! Platforms like AppTamin, AppScend , MobileDevHQ, and Smore can help you market your mobile apps. You can also take to social media advertisements to get the word out there. Create a data-driven strategy and consult with marketing professionals about how you can get your target market to download the new app.
It’s true that mobile apps are popping up like mushrooms in app stores. But, mobile app development isn’t as easy as 1, 2, 3, launch! There are challenges that beset creators and developers. Fortunately, these challenges can be overcome with careful planning.