
7 PHP IDEs for 2018 Software Development
As we mentioned in our previous article, PHP remains a crucial programming language in 2018 as a result of its flexibility in building Saas and Paas solutions from scratch. And since the only way you can continue to be competitive and productive as a developer is to write effective code, we consider useful to gather the best IDEs that will streamline your PHP development process.
PHPStorm
With this IDE, PHP developers can build complex web apps faster, whether they are working with Symfony, Drupal, Wordpress, ZendFramework, Laravel, Magento, Joomla!, CakePHP or Yii. PHPStorm allows command execution between the host and remote servers through its built-in terminal. This IDE remains a popular one because it can deeply understand code structure and has the best code compilation, refactorings, on-the-fly error prevention and more. PhpStorm it’s available on Microsoft Windows, Mac OS X, and Linux.
Among the features that make PhpStorm the best IDE for PHP are also included:
- Code quality analysis
- Syntax and error highlight
- Rich and Live editing for all Front-end Technologies
- Essential and powerful built-in tools for debugging, testing and profiling
- Easy-code navigation & search
- Code re-arranger
This year, PhpStorm announced some updates regarding:
- PHP Language: inline function/method refactoring, code refactoring to functional style, configurable unchecked exceptions or hierarchy checks for class aliases
- Testing: creating classroom test, better code coverage and gutter icons for running tests
- HTTP client: assertion support and a first start simplified

Netbeans
PHP developers continue to use Netbeans in 2018 because is an open source IDE and has a modular design so it can be extended by third-party developers. Moreover, it’s lightweight and much faster than other similar tools in building large-scale multi-language websites and has useful features like:
- Smart code compilation
- Support for embedded applications
- Built-in debugger
- Code templates and code generation tools, such as “getter and setter” generation, refactoring, parameter tooltips, hints and quick fixes
- Inbuilt database connection
NetBeans runs on Microsoft Windows, Mac OS X, Linux and Solaris and supports other languages besides PHP such as Java ME & SE, Javascript, HTML5, C/C++, XML or Groovy.
Aptana Studio
Aptana is an open source HTML editor with full PHP support for creating savvy web apps and advanced features like code assistant, integrated debugger, built-in PHP Server, Auto Indexing and Code Formatting or syntax error annotations. A differentiating feature of Aptana is that it also allows multiple protocols including FTP, SFFP, FTPS and Capistrano. Additionally, Aptana offers support for DOM & CSS besides PHP.
Eclipse
Eclipse is widely known thanks to its flexibility and for their Java IDE, C/C++, Javascript, and PHP IDEs built on extensible platforms in order to create desktop, web and cloud apps. Among the numerous supported languages, we mention Java, Javascript, C, C++, Rub, Ruby on Rails, Python, Rust, Scala, Groovy, and Php. Its features also include automatic error reporting, support for git-flow, GUI and NonGUI based applications as well as multi-platform support with lots of plugins.
Komodo
Created by ActiveState, Komodo IDE became popular as a result of its many extensions and pipe features like code profiling, built-in code collaboration or the HTTP inspector which lets you inspect HTTP traffic from the IDE to the Websites. With Komodo, developers can easily find documentation on common PHP functions by selecting them and invoking the documentation tool.
Top companies such as Siemens, Tesco, Nasa, Bank of America or Alcatel-Lucent use Komodo IDE.
ZendStudio
ZendStudio has an intelligent user-interface and all the current features for successful PHP development. Mainly, it can debug web applications, CLI applications and supports PHP Unit test.
With ZendStudio developers can also perform static code analysis using a rich set of rules for finding issues in their code as they type it. The team can write code faster, easily debug projects and can use PHP7 or other advanced interpreters. Moreover, it offers support for CMS like Wordpress and Joomla, for indexing and searching PHP Code and for Cloud Servers like Azure and AWS.

NuSphere
Nusphere PhpED is a balanced combination of an advanced code editor, reliable debugger, and productive database connectivity. That makes it a suitable and complete solution for PHP development. NuSphere key features include code insights for PHP, conditional breakpoints, ability to change current execution line, embedded SSH client or the ability to profile code in terms of performance and memory consumption.
Final Thoughts
It’s important to choose the right IDE in order to produce and maintain high-quality code. And since PHP remains a reference point as a back-end programming language, I hope you find this list of IDEs helpful in writing your PHP code, whether you are a beginner or a professional user.

How to Setup Docker for Your Symfony Project
As you probably know, I am a big Symfony fan :) In the last few years I used Vagrant to set up my Symfony development environment more or less as described here. But we now have Docker and it’s time to move forward with a new setup. Docker containers are generally more lightweight than Vagrant virtual machines, so starting and stopping them is extremely fast. They also take a lot less disk space.
To setup a Docker container you need a Dockerfile file and to combine several containers we use the docker-compose.yml file. For our environment we will need two containers, one with the latest Ubuntu LTS to host the web server and our project files and one for MySQL.
The first container is defined in the Dockerfile file as below:
FROM ubuntu:16.04
ADD . /app
RUN apt-get update
RUN apt-get install -y php apache2 libapache2-mod-php7.0 php-mysql php-intl git git-core curl php-curl php-xml composer zip unzip php-zip
# Configure Apache
RUN rm -rf /var/www/* \
    && a2enmod rewrite \
    && echo "ServerName localhost" >> /etc/apache2/apache2.conf
ADD vhost.conf /etc/apache2/sites-available/000-default.conf
# Install Symfony
RUN mkdir -p /usr/local/bin
RUN curl -LsS https://symfony.com/installer -o /usr/local/bin/symfony
RUN chmod a+x /usr/local/bin/symfony
# Add main start script for when image launches
ADD run.sh /run.sh
RUN chmod 0755 /run.sh
WORKDIR /app
EXPOSE 80
CMD ["/run.sh"]
Add this file in a new folder. We also need the vhost.conf and run.sh files used in the code from above.
The vhost.conf file is used to configure the apache virtual host:
<VirtualHost *:80>
    ServerName localhost
    DocumentRoot /app/my_project/web
    <Directory /app/my_project/web>
        Options -Indexes
        AllowOverride All
        Require all granted
    </Directory>
</VirtualHost>
The run.sh file runs when the container starts and just makes sure that the cache and logs folders are set up before launching the apache web server:
#!/bin/bash
mkdir -p my_project/app/cache my_project/app/logs
touch my_project/app/logs/prod.log
touch my_project/app/logs/dev.log
chgrp -R www-data .
chmod -R g+w my_project/app/cache my_project/app/logs
source /etc/apache2/envvars
tail -F /var/log/apache2/* my_project/app/logs/prod.log my_project/app/logs/dev.log &
exec apache2 -D FOREGROUND
That’s all for our main Ubuntu container, we now need to create the docker-compose.yml file:
version: "2"
services:
    mysql:
        image: mysql:5.7
        container_name: mysqldb
        ports:
            - "4000:3306"
        expose:
            - "3306"
        environment:
            MYSQL_ROOT_PASSWORD: yourrootpassword
    site:
        build: .
        container_name: myproject
        ports:
            - "8080:80"
        expose:
            - "80"
        depends_on:
            - mysql
        volumes:
          - .:/app
This will tell Docker to first start an MySQL 5.7 container, then our Ubuntu container that will be able to access the MySQL container using the mysql host name.
Start everything with the docker-compose up command.
When it’s done, open a new terminal (let the latest docker compose command run, do not stop it) and use the docker ps command to see the running containers:
![]()
Now, you can take the id of the Ubuntu container and ssh into it:
docker exec -t -i [ID] bash
Here you will start a new Symfony project as always (you will have to delete the my_project folder created by Docker first):
rm -rf my_project
symfony new my_project 2.8
If you name you project something else (yes, you will probably do that) just replace the all my_folder occurrences in the files and commands above with the actual name of your project.
After you created the new Symfony project, it is better to rebuild the Docker containers so the setup of the cache and logs folders will be as intended. In the terminal window where you launched Docker, press Ctrl+C to stop it then run docker-compose up again.
That’s it! You can now access your new Symfony project using the following URL: http://localhost:8080/. To connect to MySQL you will use the mysql host name:
parameters:
    database_host: mysql
    database_port: null
    database_name: symfony
    database_user: root
    database_password: yourrootpassword
Thank you! Please let me know in the comments if you have any suggestions to improve this setup or problems running it.

How to Get Nearby Locations from MySQL Database
If you have a MySQL table with locations (latitude and longitude columns) you can get a list of locations near a specific point using the following query:
SELECT *, ((ACOS(SIN(<latitude> * PI() / 180) * SIN(latitude * PI() / 180) + COS(<latitude> * PI() / 180) * COS(latitude * PI() / 180) * COS((<longitude> - longitude) * PI() / 180)) * 180 / PI()) * 60 * 1.1515 * 1.609344) as distance FROM locations HAVING distance <= <distance> ORDER BY distance ASC
In this query we have noted the latitude of the reference point with <latitude>, its longitude with <longitude> and the maximum distance to search for with <distance> (in kilometers).
To make this calculate the distance in miles, just remove the * 1.609344 from the end of the calculation:
SELECT *, ((ACOS(SIN(<latitude> * PI() / 180) * SIN(latitude * PI() / 180) + COS(<latitude> * PI() / 180) * COS(latitude * PI() / 180) * COS((<longitude> - longitude) * PI() / 180)) * 180 / PI()) * 60 * 1.1515) as distance FROM locations HAVING distance <= <distance> ORDER BY distance ASC
You can test the results using Google Maps. To measure distances in Google Maps you need to right-click and choose “Measure distance” from the popup menu.
How to Get Nearby Locations in Symfony with Doctrine
If you’re like me and use Symfony a lot, here’s how you can add a repository method for your entity to return objects ordered by distance from a specific location:
<?php
namespace AppBundle\Entity;
class LocationRepository extends \Doctrine\ORM\EntityRepository
{
    public function findClosest($lat, $lng) {
        $qb = $this->createQueryBuilder('l');
        $qb->addSelect('((ACOS(SIN(:lat * PI() / 180) * SIN(l.latitude * PI() / 180) + COS(:lat * PI() / 180) * COS(l.latitude * PI() / 180) * COS((:lng - l.longitude) * PI() / 180)) * 180 / PI()) * 60 * 1.1515) as HIDDEN distance');
        $qb->orderBy('distance');
        $qb->setParameter('lat', $lat);
        $qb->setParameter('lng', $lng);

        return $qb->getQuery()->getResult();
    }
}
To make this work we need to add the ACOS, SIN, COS and PI functions to Doctrine’s DQL as it does not have them by default.
First create 4 new classes in a new AppBundle/DQL folder, one for each function we need to define.
AppBundle/DQL/Acos.php
<?php
namespace ApiBundle\DQL;
use Doctrine\ORM\Query\AST\Functions\FunctionNode,
    Doctrine\ORM\Query\Lexer;
class Acos extends FunctionNode
{
    public $arithmeticExpression;
    public function getSql(\Doctrine\ORM\Query\SqlWalker $sqlWalker)
    {
        return 'ACOS(' . $sqlWalker->walkSimpleArithmeticExpression(
                $this->arithmeticExpression
        ) . ')';
    }
    public function parse(\Doctrine\ORM\Query\Parser $parser)
    {
        $parser->match(Lexer::T_IDENTIFIER);
        $parser->match(Lexer::T_OPEN_PARENTHESIS);
        $this->arithmeticExpression = $parser->SimpleArithmeticExpression();
        $parser->match(Lexer::T_CLOSE_PARENTHESIS);
    }
}
AppBundle/DQL/Sin.php
<?php
namespace ApiBundle\DQL;
use Doctrine\ORM\Query\AST\Functions\FunctionNode,
    Doctrine\ORM\Query\Lexer;
class Sin extends FunctionNode
{
    public $arithmeticExpression;
    public function getSql(\Doctrine\ORM\Query\SqlWalker $sqlWalker)
    {
        return 'SIN(' . $sqlWalker->walkSimpleArithmeticExpression(
                $this->arithmeticExpression
        ) . ')';
    }
    public function parse(\Doctrine\ORM\Query\Parser $parser)
    {
        $parser->match(Lexer::T_IDENTIFIER);
        $parser->match(Lexer::T_OPEN_PARENTHESIS);
        $this->arithmeticExpression = $parser->SimpleArithmeticExpression();
        $parser->match(Lexer::T_CLOSE_PARENTHESIS);
    }
}
AppBundle/DQL/Cos.php
<?php
namespace ApiBundle\DQL;
use Doctrine\ORM\Query\AST\Functions\FunctionNode,
    Doctrine\ORM\Query\Lexer;
class Cos extends FunctionNode
{
    public $arithmeticExpression;
    public function getSql(\Doctrine\ORM\Query\SqlWalker $sqlWalker)
    {
        return 'COS(' . $sqlWalker->walkSimpleArithmeticExpression(
                $this->arithmeticExpression
        ) . ')';
    }
    public function parse(\Doctrine\ORM\Query\Parser $parser)
    {
        $parser->match(Lexer::T_IDENTIFIER);
        $parser->match(Lexer::T_OPEN_PARENTHESIS);
        $this->arithmeticExpression = $parser->SimpleArithmeticExpression();
        $parser->match(Lexer::T_CLOSE_PARENTHESIS);
    }
}
AppBundle/DQL/Pi.php
<?php
namespace ApiBundle\DQL;
use Doctrine\ORM\Query\AST\Functions\FunctionNode,
    Doctrine\ORM\Query\Lexer;
class Pi extends FunctionNode
{
    public $arithmeticExpression;
    public function getSql(\Doctrine\ORM\Query\SqlWalker $sqlWalker)
    {
        return 'PI()';
    }
    public function parse(\Doctrine\ORM\Query\Parser $parser)
    {
        $parser->match(Lexer::T_IDENTIFIER);
        $parser->match(Lexer::T_OPEN_PARENTHESIS);
        $parser->match(Lexer::T_CLOSE_PARENTHESIS);
    }
}
The next and the last step is to add the above definitions to your app’s config.yml file:
doctrine:
    dbal:
        # ...
    orm:
        auto_generate_proxy_classes: '%kernel.debug%'
        naming_strategy: doctrine.orm.naming_strategy.underscore
        auto_mapping: true
        dql:
            numeric_functions:
                acos: ApiBundle\DQL\Acos
                sin: ApiBundle\DQL\Sin
                cos: ApiBundle\DQL\Cos
                pi: ApiBundle\DQL\Pi
That’s it. Now it will all work as expected. If you need to add more specific functions to DQL, just look at the above classes and make your own.

Symfony OAuth Authentication for Your Mobile Application
Let’s say you built an API using Symfony and you need to access it from a mobile application using authenticated requests on behalf of your users.
Here’s how to make this work using Symfony 2.8 and Doctrine.
Install FOSOAuthServerBundle
We will use the FOSOAuthServerBundle to implement this feature. Install it using the following command:
composer require friendsofsymfony/oauth-server-bundle
Next, enable the bundle in the AppKernel.php file:
public function registerBundles()
{
    $bundles = array(
        // ...
        new FOS\OAuthServerBundle\FOSOAuthServerBundle(),
    );
}
Create OAuth model classes
To create the OAuth model classes just add the following files to your project. Here we already have FOSUserBundle installed and set up to use the ApiBundle\Entity\User class.
src/ApiBundle/Entity/Client.php
<?php
namespace ApiBundle\Entity;

use FOS\OAuthServerBundle\Entity\Client as BaseClient;
use Doctrine\ORM\Mapping as ORM;

/**
 * @ORM\Entity
 */
class Client extends BaseClient
{
    /**
     * @ORM\Id
     * @ORM\Column(type="integer")
     * @ORM\GeneratedValue(strategy="AUTO")
     */
    protected $id;

    public function __construct()
    {
        parent::__construct();
        // your own logic
    }
}
src/ApiBundle/Entity/AccessToken.php
<?php
namespace ApiBundle\Entity;

use FOS\OAuthServerBundle\Entity\AccessToken as BaseAccessToken;
use Doctrine\ORM\Mapping as ORM;

/**
 * @ORM\Entity
 */
class AccessToken extends BaseAccessToken
{
    /**
     * @ORM\Id
     * @ORM\Column(type="integer")
     * @ORM\GeneratedValue(strategy="AUTO")
     */
    protected $id;

    /**
     * @ORM\ManyToOne(targetEntity="Client")
     * @ORM\JoinColumn(nullable=false)
     */
    protected $client;

    /**
     * @ORM\ManyToOne(targetEntity="User")
     */
    protected $user;
}
src/ApiBundle/Entity/RefreshToken.php
<?php
namespace ApiBundle\Entity;

use FOS\OAuthServerBundle\Entity\RefreshToken as BaseRefreshToken;
use Doctrine\ORM\Mapping as ORM;

/**
 * @ORM\Entity
 */
class RefreshToken extends BaseRefreshToken
{
    /**
     * @ORM\Id
     * @ORM\Column(type="integer")
     * @ORM\GeneratedValue(strategy="AUTO")
     */
    protected $id;

    /**
     * @ORM\ManyToOne(targetEntity="Client")
     * @ORM\JoinColumn(nullable=false)
     */
    protected $client;

    /**
     * @ORM\ManyToOne(targetEntity="User")
     */
    protected $user;
}
src/ApiBundle/Entity/AuthCode.php
<?php
namespace ApiBundle\Entity;

use FOS\OAuthServerBundle\Entity\AuthCode as BaseAuthCode;
use Doctrine\ORM\Mapping as ORM;

/**
 * @ORM\Entity
 */
class AuthCode extends BaseAuthCode
{
    /**
     * @ORM\Id
     * @ORM\Column(type="integer")
     * @ORM\GeneratedValue(strategy="AUTO")
     */
    protected $id;

    /**
     * @ORM\ManyToOne(targetEntity="Client")
     * @ORM\JoinColumn(nullable=false)
     */
    protected $client;

    /**
     * @ORM\ManyToOne(targetEntity="User")
     */
    protected $user;
}
Configure FOSOAuthServerBundle
Import the routing configuration in your app/config/routing.yml file:
fos_oauth_server_token:
    resource: "@FOSOAuthServerBundle/Resources/config/routing/token.xml"
fos_oauth_server_authorize:
    resource: "@FOSOAuthServerBundle/Resources/config/routing/authorize.xml"
Add FOSOAuthServerBundle settings in app/config/config.yml:
fos_oauth_server:
    db_driver: orm       # Drivers available: orm, mongodb, or propel
    client_class:        ApiBundle\Entity\Client
    access_token_class:  ApiBundle\Entity\AccessToken
    refresh_token_class: ApiBundle\Entity\RefreshToken
    auth_code_class:     ApiBundle\Entity\AuthCode
    service:
        user_provider: fos_user.user_provider.username
Back to the models
Generate a migration and migrate the database:
php app/console doctrine:migrations:diff
php app/console doctrine:migrations:migrate
…or, if you’re not using migrations, just update the database schema:
php app/console doctrine:schema:update --force
Configure your application’s security
Edit your app/config/security.yml file to add FOSOAuthServerBundle specific configuration:
# ...

    firewalls:
        oauth_token: # Everyone can access the access token URL.
            pattern: ^/oauth/v2/token
            security: false

        api:
            pattern:    ^/api
            fos_oauth:  true
            stateless:  true
            anonymous:  true # can be omitted as its default value

    # ...

    access_control:
        - { path: ^/api, role: IS_AUTHENTICATED_FULLY }
Create a client
Before you can generate tokens, you need to create a Client using the ClientManager. For this, create a new Symfony command:
<?php
namespace ApiBundle\Command;

use Symfony\Bundle\FrameworkBundle\Command\ContainerAwareCommand;
use Symfony\Component\Console\Input\InputInterface;
use Symfony\Component\Console\Output\OutputInterface;

class OAuthAddClientCommand extends ContainerAwareCommand
{
    protected function configure()
    {
        $this
            ->setName('oauth:add-client')
            ->setDescription("Ads a new client for OAuth")
        ;
    }

    protected function execute(InputInterface $input, OutputInterface $output)
    {
        $redirectUri = $this->getContainer()->getParameter('router.request_context.scheme') . "://" . $this->getContainer()->getParameter('router.request_context.host');
        $clientManager = $this->getContainer()->get('fos_oauth_server.client_manager.default');
        $client = $clientManager->createClient();
        $client->setRedirectUris(array($redirectUri));
        $client->setAllowedGrantTypes(array('refresh_token', 'password'));
        $clientManager->updateClient($client);
    }
}
Now run the above command to generate your first OAuth client:
php app/console oauth:add-client
This client will be able to generate tokens and refresh tokens using the user’s username and password. You can find it’s data in the database client table. The token endpoint is at /oauth/v2/token by default.
Document using NelmioApiDocBundle
If you use the NelmioApiDocBundle to document your API, you can add these OAuth methods too. Create a new YAML file in src/ApiBundle/Resources/apidoc/oauth.yml:
grant_type_password:
    requirements: []
    views: []
    filters: []
    parameters:
        grant_type:
            dataType: string
            required: true
            name: grant_type
            description: Grant Type (password)
            readonly: false
        client_id:
            dataType: string
            required: true
            name: client_id
            description: Client Id
            readonly: false
        client_secret:
            dataType: string
            required: true
            name: client_secret
            description: client Secret
            readonly: false
        username:
            dataType: string
            required: true
            name: username
            description: Username
            readonly: false
        password:
            dataType: string
            required: true
            name: password
            description: Password
            readonly: false
    input: null
    output: null
    link: null
    description: "Get OAuth token for user using username and password"
    section: "OAuth"
    documentation: null
    resource: null
    method: "POST"
    host: ""
    uri: "/oauth/v2/token"
    response:
        token:
            dataType: string
            required: true
            description: OAuth token
            readonly: true
    route:
        path: /oauth/v2/token
        defaults:
            _controller: FOS\UserBundle\Controller\SecurityController::checkAction
        requirements: []
        options:
            compiler_class: Symfony\Component\Routing\RouteCompiler
        host: ''
        schemes: []
        methods: [ 'POST' ]
        condition: ''
    https: false
    authentication: false
    authenticationRoles: []
    cache: null
    deprecated: false
    statusCodes: []
    resourceDescription: null
    responseMap: []
    parsedResponseMap: []
    tags: []

grant_type_refresh_token:
    requirements: []
    views: []
    filters: []
    parameters:
        grant_type:
            dataType: string
            required: true
            name: grant_type
            description: Grant Type (refresh_token)
            readonly: false
        client_id:
            dataType: string
            required: true
            name: client_id
            description: Client Id
            readonly: false
        client_secret:
            dataType: string
            required: true
            name: client_secret
            description: client Secret
            readonly: false
        refresh_token:
            dataType: string
            required: true
            name: refresh_token
            description: Refresh token
            readonly: false
    input: null
    output: null
    link: null
    description: "Get new OAuth token using refresh token"
    section: "OAuth"
    documentation: null
    resource: null
    method: "POST"
    host: ""
    uri: "/oauth/v2/token"
    response:
        token:
            dataType: string
            required: true
            description: OAuth token
            readonly: true
    route:
        path: /oauth/v2/token
        defaults:
            _controller: FOS\UserBundle\Controller\SecurityController::checkAction
        requirements: []
        options:
            compiler_class: Symfony\Component\Routing\RouteCompiler
        host: ''
        schemes: []
        methods: [ 'POST' ]
        condition: ''
    https: false
    authentication: false
    authenticationRoles: []
    cache: null
    deprecated: false
    statusCodes: []
    resourceDescription: null
    responseMap: []
    parsedResponseMap: []
    tags: []
Add a new NelmioApiYmlProvider.php file in src/ApiBundle/Service folder:
<?php

namespace ApiBundle\Service;

use Nelmio\ApiDocBundle\Annotation\ApiDoc;
use Nelmio\ApiDocBundle\Extractor\AnnotationsProviderInterface;
use Symfony\Component\Finder\Finder;
use Symfony\Component\Routing\Route;
use Symfony\Component\Yaml\Yaml;

/**
 * Generate annotations for vendor routes to be displayed in Nelmio ApiDoc.
 */
class NelmioApiYmlProvider implements AnnotationsProviderInterface
{
    private $vendorFolder;

    public function __construct($vendorFolder)
    {
        $this->vendorFolder = $vendorFolder;
    }
    /**
     * {@inheritdoc}
     */
    public function getAnnotations()
    {
        $annotations = [];
        $configDirectories = array($this->vendorFolder);

        $finder = new Finder();

        $finder->files()->in($configDirectories);

        if (count($finder) == 0) {
            return $annotations;
        }

        foreach ($finder as $file_) {
            $data = Yaml::parse(file_get_contents($file_));

            $vendors = array_keys($data);
            foreach ($vendors as $vendor) {
                $apiDoc = new ApiDoc($data[$vendor]);
                $route = new Route(
                    $data[$vendor]['route']['path'],
                    $data[$vendor]['route']['defaults'],
                    $data[$vendor]['route']['requirements'],
                    $data[$vendor]['route']['options'],
                    $data[$vendor]['route']['host'],
                    $data[$vendor]['route']['schemes'],
                    $data[$vendor]['route']['methods'],
                    $data[$vendor]['route']['condition']
                );

                $apiDoc->setRoute($route);
                $apiDoc->setResponse($data[$vendor]['response']);
                $annotations[] = $apiDoc;
            }
        }

        return $annotations;
    }
}
Add a new service in src/ApiBundle/Resources/config/services.yml file:
services:
    nelmio_api_doc.yml_provider.api_yml_provider:
        class: ApiBundle\Service\NelmioApiYmlProvider
        arguments:
            folder: %kernel.root_dir%/../src/ApiBundle/Resources/apidoc
        tags:
            - { name: nelmio_api_doc.extractor.annotations_provider }
You’ll find now two /oauth/v2/token methods with different parameters listed in the api/doc section of your project.
That’s all! You can now use the generated client to authenticate your users in your mobile app using OAuth.
How to use the FOSOAuthServerBundle
First you will need to get an access token by making a POST request to the /oauth/v2/token endpoint with the following parameters:
grant_type=password
client_id=[client's id from the database followed by '_' then the corresponding random id]
client_secret=[client's secret]
username=[user's username]
password=[users's password]
You should get back something like this:
{
  "access_token": "ZDgxZDlkOWI2N2IyZWU2ZjlhY2VlNWQxNzM0ZDhlOWY2ZTIwOTBkNGUzZDUyOGYxOTg1ZTRjZGExOTY2YjNmNw",
  "expires_in": 3600,
  "token_type": "bearer",
  "scope": null,
  "refresh_token": "MDQ3MGIwZTk5MDkwOGM5NjhkMzk5NTUyZDJjZmYwM2YzZWViZDFhZjk0NTIyZmNjNzkyMDM0YjM4ODQ2N2VhNg"
}
Use the access token for authenticated requests by placing it in the request header:
Authorization: Bearer ZDgxZDlkOWI2N2IyZWU2ZjlhY2VlNWQxNzM0ZDhlOWY2ZTIwOTBkNGUzZDUyOGYxOTg1ZTRjZGExOTY2YjNmNw
When the access token expires, you can get a new one using the refresh_token grant type at the same /oauth/v2/token endpoint:
grant_type=refresh_token
client_id=[client's id from the database followed by '_' then the corresponding random id]
client_secret=[client's secret]
refresh_token=[refresh token received earlier]
The response should be similar to:
{
  "access_token": "MjE1NjRjNDc0ZmU4NmU3NjgzOTIyZDZlNDBiMTg5OGNhMTc0MjM5OWU3MjAxN2ZjNzAwOTk4NGQxMjE5ODVhZA",
  "expires_in": 3600,
  "token_type": "bearer",
  "scope": null,
  "refresh_token": "YzM2ZWNiMGQ5MDBmOGExNjhmNDI1YjExZTkyN2U0Mzk5ZmM4NzcwNDdhNjAzZDliMjY3YzE0ZTg5NDFlZjg3MQ"
}
Face Detection with Apple’s iOS 11 Vision Framework
Great stuff is coming from Apple this autumn! Among a lot of new APIs there is the Vision Framework which helps with detection of faces, face features, object tracking and others.
In this post we will take a look at how can one put the face detection to work. We will make a simple application that can take a photo (using the camera of from the library) and will draw some lines on the faces it detects to show you the power of Vision.
Select an Image
I will go fast through this so if you are a really beginner and you find this too hard to follow, please check the my previous iOS related post, Building a Travel Photo Sharing iOS App, first, as it has the same photo selection functionality but explained in greater detail.
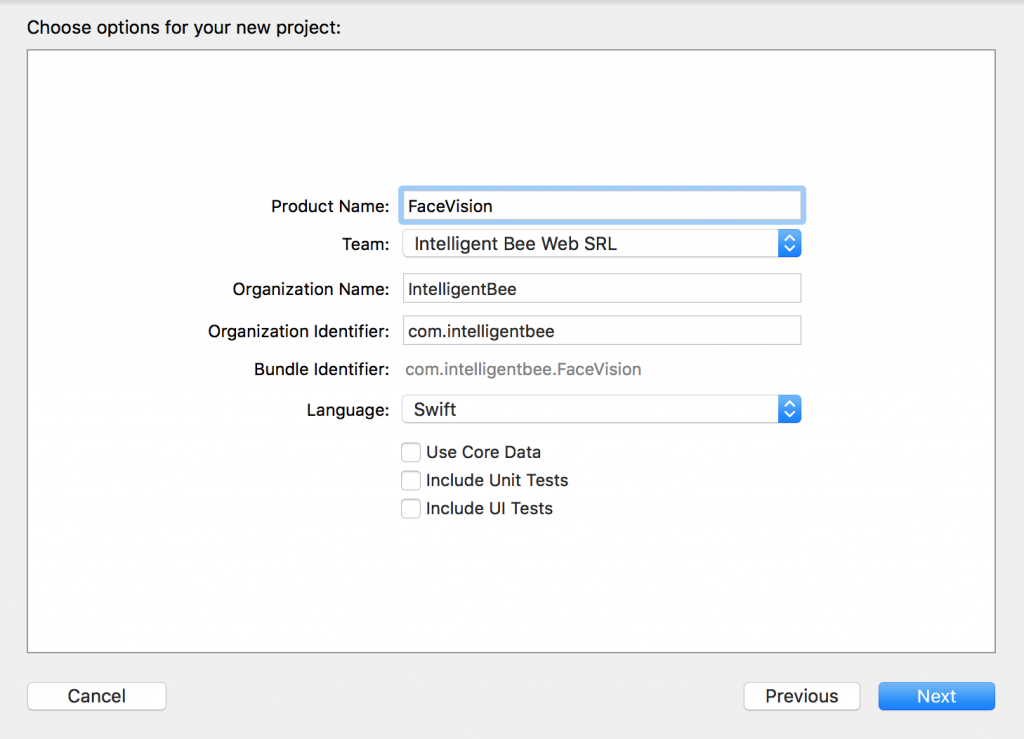
You will need Xcode 9 beta and a device running iOS 11 beta to test this. Let’s start by creating a new Single View App project named FaceVision:
Open the Main.storyboard and drag a button Take Photo to the center of it. Use the constraints to make it stay there :) Create a takePhoto action for it:
@IBAction func takePhoto(_ sender: UIButton) {
    let picker = UIImagePickerController()
    picker.delegate = self
    let alert = UIAlertController(title: nil, message: nil, preferredStyle: .actionSheet)
    if UIImagePickerController.isSourceTypeAvailable(.camera) {
        alert.addAction(UIAlertAction(title: "Camera", style: .default, handler: {action in
            picker.sourceType = .camera
            self.present(picker, animated: true, completion: nil)
        }))
    }
    alert.addAction(UIAlertAction(title: "Photo Library", style: .default, handler: { action in
        picker.sourceType = .photoLibrary
        // on iPad we are required to present this as a popover
        if UIDevice.current.userInterfaceIdiom == .pad {
            picker.modalPresentationStyle = .popover
            picker.popoverPresentationController?.sourceView = self.view
            picker.popoverPresentationController?.sourceRect = self.takePhotoButton.frame
        }
        self.present(picker, animated: true, completion: nil)
    }))
    alert.addAction(UIAlertAction(title: "Cancel", style: .cancel, handler: nil))
    // on iPad this is a popover
    alert.popoverPresentationController?.sourceView = self.view
    alert.popoverPresentationController?.sourceRect = takePhotoButton.frame
    self.present(alert, animated: true, completion: nil)
}
Here we used an UIImagePickerController to get an image so we have to make our ViewController implement the UIImagePickerControllerDelegate and UINavigationControllerDelegate protocols:
class ViewController: UIViewController, UIImagePickerControllerDelegate, UINavigationControllerDelegate {We also need an outlet for the button:
@IBOutlet weak var takePhotoButton: UIButton!
And an image var:
var image: UIImage!
We also need to add the following in the Info.plist to be able to access the camera and the photo library:
Privacy - Camera Usage Description: Access to the camera is needed in order to be able to take a photo to be analyzed by the appPrivacy - Photo Library Usage Description: Access to the photo library is needed in order to be able to choose a photo to be analyzed by the app
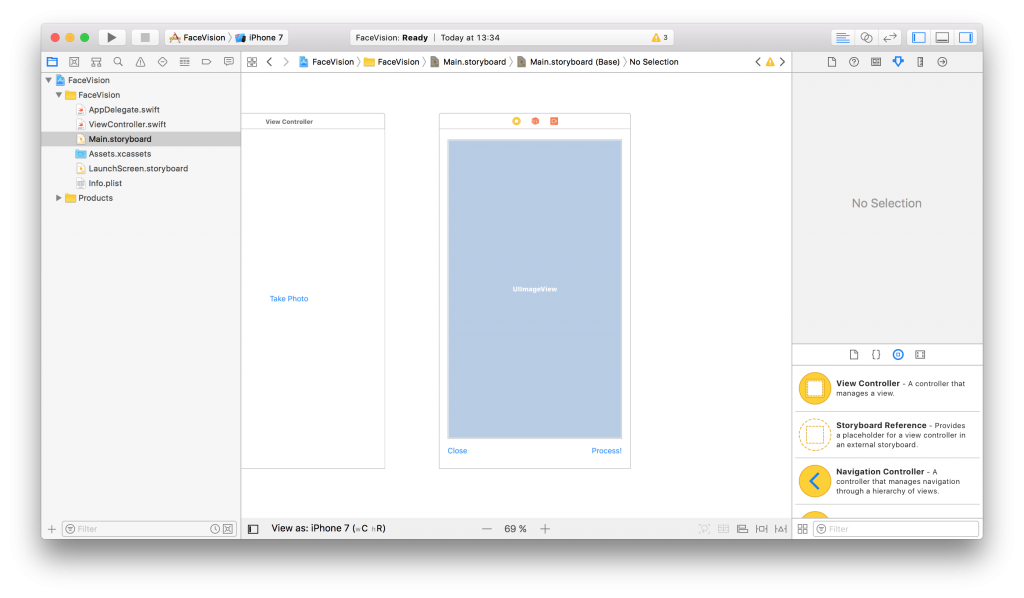
After the users chooses an image we will use another view controller to show it and to let the user start the processing or go back to the first screen. Add a new View Controller in the Main.storyboard. In it, add an Image View with an Aspect Fit Content Mode and two buttons like in the image below (don’t forget to use the necessary constraints):
Now, create a new UIViewController class named ImageViewControler.swift and set it to be the class of the new View Controller you just added in the Main.storyboard:
import UIKit

class ImageViewController: UIViewController {

    override func viewDidLoad() {
        super.viewDidLoad()

        // Do any additional setup after loading the view.
    }
}
Still in the Main.storyboard, create a Present Modally kind segue between the two view controllers with the showImageSegue identifier:

Also add an outlet for the Image View and a new property to hold the image from the user:
@IBOutlet weak var imageView: UIImageView!

var image: UIImage!
Now, back to our initial ViewController class, we need to present the new ImageViewController and set the selected image:
func imagePickerController(_ picker: UIImagePickerController, didFinishPickingMediaWithInfo info: [String : Any]) {
    dismiss(animated: true, completion: nil)
    image = info[UIImagePickerControllerOriginalImage] as! UIImage
    performSegue(withIdentifier: "showImageSegue", sender: self)
}

override func prepare(for segue: UIStoryboardSegue, sender: Any?) {
    if segue.identifier == "showImageSegue" {
        if let imageViewController = segue.destination as? ImageViewController {
            imageViewController.image = self.image
        }
    }
}
We also need an exit method to be called when we press the Close button from the Image View Controller:
@IBAction func exit(unwindSegue: UIStoryboardSegue) {
    image = nil
}
To make this work, head back to the Main.storyboard and Ctrl+drag from the Close button to the exit icon of the Image View Controller and select the exit method from the popup.
To actually show the selected image to the user we have to set it to the imageView:
override func viewDidLoad() {
    super.viewDidLoad()

    // Do any additional setup after loading the view.
    imageView.image = image
}
If you run the app now you should be able to select a photo either from the camera or from the library and it will be presented to you in the second view controller with the Close and Process! buttons below it.
![]()
Detect Face Features
It’s time to get to the fun part, detect the faces and faces features in the image.
Create a new process action for the Process! button with the following content:
@IBAction func process(_ sender: UIButton) {
    var orientation:Int32 = 0

    // detect image orientation, we need it to be accurate for the face detection to work
    switch image.imageOrientation {
    case .up:
        orientation = 1
    case .right:
        orientation = 6
    case .down:
        orientation = 3
    case .left:
        orientation = 8
    default:
        orientation = 1
    }

    // vision
    let faceLandmarksRequest = VNDetectFaceLandmarksRequest(completionHandler: self.handleFaceFeatures)
    let requestHandler = VNImageRequestHandler(cgImage: image.cgImage!, orientation: orientation ,options: [:])
    do {
        try requestHandler.perform([faceLandmarksRequest])
    } catch {
        print(error)
    }
}
After translating the image orientation from UIImageOrientation values to kCGImagePropertyOrientation values (not sure why Apple didn’t make them the same), the code will start the detection process from the Vision framework. Don’t forget to import Vision to have access to it’s API.
We’ll add now the method that will be called when the Vision’s processing is done:
func handleFaceFeatures(request: VNRequest, errror: Error?) {
    guard let observations = request.results as? [VNFaceObservation] else {
        fatalError("unexpected result type!")
    }

    for face in observations {
        addFaceLandmarksToImage(face)
    }
}
This also calls yet another method that does the actual drawing on the image based on the data received from the detect face landmarks request:
func addFaceLandmarksToImage(_ face: VNFaceObservation) {
UIGraphicsBeginImageContextWithOptions(image.size, true, 0.0)
let context = UIGraphicsGetCurrentContext()
// draw the image
image.draw(in: CGRect(x: 0, y: 0, width: image.size.width, height: image.size.height))
context?.translateBy(x: 0, y: image.size.height)
context?.scaleBy(x: 1.0, y: -1.0)
// draw the face rect
let w = face.boundingBox.size.width * image.size.width
let h = face.boundingBox.size.height * image.size.height
let x = face.boundingBox.origin.x * image.size.width
let y = face.boundingBox.origin.y * image.size.height
let faceRect = CGRect(x: x, y: y, width: w, height: h)
context?.saveGState()
context?.setStrokeColor(UIColor.red.cgColor)
context?.setLineWidth(8.0)
context?.addRect(faceRect)
context?.drawPath(using: .stroke)
context?.restoreGState()
// face contour
context?.saveGState()
context?.setStrokeColor(UIColor.yellow.cgColor)
if let landmark = face.landmarks?.faceContour {
for i in 0...landmark.pointCount - 1 { // last point is 0,0
let point = landmark.point(at: i)
if i == 0 {
context?.move(to: CGPoint(x: x + CGFloat(point.x) * w, y: y + CGFloat(point.y) * h))
} else {
context?.addLine(to: CGPoint(x: x + CGFloat(point.x) * w, y: y + CGFloat(point.y) * h))
}
}
}
context?.setLineWidth(8.0)
context?.drawPath(using: .stroke)
context?.saveGState()
// outer lips
context?.saveGState()
context?.setStrokeColor(UIColor.yellow.cgColor)
if let landmark = face.landmarks?.outerLips {
for i in 0...landmark.pointCount - 1 { // last point is 0,0
let point = landmark.point(at: i)
if i == 0 {
context?.move(to: CGPoint(x: x + CGFloat(point.x) * w, y: y + CGFloat(point.y) * h))
} else {
context?.addLine(to: CGPoint(x: x + CGFloat(point.x) * w, y: y + CGFloat(point.y) * h))
}
}
}
context?.closePath()
context?.setLineWidth(8.0)
context?.drawPath(using: .stroke)
context?.saveGState()
// inner lips
context?.saveGState()
context?.setStrokeColor(UIColor.yellow.cgColor)
if let landmark = face.landmarks?.innerLips {
for i in 0...landmark.pointCount - 1 { // last point is 0,0
let point = landmark.point(at: i)
if i == 0 {
context?.move(to: CGPoint(x: x + CGFloat(point.x) * w, y: y + CGFloat(point.y) * h))
} else {
context?.addLine(to: CGPoint(x: x + CGFloat(point.x) * w, y: y + CGFloat(point.y) * h))
}
}
}
context?.closePath()
context?.setLineWidth(8.0)
context?.drawPath(using: .stroke)
context?.saveGState()
// left eye
context?.saveGState()
context?.setStrokeColor(UIColor.yellow.cgColor)
if let landmark = face.landmarks?.leftEye {
for i in 0...landmark.pointCount - 1 { // last point is 0,0
let point = landmark.point(at: i)
if i == 0 {
context?.move(to: CGPoint(x: x + CGFloat(point.x) * w, y: y + CGFloat(point.y) * h))
} else {
context?.addLine(to: CGPoint(x: x + CGFloat(point.x) * w, y: y + CGFloat(point.y) * h))
}
}
}
context?.closePath()
context?.setLineWidth(8.0)
context?.drawPath(using: .stroke)
context?.saveGState()
// right eye
context?.saveGState()
context?.setStrokeColor(UIColor.yellow.cgColor)
if let landmark = face.landmarks?.rightEye {
for i in 0...landmark.pointCount - 1 { // last point is 0,0
let point = landmark.point(at: i)
if i == 0 {
context?.move(to: CGPoint(x: x + CGFloat(point.x) * w, y: y + CGFloat(point.y) * h))
} else {
context?.addLine(to: CGPoint(x: x + CGFloat(point.x) * w, y: y + CGFloat(point.y) * h))
}
}
}
context?.closePath()
context?.setLineWidth(8.0)
context?.drawPath(using: .stroke)
context?.saveGState()
// left pupil
context?.saveGState()
context?.setStrokeColor(UIColor.yellow.cgColor)
if let landmark = face.landmarks?.leftPupil {
for i in 0...landmark.pointCount - 1 { // last point is 0,0
let point = landmark.point(at: i)
if i == 0 {
context?.move(to: CGPoint(x: x + CGFloat(point.x) * w, y: y + CGFloat(point.y) * h))
} else {
context?.addLine(to: CGPoint(x: x + CGFloat(point.x) * w, y: y + CGFloat(point.y) * h))
}
}
}
context?.closePath()
context?.setLineWidth(8.0)
context?.drawPath(using: .stroke)
context?.saveGState()
// right pupil
context?.saveGState()
context?.setStrokeColor(UIColor.yellow.cgColor)
if let landmark = face.landmarks?.rightPupil {
for i in 0...landmark.pointCount - 1 { // last point is 0,0
let point = landmark.point(at: i)
if i == 0 {
context?.move(to: CGPoint(x: x + CGFloat(point.x) * w, y: y + CGFloat(point.y) * h))
} else {
context?.addLine(to: CGPoint(x: x + CGFloat(point.x) * w, y: y + CGFloat(point.y) * h))
}
}
}
context?.closePath()
context?.setLineWidth(8.0)
context?.drawPath(using: .stroke)
context?.saveGState()
// left eyebrow
context?.saveGState()
context?.setStrokeColor(UIColor.yellow.cgColor)
if let landmark = face.landmarks?.leftEyebrow {
for i in 0...landmark.pointCount - 1 { // last point is 0,0
let point = landmark.point(at: i)
if i == 0 {
context?.move(to: CGPoint(x: x + CGFloat(point.x) * w, y: y + CGFloat(point.y) * h))
} else {
context?.addLine(to: CGPoint(x: x + CGFloat(point.x) * w, y: y + CGFloat(point.y) * h))
}
}
}
context?.setLineWidth(8.0)
context?.drawPath(using: .stroke)
context?.saveGState()
// right eyebrow
context?.saveGState()
context?.setStrokeColor(UIColor.yellow.cgColor)
if let landmark = face.landmarks?.rightEyebrow {
for i in 0...landmark.pointCount - 1 { // last point is 0,0
let point = landmark.point(at: i)
if i == 0 {
context?.move(to: CGPoint(x: x + CGFloat(point.x) * w, y: y + CGFloat(point.y) * h))
} else {
context?.addLine(to: CGPoint(x: x + CGFloat(point.x) * w, y: y + CGFloat(point.y) * h))
}
}
}
context?.setLineWidth(8.0)
context?.drawPath(using: .stroke)
context?.saveGState()
// nose
context?.saveGState()
context?.setStrokeColor(UIColor.yellow.cgColor)
if let landmark = face.landmarks?.nose {
for i in 0...landmark.pointCount - 1 { // last point is 0,0
let point = landmark.point(at: i)
if i == 0 {
context?.move(to: CGPoint(x: x + CGFloat(point.x) * w, y: y + CGFloat(point.y) * h))
} else {
context?.addLine(to: CGPoint(x: x + CGFloat(point.x) * w, y: y + CGFloat(point.y) * h))
}
}
}
context?.closePath()
context?.setLineWidth(8.0)
context?.drawPath(using: .stroke)
context?.saveGState()
// nose crest
context?.saveGState()
context?.setStrokeColor(UIColor.yellow.cgColor)
if let landmark = face.landmarks?.noseCrest {
for i in 0...landmark.pointCount - 1 { // last point is 0,0
let point = landmark.point(at: i)
if i == 0 {
context?.move(to: CGPoint(x: x + CGFloat(point.x) * w, y: y + CGFloat(point.y) * h))
} else {
context?.addLine(to: CGPoint(x: x + CGFloat(point.x) * w, y: y + CGFloat(point.y) * h))
}
}
}
context?.setLineWidth(8.0)
context?.drawPath(using: .stroke)
context?.saveGState()
// median line
context?.saveGState()
context?.setStrokeColor(UIColor.yellow.cgColor)
if let landmark = face.landmarks?.medianLine {
for i in 0...landmark.pointCount - 1 { // last point is 0,0
let point = landmark.point(at: i)
if i == 0 {
context?.move(to: CGPoint(x: x + CGFloat(point.x) * w, y: y + CGFloat(point.y) * h))
} else {
context?.addLine(to: CGPoint(x: x + CGFloat(point.x) * w, y: y + CGFloat(point.y) * h))
}
}
}
context?.setLineWidth(8.0)
context?.drawPath(using: .stroke)
context?.saveGState()
// get the final image
let finalImage = UIGraphicsGetImageFromCurrentImageContext()
// end drawing context
UIGraphicsEndImageContext()
imageView.image = finalImage
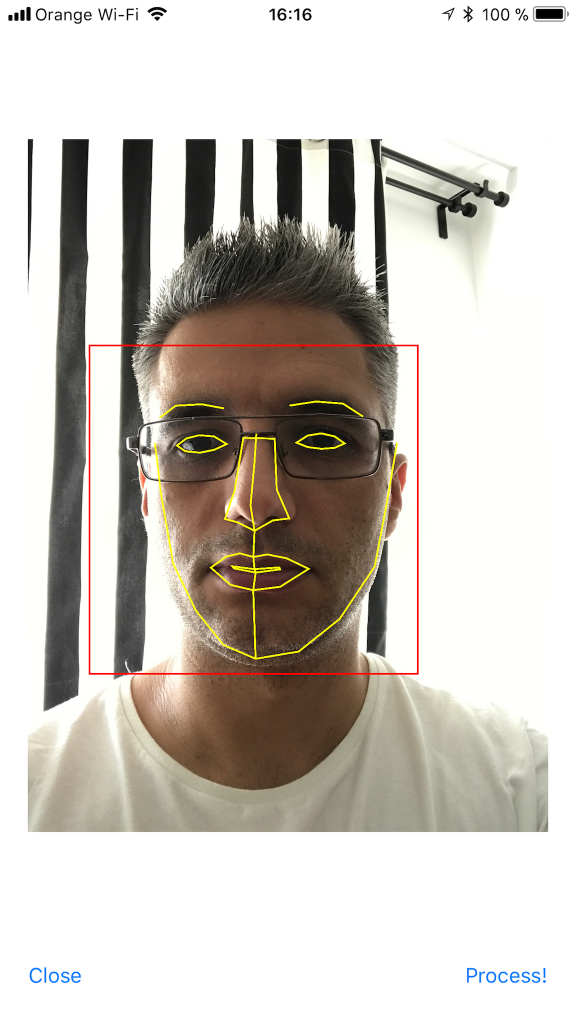
}As you can see we have quite a lot of features that Vision is able to identify: the face contour, the mouth (both inner and outer lips), the eyes together with the pupils and eyebrows, the nose and the nose crest and, finally, the median line of the faces.
You can now run the app and take some unusual selfies of yourself. Here’s mine:
I hope you enjoyed this, please let me know in the comments how did it go and if there are things that can be improved. Also, some pictures taken with the app wouldn’t hurt at all :)
You can get the code from here: https://github.com/intelligentbee/FaceVision
Thanks!

Building a Travel Photo Sharing iOS App
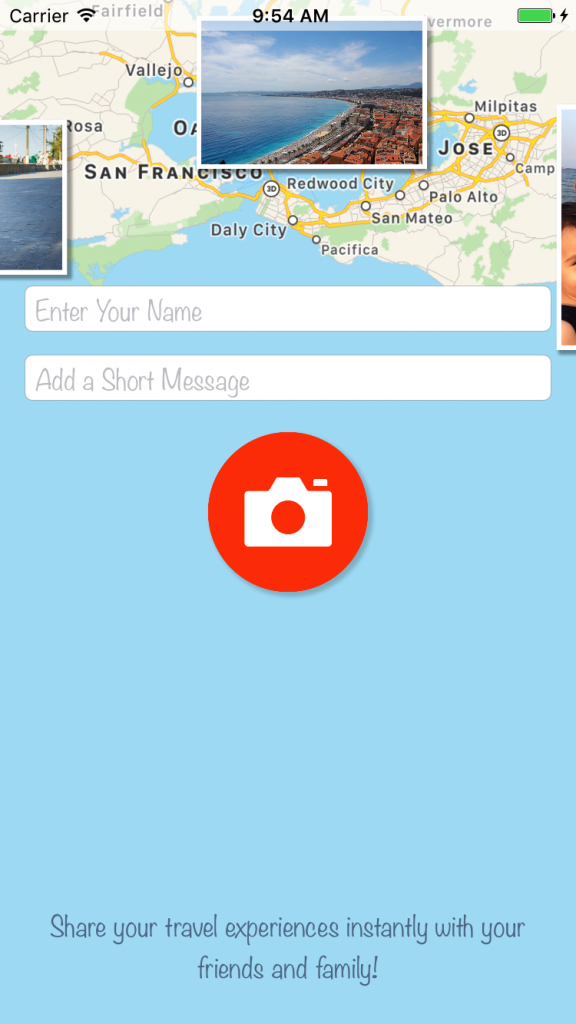
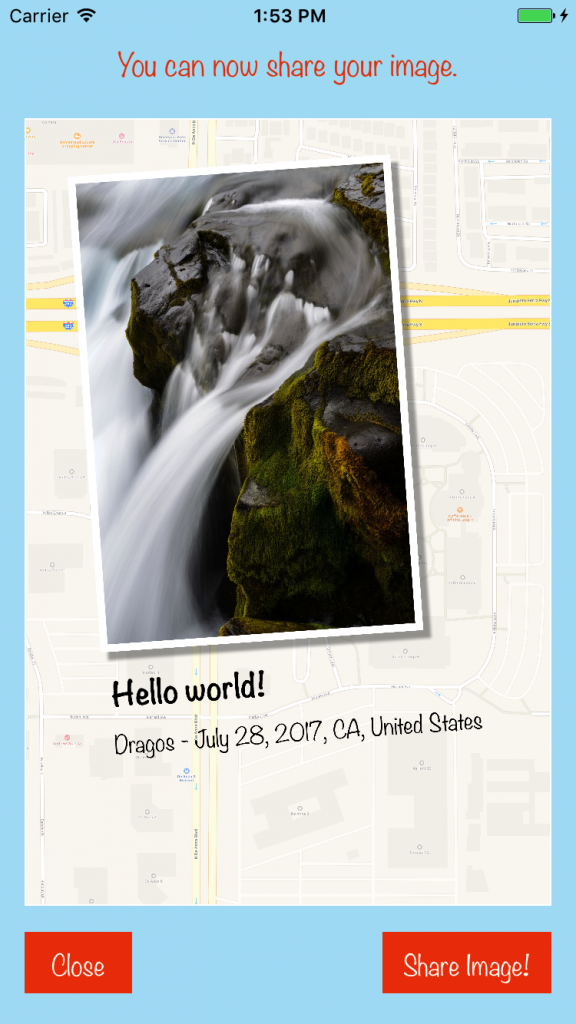
Hello! I want to show you how to build a relative simple photo sharing app with a twist: your images will be placed on a map background of your current location. You will also be able to add a short message and your name, to end up with an image looking like this (so you can brag to your friends with what you visited in the awesome vacation you have):

To follow this tutorial you need an Apple computer with xCode installed and an Apple developer account.
Create the Project
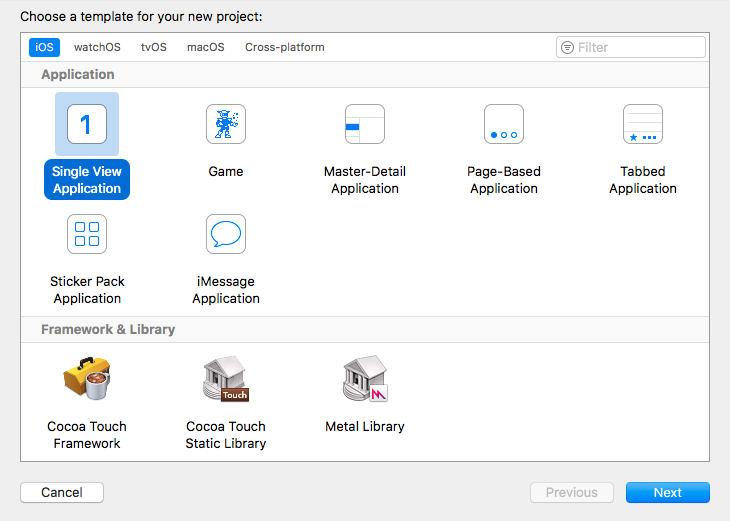
Open xCode and create a new project named PicTravel. Choose the Single View Application template:
Give the project a name, we chose PicTravel but you ca choose what other name you like. Also fill in the organization name and the organization identifier for your project:
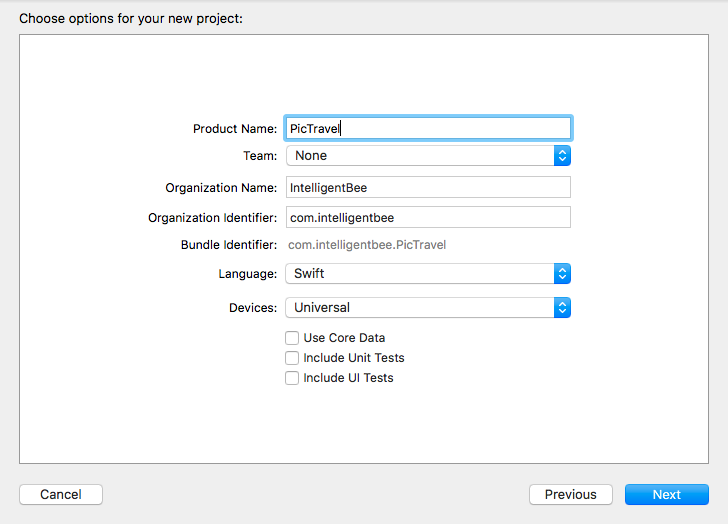
The last step is to save the newly created project in your Developer folder.
Building the Interface
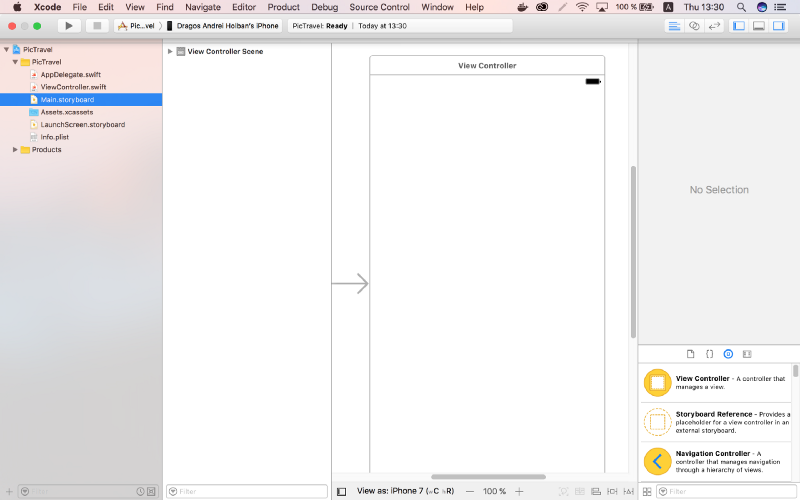
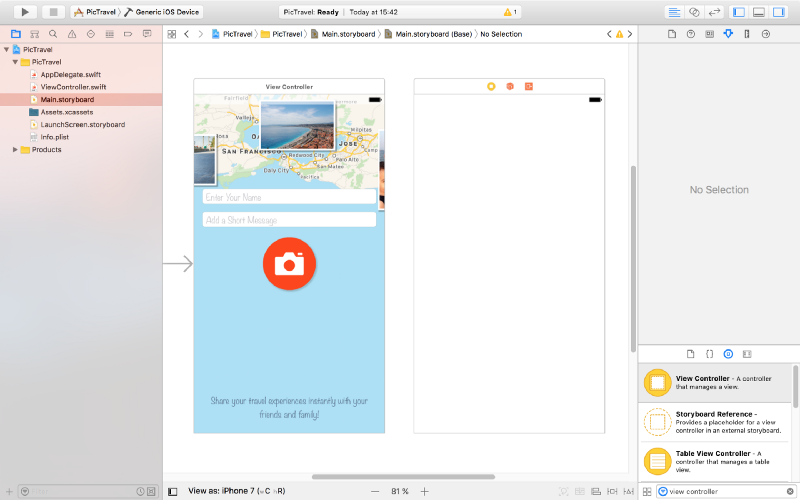
From the left panel, open the Main.storyboard. This is where we will build our app interface.
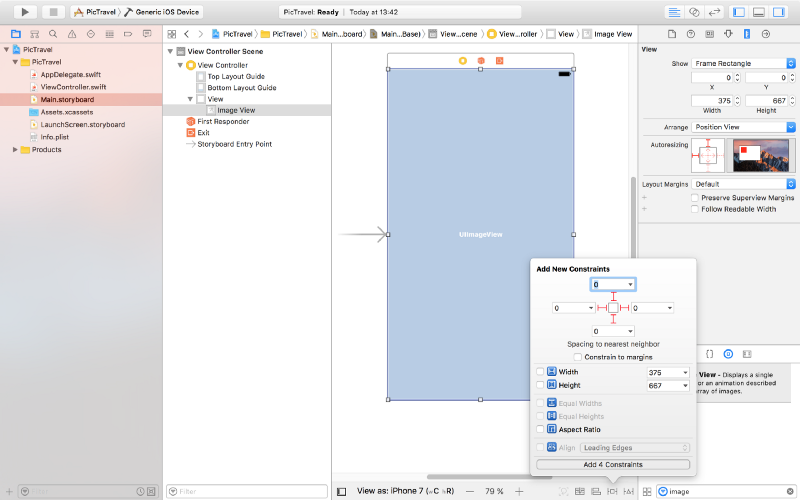
From the right panel, the bottom part, drag an ImageView and place it in the center of the scene. Resize it so it covers everything (snap it to the blue lines that appear).
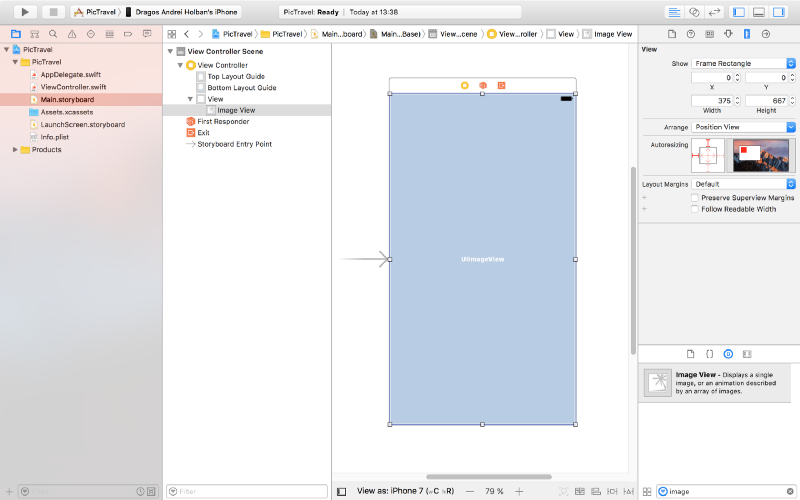
Pin the ImageView to the scene margins using the constraints dialog like you see in the image below:
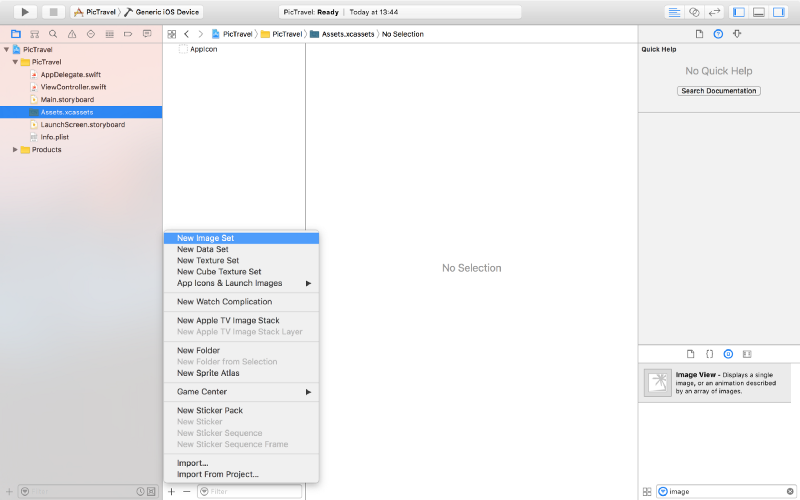
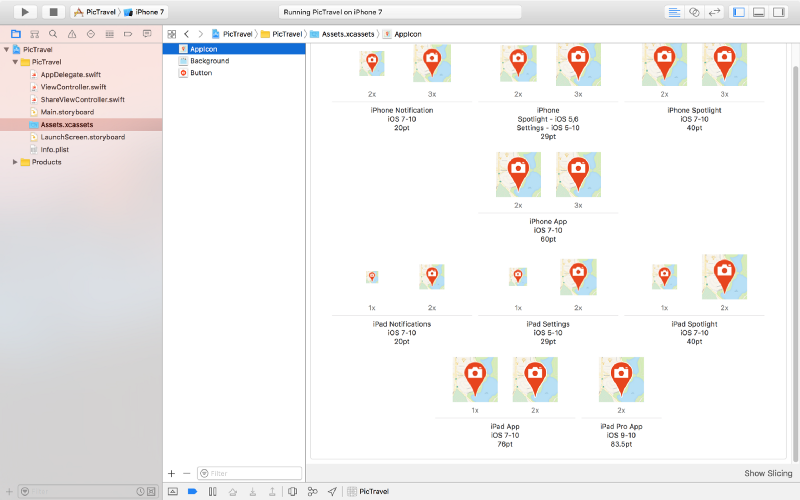
We will use this to put a background image for our app’s main screen. Download the background image from here then open the Assets.xcassets item from the left panel, click on the “+” button from the bottom and add a new image set named Background.
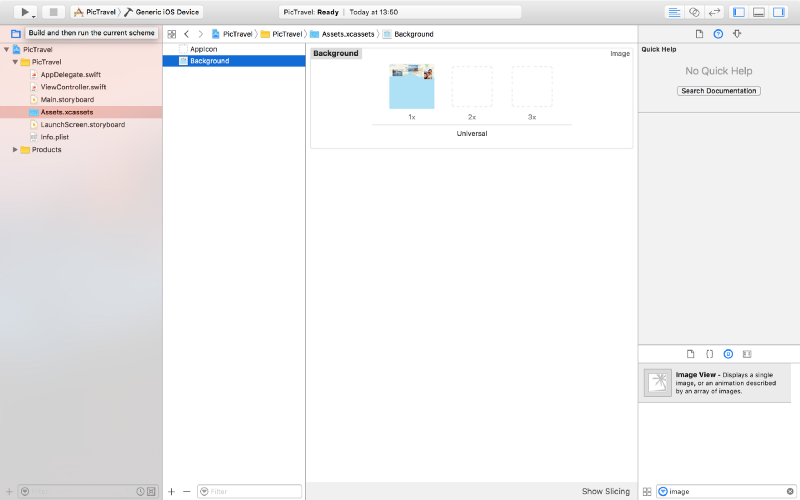
Drag the downloaded image to the “1x” placeholder to end up with something like this (we will not use the “2x” and “3x” placeholder for this tutorial, but you can add bigger resolution images to it if you want).
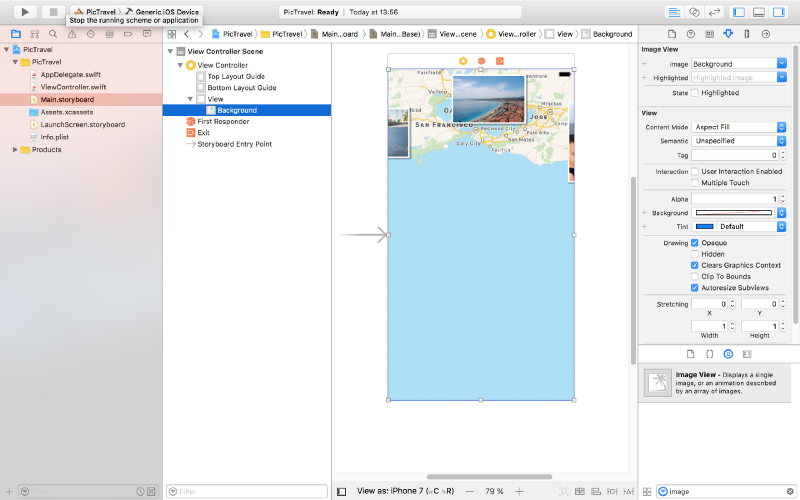
Now, back to the Main.storyboard, select the ImageView and, from the Attributes Inspector, select the Background image and set the Content Mode to Aspect Fill.
It’s time to add a new image to our assets that we will use for the take a photo button we are about to add. Download the image from here, create a new Image Set named Button in the Assets.xcassets and drag the image into the 1x placeholder like we did earlier with the background.
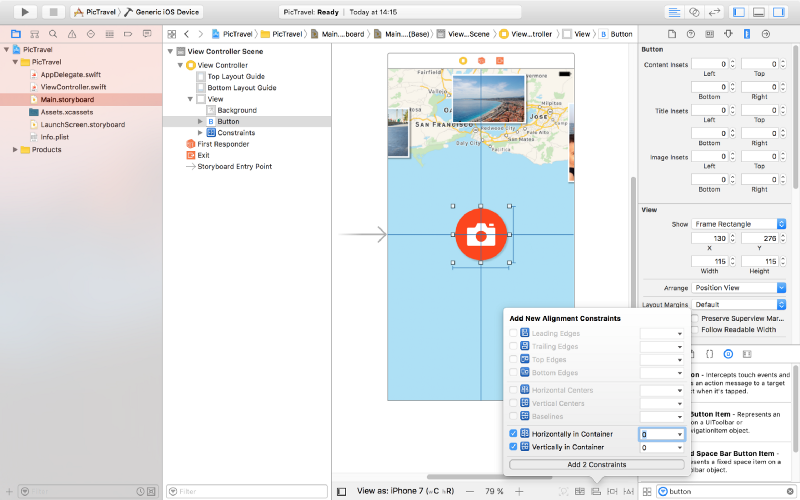
Next, in the Main.storybord, drag a button to the center of the scene. Set it’s Type to Custom, clear the Title and set the Background to the Button image we just created. From the Size Inspector, set the button with and height to 115.
Add two new constraints for the button’s with and heigh (115 each), then, from the Alignment Constriants, align the button horizontally and vertically in the container.
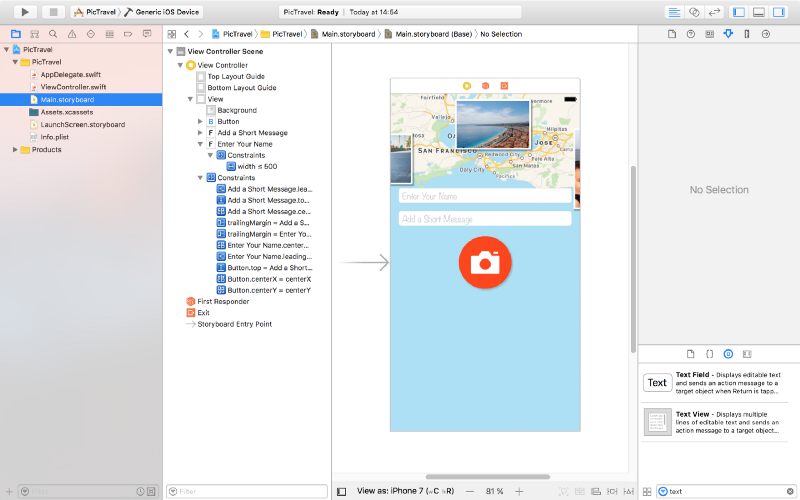
Now let’s add two text fields for the user’s name and message. Place them like in the image below, with the constraints listed below. Don’t forget the blue guides that make the placement easier for you. To create constrains between two elements you can Ctrl+drag from one to another and select the type of constraint you want from the popup that appears.
For the message text field:
- Top Space to the name text field:
15 - Bottom Space to the button:
15 - Width <=
500 - Align Center X to superview
- Trailing Space to superview:
0with a Priority of900- that’s very important as it will keep the text field pinned to the margin on iPhones but on bigger devices the width constraint will be stronger so it will not grow larger than 500. - Leading Space to superview:
0with a Priority of900
For the name field:
- Bottom Space to the message text field:
15 - Width <=
500 - Align Center X to superview
- Trailing Space to superview:
0with a Priority of900 - Leading Space to superview:
0with a Priority of900
Set the placeholders for each of the text fields to “Enter Your Name” and “Add a Short Message” so the user knows what to do. Set the Font to Noteworthy Light with a size of 17 for both.
Also, for the name field set the Capitalization to Words, Correction and SpellChecking, both to No. For the message field set the Capitalization to Sentences.
Here’s the result:
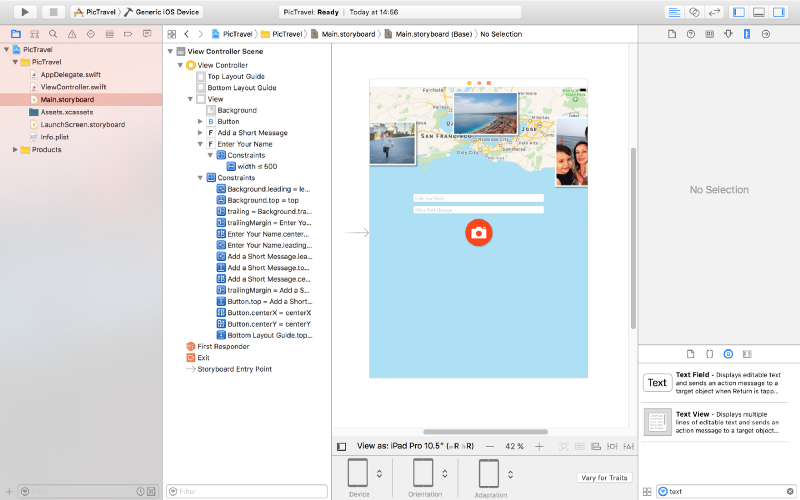
And here’s how it looks on an iPad (you can use the bottom bar under the scene to select on what device you want to preview the interface):
There are two more small elements to add and our main screen will be finished.
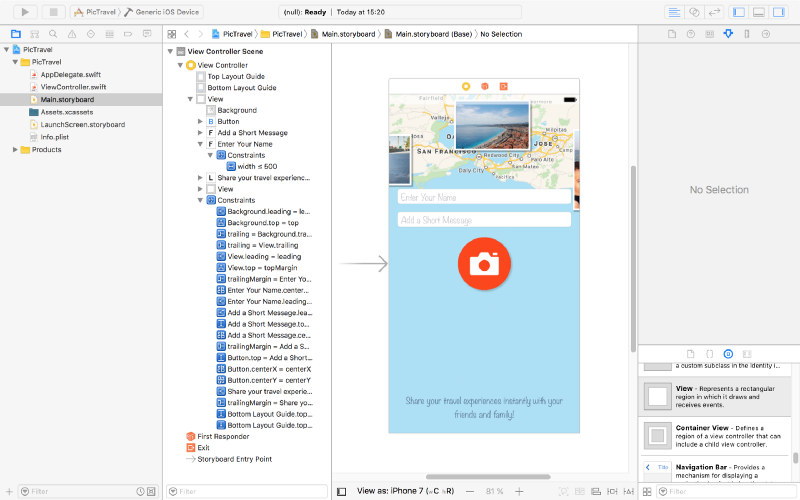
Add a label at the bottom with the following text: “Share your travel experiences instantly with your friends & family!”. Set it’s Font to Noteworthly Light 17, Alignment to center, Color to #5E7A96 and Lines to 0. Use the following constrains:
- Trailing Space to superview’s margins:
0 - Leading Space to superview’s margins:
0 - Bottom Space to Bottom Layout:
20 - Height:
64
Finally, add a new view at the top, having a white background with a opacity of 60%. Constrains used are:
- Trailing Space to superview:
0 - Leading Space to superview:
0 - Bottom Space to Top Layout:
20 - Height:
20
Here is the final design:
We will use this screen to get the user’s name and message and open the camera or photo library to take a photo. But after we gel all we need from the user, we need a new screen to show the final image and let him share it. So let’s add a new screen to our app.
From the Object Library, drag a new View Controller near the first one:
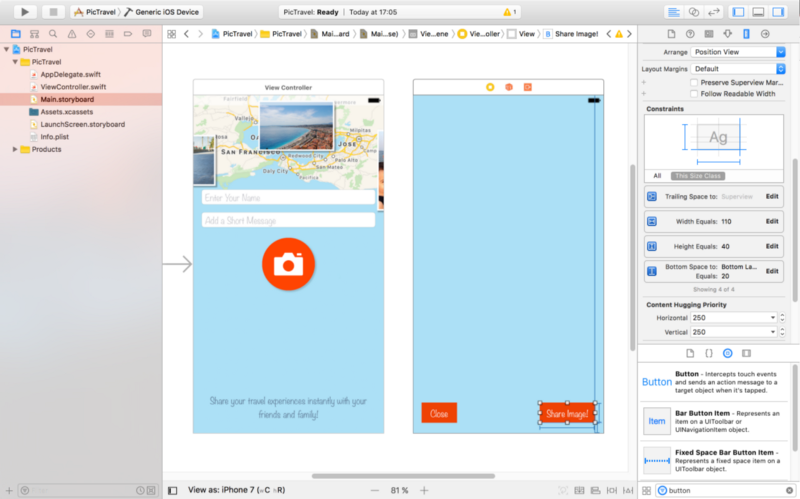
Set the background for the view of this new View Controller to #ACE0F6.
Next, add two buttons like in the image below. Type is custom, background color is #EE4205, font Noteworthy Light 17. Height 40, width 70 and 110. They are pinned to the bottom layout + 20, left or right of the container and also have constraints on with and height.
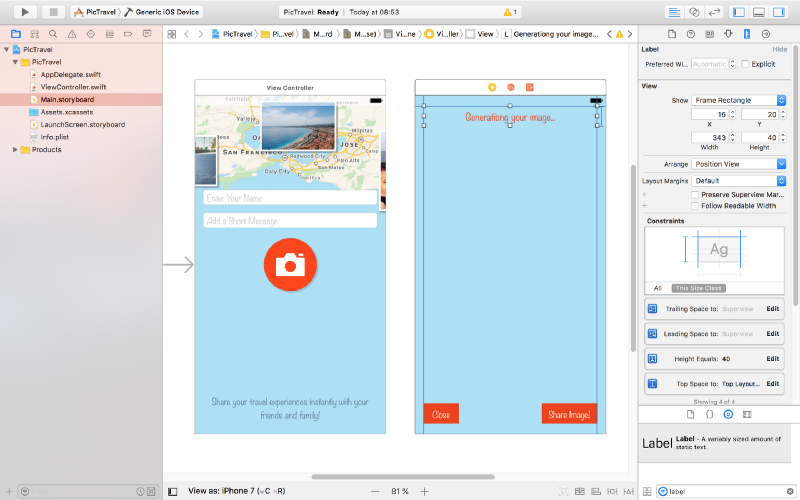
At the top, add a label to show the current status of the app to the user. Pin it to the top, left and right margins using constrains with a height of 40. Set the font to Noteworthy Light 19 and color to #EE4205. The initial text will be “Generating your image…” center aligned.
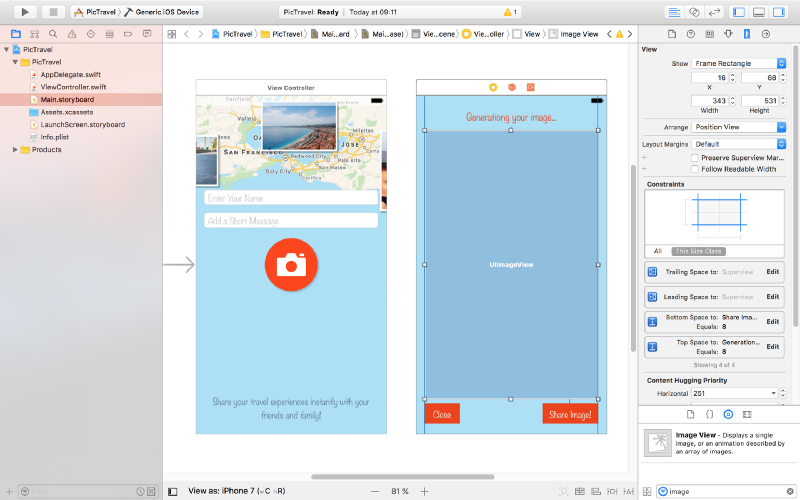
To show the generated image we need an Image View. Drag it to the center of the second screen and create the following constraints for it:
- Top Space to “Generating your image…” label:
8 - Bottom Space to “Share Image!” button:
8 - Leading Space to superview margin:
0 - Trailing Space to superview margin:
0
Also set it’s Content Mode to Aspect Fit
The last piece of the puzzle is an Activity Indicator View that we will use to visually inform the user that something happens behind the scenes (final image generation) and he has to wait for a few seconds.
Drag it from the Object Library and place it in the middle of the screen. Add constraints to center it horizontally and vertically in the container and set its Behavior to Animating and Hides When Stopped.
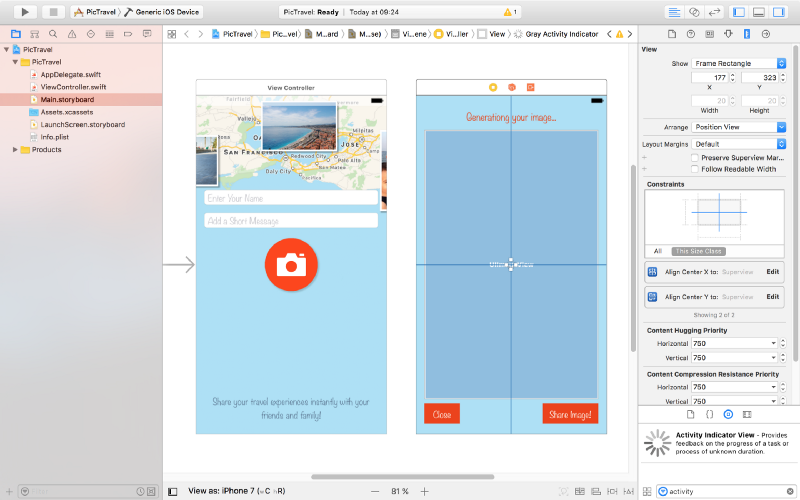
That’s it, our app’s interface is done. Run the app in the simulator to see how it looks.
Now it’s time to write some code.
Taking a Photo
With the main.storyboard still open, select the button from the first screen then open the Assistant editor and be sure you have the ViewController.swit file open on the right side. Use the manual mode if you have in case the Assistant editor has a problem figuring this out.
Now, Ctrl+drag from the button to the code to create a new action (be sure to select Action as the Connection , set the Name to selectPhotoClicked and the Type to UIButton):
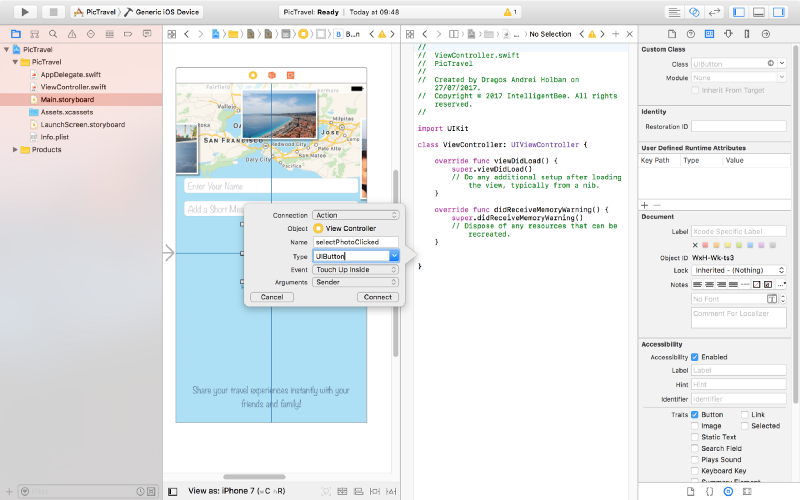
@IBAction func selectPhotoClicked(_ sender: UIButton) {

}
Also Ctrl+drag from the two text fields and the button to the code and create three outlets:
@IBOutlet weak var name: UITextField!
@IBOutlet weak var message: UITextField!
@IBOutlet weak var selectPhotoButton: UIButton!
Now let’s start with the most interesting part, choosing a photo. The user will be given a choice to take a photo using the camera or to choose one from the photo library. For this we will use an action sheet.
Edit the selectPhotoClicked method to add the code for this:
@IBAction func selectPhotoClicked(_ sender: UIButton) {
    let picker = UIImagePickerController()
    picker.delegate = self
    let alert = UIAlertController(title: nil, message: nil, preferredStyle: .actionSheet)
    alert.addAction(UIAlertAction(title: "Camera", style: .default, handler: {action in
        picker.sourceType = .camera
        self.present(picker, animated: true, completion: nil)
    }))
    alert.addAction(UIAlertAction(title: "Photo Library", style: .default, handler: { action in
        picker.sourceType = .photoLibrary
        self.present(picker, animated: true, completion: nil)
    }))
    alert.addAction(UIAlertAction(title: "Cancel", style: .cancel, handler: nil))
    self.present(alert, animated: true, completion: nil)
}
To make this code work we need to make our ViewController a delegate for both UIImagePickerControllerDelegate and UINavigationControllerDelegate. To do this change the line defining the ViewController class to the following:
class ViewController: UIViewController, UIImagePickerControllerDelegate, UINavigationControllerDelegate {If you test now the app will crash with an error like “This app has crashed because it attempted to access privacy-sensitive data without a usage description…”. That’s because the app has to ask the user’s permission to access the photo library or the camera and we have to provide a reason for this, reason that will be presented to the user. To do this open the Info.plist file and add a two new items:
Privacy - Photo Library Usage Descriptionwith a string value ofAccess to the photo library is needed in order to be able to choose a photo to be shared by the app.Privacy - Camera Usage Descriptionwith a string value ofAccess to the camera is needed in order to be able to take a photo to be shared by the app.
Also, if you try to choose the “camera” option in the simulator, the app will crash again because the simulator has no camera (“Source type 1 not available”). We need to add a test for this and only present the option if the camera is available:
if UIImagePickerController.isSourceTypeAvailable(.camera) {
    alert.addAction(UIAlertAction(title: "Camera", style: .default, handler: {action in
        picker.sourceType = .camera
        self.present(picker, animated: true, completion: nil)
    }))
}
One more thing to fix before we start handling the actual images: try to run the app on an iPad (in the simulator or on a real device). The app crashes one more time :(
Your application has presented a UIAlertController of style UIAlertControllerStyleActionSheet. The modalPresentationStyle of a UIAlertController with this style is UIModalPresentationPopover. You must provide location information for this popover through the alert controller’s popoverPresentationController. You must provide either a sourceView and sourceRect or a barButtonItem. If this information is not known when you present the alert controller, you may provide it in the UIPopoverPresentationControllerDelegate method -prepareForPopoverPresentation.
That’s because the UIAlertController on an iPad is presented like a popover (UIModalPresentationPopover) and it needs a position to be shown at. To do this we will have to test if we have a popoverPresentationController in the alert and, if true, set it’s sourceView and sourceRect (we are using an Swift optional for this, as the code after the question mark will be executed only if the popoverPresentationController is not nil):
alert.addAction(UIAlertAction(title: "Cancel", style: .cancel, handler: nil))
// on iPad this is a popover
alert.popoverPresentationController?.sourceView = self.view
alert.popoverPresentationController?.sourceRect = selectPhotoButton.frame
self.present(alert, animated: true, completion: nil)
We also need to make the photo selection from the library to be shown as a popover on an iPad:
alert.addAction(UIAlertAction(title: "Photo Library", style: .default, handler: { action in
    picker.sourceType = .photoLibrary
    // on iPad we are required to present this as a popover
    if UIDevice.current.userInterfaceIdiom == .pad {
        picker.modalPresentationStyle = .popover
        picker.popoverPresentationController?.sourceView = self.view
        picker.popoverPresentationController?.sourceRect = self.selectPhotoButton.frame
    }
    self.present(picker, animated: true, completion: nil)
}))
Now everything should be fine. Let’s see how to handle the image the user chooses.
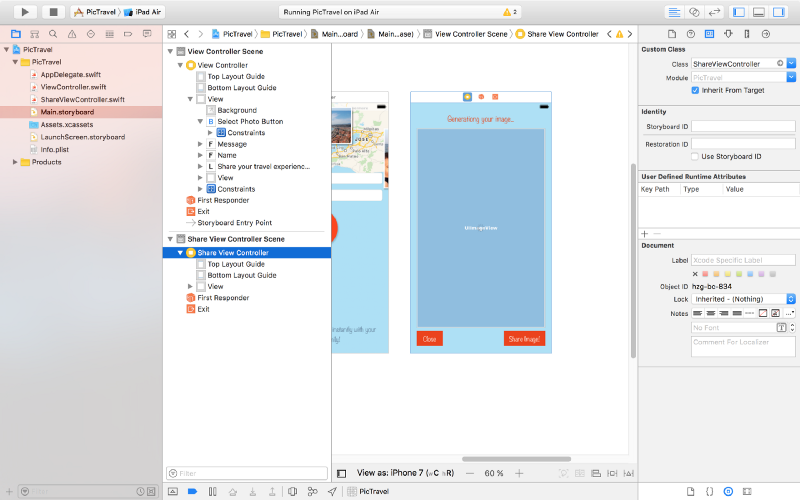
We already added a View Controller in the Main.storyboard to show the final image to the user but we need an associated view controller class for it so we have a place to write the code involved in the process.
From the File menu select New -> File… then choose the Cocoa Touch Class option and click Next. Name the new class ShareViewController and be sure to set it as a subclass of UIViewController, no XIB, Swift language.
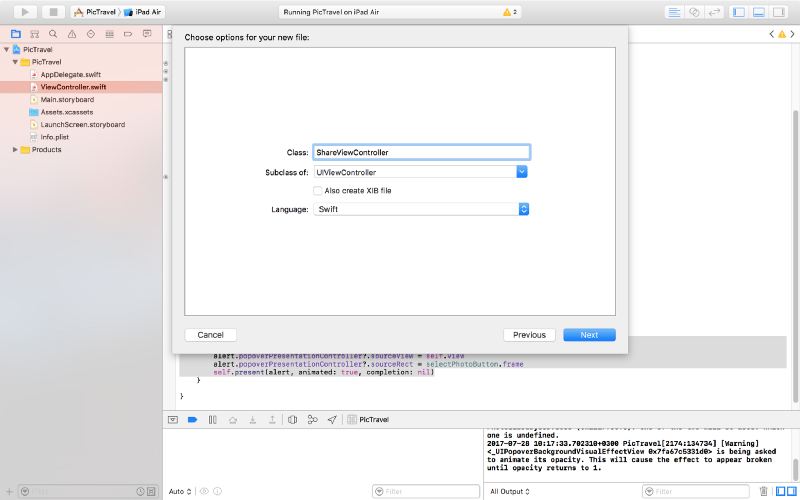
Click Next one more time and be sure to have the PicTravel Group selected and PicTravel target checked. Then Create the file.
Go back to the Main.storyboard and select the second view controller and set it’s class to the new ShareViewController we just created (you can do this from the Identity inspector, the Class dropdown).
Now, with the view controller still selected, open the assistant editor and make sure it is set to automatically open the associated file. This should be the ShareViewController class. Ctrl+drag from the Image View, Activity Indicator and the Label to the class to create outlets for them:
@IBOutlet weak var imageView: UIImageView!
@IBOutlet weak var activityIndicator: UIActivityIndicatorView!
@IBOutlet weak var titleLabel: UILabel!

Also add some new variables for the user’s image, name and message:
var image: UIImage!
var name: String!
var message: String!
So, here’s what we will do next: when the user chooses an image, we instantiate the ShareViewController, set its image, name and message properties to the user’s data then present the ShareViewController.
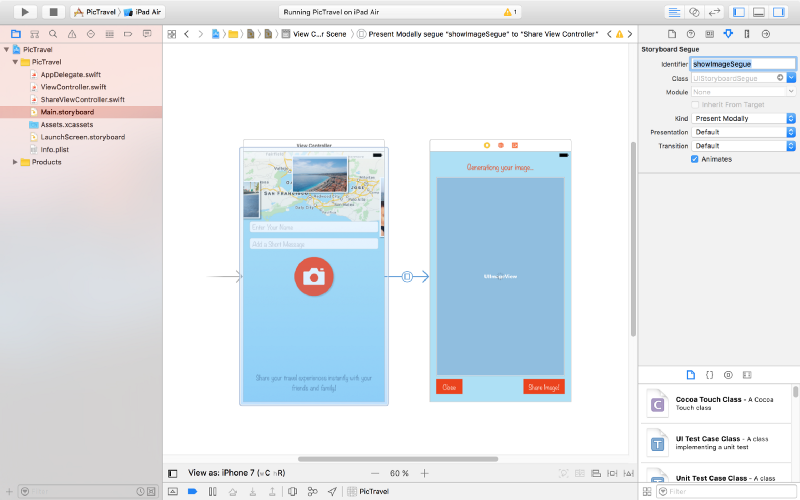
To do this we need to create a segue (transition). Close the assistant editor then, in the Main.storyboard, Ctrl+drag from the first “View Controller” (click on the yellow symbol from the top-right) to the “Share View Controller” and define a “Present Modally” segue. then click on the created segue and set it’s identifier to showImageSegue (we will need this later in the code to identify this specific segue).
Now open our ViewController class. Add a new method to be called when the user selects an image (this is part of the UIImagePickerControllerDelegate):
func imagePickerController(_ picker: UIImagePickerController, didFinishPickingMediaWithInfo info: [String : Any]) {
    dismiss(animated: true, completion: nil)
    image = info[UIImagePickerControllerOriginalImage] as! UIImage
    performSegue(withIdentifier: "showImageSegue", sender: self)
}
Here’s what this method does:
- dismiss the image picker controller
- get the image in a class variable
- present the ShareViewController by performing the
showImageSeguesegue
For this we need a new image variable to be defined in our ViewController class:
var image: UIImage!
To send the data to the ShareViewController, we will use a method that is called just before the segue to the new view controller happens:
override func prepare(for segue: UIStoryboardSegue, sender: Any?) {
    if segue.identifier == "showImageSegue" {
        if let shareViewController = segue.destination as? ShareViewController {
            shareViewController.image = self.image
            shareViewController.name = name.text ?? ""
            shareViewController.message = message.text ?? ""
        }
    }
}
Now run the app. After the user selects an image, the second view controller should be presented to the user. But… we have no way to close it. Let’s do this next.
Still in the ViewController, create an action that will be called when the ShareViewController will exit (here we will also set the image to nil to free the memory because we don’t need it anymore):
@IBAction func exit(unwindSegue: UIStoryboardSegue) {
    image = nil
}
Back to the Main.storyboard, Ctrl+drag from the Close button to the exit symbol from the top-right of the ShareViewController and select the exit method when prompted.
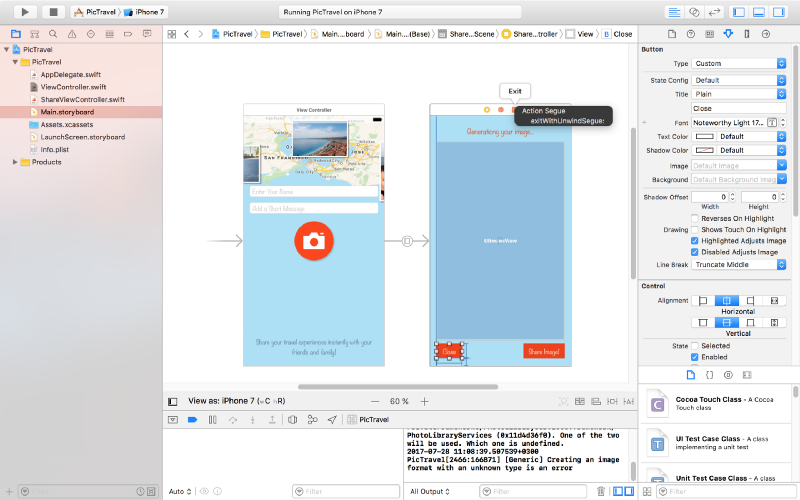
This should solve our problem of closing the second screen.
Let’s get now to the main objective of our app: get the user’s location, generate a map image and put the photo the user selected on top of it together with the name, location and message.
To continue, add some constants to the ShareViewController class that will be used in the code that follows:
// some constants used to generate the final image
let finalImageMaxDimension: CGFloat = 2048
let finalImageBorderWidth: CGFloat = 4
let userImageMaxDimension: CGFloat = 1200
let userImageBorderWidth: CGFloat = 20
let userImageX: CGFloat = 100
let userImageY: CGFloat = 160
let mapRegionDistance: CLLocationDistance = 600
let rotateContentByDegrees: CGFloat = -4
let userMessageMaxLength = 100
let textMargin: CGFloat = 280
let userMessageTopMargin: CGFloat = 60
let userNameTopMargin: CGFloat = 80
let userNameHeight: CGFloat = 120
Getting Current User Location
First we need to add a new key to Info.plist, Privacy - Location When In Use Usage Description with the value of Current location is needed to generate a map image of your location.
Now we need to import CoreLocation into our ShareViewController:
import UIKit
import CoreLocation
Declare a new locationManager variable:
var locationManager:CLLocationManager!
Add a new method that will start the process of finding the user location:
func getCurrentLocation() {
    locationManager = CLLocationManager()
    locationManager.delegate = self
    locationManager.desiredAccuracy = kCLLocationAccuracyNearestTenMeters
    locationManager.requestWhenInUseAuthorization()
    if (CLLocationManager.authorizationStatus() == .denied) {
        showError(title: "Location Access Denied", message: "The location permission was not authorized. Please enable it in Privacy Settings to allow the app to get your location and generate a map image based on that.")
    }

    if CLLocationManager.locationServicesEnabled() {
        locationManager.startUpdatingLocation()
    }
}
For this to work we need to implement the CLLocationManagerDelegate protocol:
class ShareViewController: UIViewController, CLLocationManagerDelegate {We also need to define the showError function:
func showError(title: String, message: String)
{
    let alert = UIAlertController(title: title, message: message, preferredStyle: .alert)
    let action = UIAlertAction(title: "OK", style: .default, handler: { _ in
        self.dismiss(animated: true, completion: nil)
    })
    alert.addAction(action)

    present(alert, animated: true, completion: nil)
}
Now implement the method of the CLLocationManagerDelegate protocol that is called when we get a location update:
func locationManager(_ manager: CLLocationManager, didUpdateLocations locations: [CLLocation]) {
    let location = locations[0]
    manager.stopUpdatingLocation()

    // get city & country name
    let geocoder = CLGeocoder()
    geocoder.reverseGeocodeLocation(location, completionHandler: { placemarks, error in
        if error != nil {
            self.showError(title: "Whoops...", message: error!.localizedDescription)
        } else {
            let placemark = placemarks?[0]
            self.locationString = (placemark?.administrativeArea ?? "") + ", " + (placemark?.country ?? "")
            self.generateMapImage(location: location)
        }
    })
}
This method will receive the user’s location, stop the location updates (because we don’t need them anymore) and calls a generateMapImage function (that we’ll define later) with the retrieved location as an argument. It also uses the Apple’s geocoder service to find out the city and country name for the retrieved location and puts them in a new class variable locationString:
var locationString = ""
Generate the Map Image
To generate the map image we will use the following function:
func generateMapImage(location userLocation: CLLocation) {
    let mapSnapshotOptions = MKMapSnapshotOptions()

    // Set the region of the map that is rendered.
    let location = CLLocationCoordinate2DMake(userLocation.coordinate.latitude, userLocation.coordinate.longitude)
    let region = MKCoordinateRegionMakeWithDistance(location, mapRegionDistance, mapRegionDistance)
    mapSnapshotOptions.region = region

    // Set the size of the image output.
    mapSnapshotOptions.size = calculateMapImageSize(image: self.image)

    let snapShotter = MKMapSnapshotter(options: mapSnapshotOptions)
    snapShotter.start(completionHandler: { snapShot, error in
        if error != nil {
            self.showError(title: "Whoops1...", message: error!.localizedDescription)
        } else {
            self.mapImage = snapShot?.image
            self.activityIndicator.stopAnimating()
            self.generateFinalImage()
        }
    })
}
You need to import MapKit into ShareViewController:
import MapKit
Also a new class variable is used:
var mapImage: UIImage!
To calculate the map size we used another function, calculateMapImageSize that returns a CGSize object to be used when generating the map image:
func calculateMapImageSize() -> CGSize  {
    let maxSize = finalImageMaxDimension - 2 * finalImageBorderWidth
    if image.size.width > image.size.height {
        return CGSize(width: maxSize, height: round(maxSize * image.size.height / image.size.width))
    } else {
        return CGSize(width: round(maxSize * image.size.width / image.size.height), height: maxSize)
    }
}
Building the Final Image
The last thing we need to do is to generate the final image with all the pieces put together:
func generateFinalImage() {
    let size = CGSize(width: mapImage.size.width + 2 * finalImageBorderWidth, height: mapImage.size.height + 2 * finalImageBorderWidth)
    let userImageSize = calculateUserImageFinalSize()

    // start drawing context
    UIGraphicsBeginImageContextWithOptions(size, true, 0.0)
    let context = UIGraphicsGetCurrentContext()

    // draw the white background
    let bgRectangle = CGRect(x: 0, y: 0, width: mapImage.size.width + 2 * finalImageBorderWidth, height: mapImage.size.height + 2 * finalImageBorderWidth)
    context!.saveGState()
    context!.setFillColor(UIColor.white.cgColor)
    context!.addRect(bgRectangle)
    context!.drawPath(using: .fill)
    context!.restoreGState()

    // draw the map
    mapImage.draw(in: CGRect(x: finalImageBorderWidth, y: finalImageBorderWidth, width: mapImage.size.width, height: mapImage.size.height))

    // draw a semitransparent white rectage over the  map to dim it
    let transparentRectangle = CGRect(x: finalImageBorderWidth, y: finalImageBorderWidth, width: mapImage.size.width, height: mapImage.size.height)
    context!.saveGState()
    context!.setFillColor(UIColor(colorLiteralRed: 255, green: 255, blue: 255, alpha: 0.3).cgColor)
    context!.addRect(transparentRectangle)
    context!.drawPath(using: .fill)
    context!.restoreGState()

    // rotate the context
    context!.rotate(by: (rotateContentByDegrees * CGFloat.pi / 180))

    // draw white rectangle
    let rectangle = CGRect(x: userImageX, y: userImageY, width: userImageSize.width + 2 * userImageBorderWidth, height: userImageSize.height + 2 * userImageBorderWidth)
    context!.saveGState()
    context!.setFillColor(UIColor.white.cgColor)
    context!.setShadow(offset: CGSize(width: userImageBorderWidth, height: userImageBorderWidth), blur: 8.0)
    context!.addRect(rectangle)
    context!.drawPath(using: .fill)
    context!.restoreGState()

    // draw user image
    image.draw(in: CGRect(x: userImageX + userImageBorderWidth, y: userImageY + userImageBorderWidth, width: userImageSize.width, height: userImageSize.height))

    // draw message
    var truncatedMessage = message
    if (message.distance(from: message.startIndex, to: message.endIndex) > userMessageMaxLength) {
        truncatedMessage = message.substring(to: message.index(message.startIndex, offsetBy: userMessageMaxLength))
    }
    let messageFont = UIFont(name: "Noteworthy-Bold", size: 80)!
    let messageFontAttributes = [
        NSFontAttributeName: messageFont,
        NSForegroundColorAttributeName: UIColor.black,
        ] as [String : Any]
    let messageSize = sizeOfString(string: truncatedMessage!, constrainedToWidth: Double(size.width - textMargin), attributes: messageFontAttributes)
    truncatedMessage!.draw(in: CGRect(x: userImageX + userImageBorderWidth, y: userImageY + userImageBorderWidth + userImageSize.height + userMessageTopMargin, width: size.width - textMargin, height: messageSize.height), withAttributes: messageFontAttributes)

    // draw name, location & date
    let nameFont = UIFont(name: "Noteworthy", size: 58)!
    let nameFontAttributes = [
        NSFontAttributeName: nameFont,
        NSForegroundColorAttributeName: UIColor.black,
        ] as [String : Any]
    let dateFormatter = DateFormatter()
    dateFormatter.dateStyle = .long
    dateFormatter.timeStyle = .none

    var nameString = ""
    if(name != "") {
        nameString = name + " - " + dateFormatter.string(from: Date()) + ", " + locationString
    } else {
        nameString = dateFormatter.string(from: Date()) + ", " + locationString
    }
    nameString.draw(in: CGRect(x: userImageX + userImageBorderWidth, y: userImageY + userImageBorderWidth + userImageSize.height + messageSize.height + userNameTopMargin, width: size.width - textMargin, height: userNameHeight), withAttributes: nameFontAttributes)

    // get final image
    let finalImage = UIGraphicsGetImageFromCurrentImageContext()

    // end drawing context
    UIGraphicsEndImageContext()

    // show the final image to the user & update tha status label
    imageView.image = finalImage
    titleLabel.text = "You can now share your image."
}
Here we used two helper methods, calculateUserImageFinalSize and sizeOfString. The last one deserves a little attention because it will return a CGSize object with the dimensions needed to draw a text with specific attributes.
func calculateUserImageFinalSize() -> CGSize  {
    if image.size.width > image.size.height {
        return CGSize(width: userImageMaxDimension, height: round(userImageMaxDimension * image.size.height / image.size.width))
    } else {
        return CGSize(width: round(userImageMaxDimension * image.size.width / image.size.height), height: userImageMaxDimension)
    }
}

func sizeOfString (string: String, constrainedToWidth width: Double, attributes: [String: Any]) -> CGSize {
    let attString = NSAttributedString(string: string,attributes: attributes)
    let framesetter = CTFramesetterCreateWithAttributedString(attString)

    return CTFramesetterSuggestFrameSizeWithConstraints(framesetter, CFRange(location: 0,length: 0), nil, CGSize(width: width, height: .greatestFiniteMagnitude), nil)
}
Now that we have everything in place, we need to start the whole process when the ShareViewController is loaded and presented to the user:
override func viewDidAppear(_ animated: Bool) {
    super.viewDidAppear(animated)
    getCurrentLocation()
}
Test the app. Enter your name, a short message and select a photo. You should get the following result:
Sharing the Final Image
Ok, now let’s see how do we share the resulted image. To do this we will use an UIActivityViewController.
Add a new shareImage action for the Share Image! button using Ctrl+drag into the ShareViewController like we did earlier for the photo button:
@IBAction func shareImage(_ sender: UIButton) {
}
The code for the actual sharing is pretty simple:
@IBAction func shareImage(_ sender: UIButton) {
    let activityViewController = UIActivityViewController(activityItems: [image], applicationActivities: nil)
    activityViewController.popoverPresentationController?.sourceView = self.view
    present(activityViewController, animated: true, completion: nil)
}
Try it! Now you can save the image or share it with your friends & family using the installed apps on your device.
Final Touches
To finish the app we need to do two more things:
- add an app icon
- make the startup screen look good
To add an app icon, first download the images from here, then open the Assets.xcassets from the left panel, select the AppIcon item and drag&drop downloaded images to their respective placeholders.
To change the startup screen , which is white right now, open the LaunchScreen.storyboard from the left panel and drag an Image View to it. Add constraints so it covers the entire screen, select the Background Image and set the Content Mode to Aspect Fill (it will look exactly like our main app's screen background).
That’s it! You can now run the app and even install it on your device to take it out in the wild.
The code for this app is available on github: https://github.com/intelligentbee/PicTravel
You can also download the final app from the App Store: https://itunes.apple.com/us/app/pictravel/id1263495901?mt=8

Introduction to React Native
React Native is a framework for building native apps using React made by Facebook. With React Native, you don't build a “mobile web app”, an “HTML5 app”, or a “hybrid app”. You build a real mobile app that's indistinguishable from an app built using Objective-C or Java. React Native uses the same fundamental UI building blocks as regular iOS and Android apps. You just put those building blocks together using JavaScript and React. - from https://facebook.github.io/react-native/
In the following lines we will take a short tour of React Native to help you familiarize with the platform and hopefully get you started in your React Native development career.
We will create a simple app called RandomNumbers that will pick some numbers from a pool, numbers that you can use later at anything you need (for example playing the lottery).
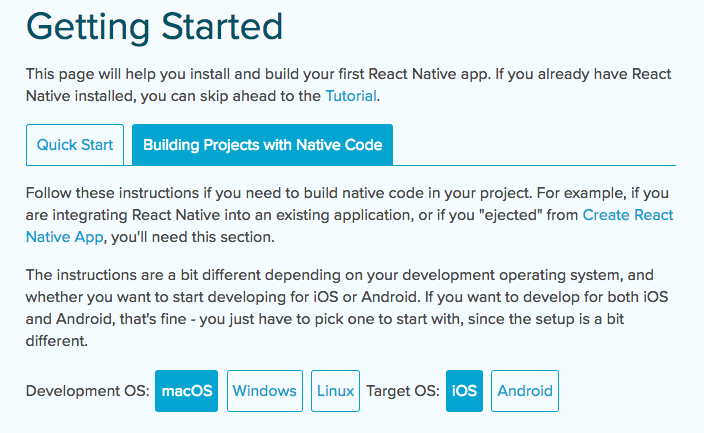
Install React Native
You will need to install Node, Watchman, the React Native command line interface, a JDK, and Xcode or Android Studio (or both). You can find details on how exactly do to this, depending on your platform, here: https://facebook.github.io/react-native/docs/getting-started.html. Select the "Building Projects with Native Code" tab and then follow the instructions.
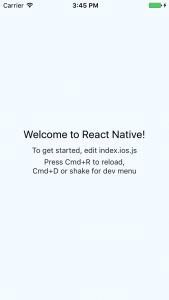
When you’re done, create a new project with the react-native init RandomNumbers command then cd into the newly created RandomNumbers folder.
The above command created an empty React Native project that you can immediately run on your device using the react-native run-ios or react-native run-android commands (you need to have an Android emulator already started for the last command to work).
Make Your First Change
Open the RandomNumbers folder in an code editor of your choice. Here you will find some files and folders, the most important ones being the index.ios.js and index.android.js files that contain our starting point of the app.
Edit one (or both) of the files above, depending on the platform you are testing, to the following:
// ...

export default class RandomNumbers extends Component {
  render() {
    return (
      <View style={styles.container}>
        <Text style={styles.welcome}>
          Random Numbers
        </Text>
      </View>
    );
  }
}

// ...
Save the edited file, then, in the emulator, press Cmd+R to reload the app. It will refresh itself to reflect the changes, no recompiling needed. Isn’t this cool?
React Native Components
Just like in React, a React Native app is made up by several components that work together to achieve the ultimate goal of the app. To see the list of available components visit https://facebook.github.io/react-native/docs/getting-started.html and scroll to the Components section in the left menu.
We will start by making the two React Native starting points (from the index.ios.js and index.android.js files) to load a single component called App.
Create a new App.js file with the following content:
import React, { Component } from 'react';
import {
    View,
    Text,
    StyleSheet
} from 'react-native';

export default class App extends Component {
    render() {
        return (
            <View style={styles.container}>
                <Text style={styles.welcome}>
                    Random Numbers
                </Text>
            </View>
        );
    }
}

const styles = StyleSheet.create({
    container: {
        flex: 1,
        justifyContent: 'center',
        alignItems: 'center',
        backgroundColor: '#F5FCFF',
    },
    welcome: {
        fontSize: 20,
        textAlign: 'center',
        margin: 10,
    },
});
Now change the index.ios.js and index.android.js to the following (both will have the same content):
import React, { Component } from 'react';
import {
  AppRegistry
} from 'react-native';
import App from './App';

export default class RandomNumbers extends Component {
  render() {
    return (
       <App />
    );
  }
}

AppRegistry.registerComponent('RandomNumbers', () => RandomNumbers);
We just removed everything from them and loaded the App component so we now have a common starting point for both platforms.
Generate a Random Number
Let’s add a Button that will trigger the number generator of our app. First import the Button component, then add the actual button to the render method (in App.js):
// ...

import {
    View,
    Text,
    Button,
    StyleSheet
} from 'react-native';

export default class App extends Component {
    render() {
        return (
            <View style={styles.container}>
                <Text style={styles.welcome}>
                    Random Numbers
                </Text>
                <Button onPress={this.generateRandomNumber} title="Generate!" />
            </View>
        );
    }
}

// ...
For this to work we need to define a new method generateRandomNumber:
// ...

export default class App extends Component {
    generateRandomNumber = () => {
        let random = Math.floor(Math.random() * 100);
        console.log(random);
    }

// ...
Now if you click on the Generate! button, a random number between 0 and 100 will be generated and printed to the console.
To see the console output open the developer menu in your app by pressing Cmd+D and select Debug JS Remotely. A new browser window will open and there you can check the console output like you normally do when developing for the web.
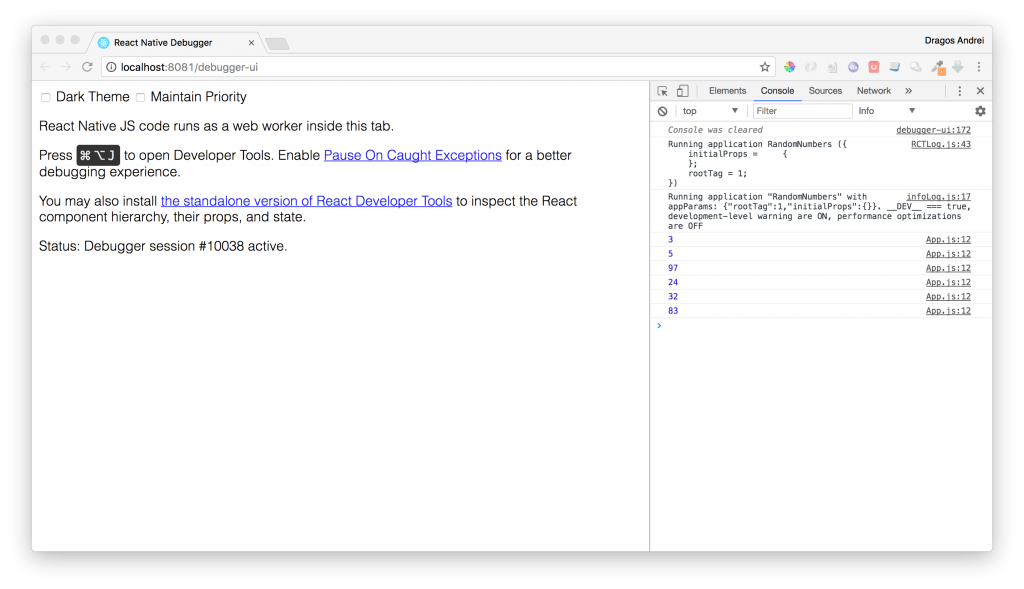
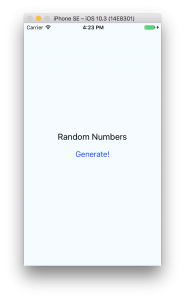
Output Data to the Screen
Now we have our generated random number, but how can we show it to the user? For this we will use the state concept of React. The are two fundamental concepts of React that you need to understand: the state and props.
There are two types of data that control a component: props and state. Props are set by the parent and they are fixed throughout the lifetime of a component. For data that is going to change, we have to use state.
You can read more about this topic here:
- https://facebook.github.io/react-native/docs/props.html
- https://facebook.github.io/react-native/docs/state.html
Start by creating a constructor for our App component that sets the initial state:
// ...

export default class App extends Component {
    constructor(props) {
        super(props);

        this.state = {
            random: null
        };
    }

// ...
In the generateRandomNumber method, change the state to contain the newly generated number:
// ...

generateRandomNumber = () => {
    let random = Math.floor(Math.random() * 100);
    this.setState({random: random});
}

// ...
Finally add a new Text component in the render() method that will show the random number from the app’s state:
// ...

render() {
    return (
        <View style={styles.container}>
            <Text style={styles.welcome}>
                Random Numbers
            </Text>
            <Text>{this.state.random}</Text>
            <Button onPress={this.generateRandomNumber} title="Generate!" />
        </View>
    );
}

// ...
Now, every time you click the Generate! button a new random number will appear on the screen.
How Many Numbers?
What if you need more than one number, extracted from a pool of numbers?
To define the pool of numbers we will use a slider with values from 1 to 100. To define how many numbers do we need to be extracted from the pool, we will use a picker with values from 1 to 10. This way we can configure the app to do what we need at run-time.
Import the Slider component then add it to the app:
<Text style={styles.welcome}>
    Random Numbers
</Text>
<Slider style={{width: '100%'}} minimumValue={1} maximumValue={100} />
<Text>{this.state.random}</Text>
We need to show the current slider value to the user so we will add it to the state of our app:
this.state = {
    random: null,
    pool: 1
};
When the slider moves, we have to update the state:
<Slider style={{width: '100%'}} minimumValue={1} maximumValue={100} onValueChange={(value) => this.setState({pool: Math.round(value)})} />Add a new text component to show it to the user (and an informative label):
<Text style={styles.welcome}>
    Random Numbers
</Text>
<Text>Pool of numbers:</Text>
<Text>{this.state.pool}</Text>
Now to select how many numbers we need, let’s try a picker:
<Picker selectedValue={this.state.amount} style={{width: '100%'}} onValueChange={(itemValue, itemIndex) => this.setState({amount: itemValue})}>
    <Picker.Item label="1" value="1" />
    <Picker.Item label="2" value="2" />
    <Picker.Item label="3" value="3" />
    <Picker.Item label="4" value="4" />
    <Picker.Item label="5" value="5" />
    <Picker.Item label="6" value="6" />
    <Picker.Item label="7" value="7" />
    <Picker.Item label="8" value="8" />
    <Picker.Item label="9" value="9" />
    <Picker.Item label="10" value="10" />
</Picker>
For this we added amount to the state:
this.state = {
    random: null,
    pool: 1,
    amount: 1
};
Now let’s change the generateRandomNumbers method to take in account the new settings:
generateRandomNumber = () => {
    // build the pool of numbers
    var pool = [];
    for(let i = 1; i <= this.state.pool; i++) {
        pool.push(i);
    }

    // generate random numbers
    var randomString = '';
    for(let i = 1; i <= this.state.amount; i++) {
        let index = Math.floor(Math.random() * pool.length);
        let random = pool[index];
        pool.splice(index, 1);
        randomString = randomString + (randomString ? ", " : "") + random;
    }
    this.setState({random: randomString});
}
What if you try to generate 10 numbers out of 5? Or something like this? We will have to tell the user that’s not possible using an alert.
generateRandomNumber = () => {
    if(this.state.amount > this.state.pool) {
        Alert.alert("Error", "The pool must not be smaller than the amount of numbers you want to generate!");
        return;
    }

    // ...
That’s all we had to do for our app functionality. Try it!
... but, to be honest, it doesn't look so good :(
Making the App Look Good
Let’s start by adding a nice background to our app. First download the image from here and save it to your project folder. Then replace the root <View> with an <Image> component (also be sure to include the Image component at the beginning of the file):
<Image source={require('./background.png')} style={styles.container}>
…
</Image>
Update the container style to this:
container: {
    flex: 1,
    padding: 15,
    backgroundColor: '#fff',
    alignItems: 'center',
    justifyContent: 'space-between',
    width: null,
    height: null
}
Now, let’s take care of the button. We will remove the <Button> component because it’s not as customizable as we need and replace it with a <TouchableOpacity> (don’t forget to include this component too and remove the <Button> from the includes because we will not use it anymore). Also get the button background image from here.
<TouchableOpacity onPress={this.generateRandomNumber}>
    <Image style={styles.button} source={require('./button.png')}>
        <Text style={styles.buttonText}>Generate!</Text>
    </Image>
</TouchableOpacity>
Next we will use some styling for the rest of the components, here is all the render() code and styles:
render() {
    return (
        <Image source={require('./background.png')} style={styles.container}>
            <Text style={styles.textTitle}>Random Numbers</Text>
            <Text style={styles.text}>Pool of numbers:</Text>
            <Text style={styles.text}>{this.state.pool}</Text>
            <Slider
                style={styles.slider}
                minimumValue={1}
                maximumValue={100}
                onValueChange={(value) => this.setState({pool: Math.round(value)})}
                minimumTrackTintColor="#a0a0a0"
                maximumTrackTintColor="#a0a0a0"
                thumbTintColor="#ff0000"
                thumbImage={require('./thumb.png')}
            />
            <Text style={styles.resultText}>{this.state.random}</Text>
            <Picker
                selectedValue={this.state.amount}
                style={styles.picker}
                itemStyle={styles.pickerItem}
                onValueChange={(itemValue, itemIndex) => this.setState({amount: itemValue})}>
                <Picker.Item label="1" value="1" color="#FF6600" />
                <Picker.Item label="2" value="2" color="#FF6600" />
                <Picker.Item label="3" value="3" color="#FF6600" />
                <Picker.Item label="4" value="4" color="#FF6600" />
                <Picker.Item label="5" value="5" color="#FF6600" />
                <Picker.Item label="6" value="6" color="#FF6600" />
                <Picker.Item label="7" value="7" color="#FF6600" />
                <Picker.Item label="8" value="8" color="#FF6600" />
                <Picker.Item label="9" value="9" color="#FF6600" />
                <Picker.Item label="10" value="10" color="#FF6600" />
            </Picker>
            <TouchableOpacity onPress={this.generateRandomNumber}>
                <Image style={styles.button} source={require('./button.png')}>
                    <Text style={styles.buttonText}>Generate!</Text>
                </Image>
            </TouchableOpacity>
        </Image>
    );
}
const styles = StyleSheet.create({
container: {
flex: 1,
padding: 15,
backgroundColor: '#fff',
alignItems: 'center',
justifyContent: 'space-between',
width: null,
height: null
},
textTitle: {
color: '#ffffff',
backgroundColor: '#00000000',
fontSize: 28
},
text: {
color: '#ffffff',
backgroundColor: '#00000000'
},
resultText: {
color: '#ffffff',
backgroundColor: '#00000000',
fontSize: 18
},
slider: {
width: '100%'
},
picker: {
width: '100%',
backgroundColor: '#000000C0',
borderRadius: 10,
borderWidth: 2,
borderColor: '#000000'
},
pickerItem: {
color: '#ffffff'
},
button: {
flexDirection: 'row',
alignItems: 'center',
justifyContent: 'center',
width: 175,
height: 60
},
buttonText: {
color: '#ffffff',
fontWeight: 'bold',
backgroundColor: '#00000000'
}
});You will also need the slider thumb images from here and here.
If you run the app now, you will find a much better interface:
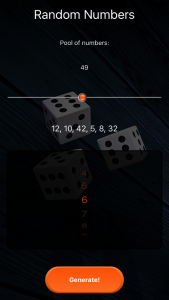
The images used in this tutorial were downloaded from pixabay.com then edited using Photoshop:
- https://pixabay.com/en/cube-play-random-luck-points-1979775/
- https://pixabay.com/en/button-click-hit-web-element-2155595/
- https://pixabay.com/en/buttons-gloss-round-circle-colors-150235/
Getting Your App Ready to Be Published
So our app is done, how do we publish it to the AppStore and Google Play Store?
First, let's fix one small problem: if you rotate your emulator screen (Cmd+Left or Right Arrow) you will see that the app will go into landscape and it will not be usable anymore :(
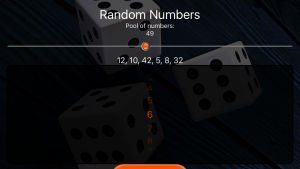
Too lock the app to portrait we need to go "native".
For iOS, open xCode then open the project found in the randomNumbers/ios folder. Select the project in the left pane then, under Deployment Info, uncheck Landscape Left and Landscape Right Device Orientation so we are only left with the Portrait orientation.
For Android, you can just open the android/app/src/AndroidManifest.xml and add android:screenOrientation="portrait" under the activity section:
<activity
    android:name=".MainActivity"
    android:label="@string/app_name"
    android:configChanges="keyboard|keyboardHidden|orientation|screenSize"
    android:screenOrientation="portrait"
    android:windowSoftInputMode="adjustResize">
    <intent-filter>
        <action android:name="android.intent.action.MAIN" />
        <category android:name="android.intent.category.LAUNCHER" />
    </intent-filter>
</activity>
Now, to see those changes, you have to relaunch the app again. Not just reload, relaunch with the react-native run-ios or react-native run-android commands and try to rotate the emulator. Everything should be fine this time.
Now back to our main task, getting the app ready to be published.
iOS
First let's add the app's icons. Open the xCode project and select Images.xcassets from the left panel. Then select the AppIcon item and drag each icon image to its corresponding placeholder. Download the icons from here.
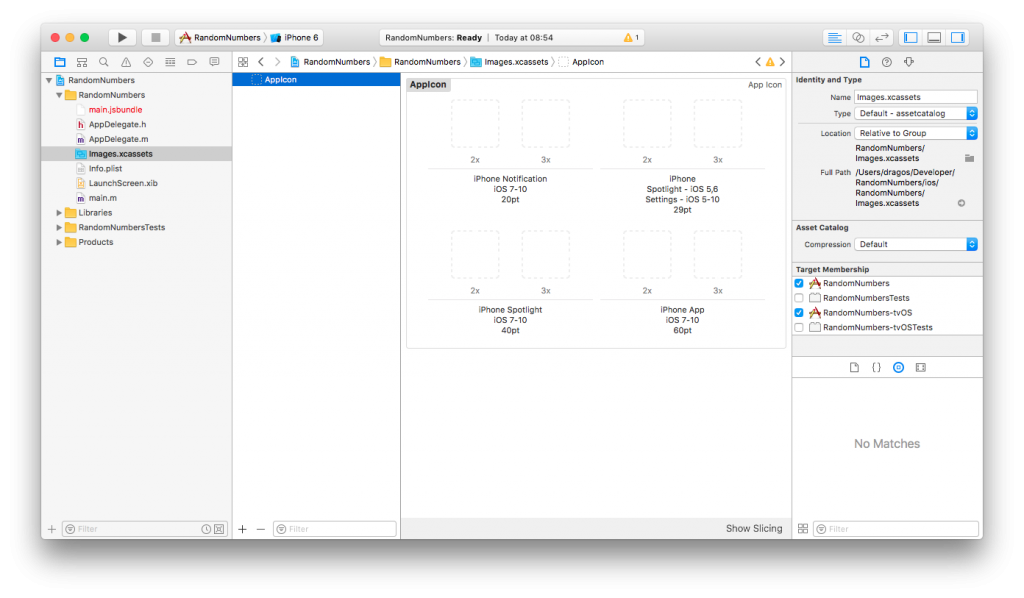
When you're done, select Product -> Archive from the menu to build the iOS package (it only works with a Generic iOS Device selected or a real device, no emulators).
Android
To add app icons in Android, you have to put them in the android/app/src/main/res/mipmap* folders (overwrite the existing ic_launcher.png). You can get the icons from here.
Now you need to generate a signing key then a signed APK. I found the walkthrough from the React Native documentation to be pretty good so you just follow it: https://facebook.github.io/react-native/docs/signed-apk-android.html
Final Words
That's it! You now have your first React Native application ready to be sent into the wild. I hope you had fun doing this, please let us know in the comments how it worked for you. Oh, and you can find the final code here.
Have a nice mobile developer life! :)

How to add TINYINT MySQL type to Doctrine in Symfony 2.8
Hello! A few days ago I needed to define an entity with a TINYINT type column to hold a rating value between 1 and 5. I was doing this in a Symfony 2.8 project and to my surprise, Doctrine was unable to handle this type of data out of the box (it uses it for booleans but it has no TINYINT standalone type).
So I searched the internet for a solution and I found some but nothing complete.
The solution (TINYINT vs Doctrine):
First you need to define the new Doctrine type class like this:
<?php
namespace AppBundle\Types;


use Doctrine\DBAL\Types\Type;
use Doctrine\DBAL\Platforms\AbstractPlatform;


class TinyintType extends Type
{
    const TINYINT = 'tinyint';


    public function getSQLDeclaration(array $fieldDeclaration, AbstractPlatform $platform)
    {
        return 'TINYINT';
    }


    public function convertToPHPValue($value, AbstractPlatform $platform)
    {
        return $value;
    }


    public function convertToDatabaseValue($value, AbstractPlatform $platform)
    {
        return $value;
    }


    public function getName()
    {
        return self::TINYINT;
    }
}
Then, to register it, I used the boot function of the AppBundle:
<?php
namespace AppBundle;


use Symfony\Component\HttpKernel\Bundle\Bundle;
use Doctrine\DBAL\Types\Type;


class AppBundle extends Bundle
{
    public function boot()
    {
        parent::boot();

        $em = $this->container->get('doctrine.orm.default_entity_manager');

        // types registration
        if(!Type::hasType('tinyint')) {
            try {
                Type::addType('tinyint', 'AppBundle\Types\TinyintType');
                $em->getConnection()->getDatabasePlatform()->registerDoctrineTypeMapping('TINYINT', 'tinyint');
            } catch (\Exception $e) {

            }
        }
    }
}
I had to use the try / catch block to avoid an error when running symfony console commands having no database defined:
PHP Fatal error: Uncaught exception 'PDOException' with message 'SQLSTATE[42000] [1049] Unknown database 'rating'' in vendor/doctrine/dbal/lib/Doctrine/DBAL/Driver/PDOConnection.php:43
Now you can use the new type in your entities:
    /**
     * @ORM\Column(name="rating", type="tinyint")
     * @Assert\NotBlank()
     * @Assert\GreaterThanOrEqual(
     *     value = 1
     * )
     * @Assert\LessThanOrEqual(
     *     value = 5
     * )
     */
    protected $rating;
Learn how to setup Docker machine for Symfony development.
Hope this helps someone :)
Have a great day!
Setup Docker Machine for Symfony Development
If you need a development environment for Symfony, hosted by Docker, you can use the fazy/apache-symfony docker image to start with, then extend it to your need.
In your Symfony project's folder add the Dockerfile and docker-compose.yml files.
In the first one, we added mysql and composer, then we used the docker-compose.yml file to mount a local volume to the docker container with file sync.
This way you can code on your machine and test in the docker environment.
The Dockerfile:
FROM fazy/apache-symfony
ADD . /app

RUN    apt-get update \
    && apt-get -yq install \
        mysql-server \
        php5-mysql \
    && rm -rf /var/lib/apt/lists/*

RUN curl -s https://getcomposer.org/installer | php
RUN mv composer.phar /usr/local/bin/composer
ENV COMPOSER_ALLOW_SUPERUSER 1
RUN service mysql start
The docker-compose.yml file:
version: "2"
services:
    site:
        build: .
        ports:
            - "8080:80"
        expose:
            - "80"
        volumes:
          - .:/app
To build the Docker container use:
docker-compose up --build
To start it when it's down just remove the --build parameter:
docker-compose up
Once is running, you can view it's ID by running:
docker ps
Now grab the first 3 characters from the id and use them in the next command to be able to log in the running container:
docker exec -t -i ID bash
Finally, to access the Symfony project in your browser, go to http://localhost:8080/app_dev.php and have fun!

How to monitor Symfony and Apache logs with M/Monit
So you have developed and deployed a fresh new project and you want to be alerted in case an error happens.
Here's how you do it using the M/Monit tool.
It can be installed on an Ubuntu machine using the following command:
sudo apt-get install monit
Now edit the /etc/monit/monitrc configuration file and add the following:
set mailserver smtp.sendgrid.net port 587
  username "USERNAME" password "PASSWORD"

set alert YOUR_EMAIL@HOST.COM not on { instance, action }

set httpd port 2812 and
    use address localhost  # only accept connection from localhost
    allow localhost        # allow localhost to connect to the server and
    allow admin:monit      # require user 'admin' with password 'monit'

check file error.log with path /var/log/apache2/error.log
      if match "error" then alert

check file prod.log with path /var/www/sfproject/app/logs/prod.log
      if match "request.CRITICAL" then alert
First we need to tell M/Monit what mail server to use (we used Sendgrid but you can use whatever you want), then to specify the email address which will receive the alerts. We also have to allow connections from localhost so the status command below can be executed.
The actual monitoring is set up in the last two blocks of code, one for the apache error log and the next for the Symfony production logs. Anytime the specified string will appear in the logs, an alert email will be sent to the address we defined above.
To enable the changes, reload configuration:
monit reload
You can now check the status with the command:
monit status
It's that simple!