Debugging Golang apps in Docker with Visual Studio Code
Context
We’ve recently had some problems with a Go application that was running inside a Docker container in a very big Docker Compose setup.
After getting fed up with writing console prints and rebuilding the Docker image for that container and spinning up all the containers to debug things, we started investigating how we could speed up our debugging process.
Enter Visual Studio Code and its wonderful Go extension which supports Delve.
Now if you read through the pages linked above you will find out how to install and setup all these things. It’s pretty straight forward. The Docker part, however, is not. As such, I will show you a basic Go application which mimics what we had to deal with and how to set up debugging for it.
The application
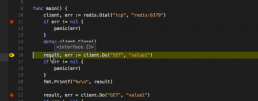
The following is the main.go of our app. It will connect to a Redis server, set and get a value.
package main


import (
    "fmt"


    "github.com/garyburd/redigo/redis"
)


func main() {
    client, err := redis.Dial("tcp", "redis:6379")
    if err != nil {
        panic(err)
    }
    defer client.Close()


    result, err := client.Do("SET", "key1", "value1")
    if err != nil {
        panic(err)
    }
    fmt.Printf("%v\n", result)


    result, err = client.Do("GET", "key1")
    if err != nil {
        panic(err)
    }
    fmt.Printf("%v\n", result)
}
As you can see, it relies on the Redigo package, so make sure you get it and place it in your vendor folder.
To make sure you have everything setup the right way, go ahead and build it locally by running :
go build -o main main.go
If you run the application built this way, it will fail of course, because you need to connect to Redis. I’ve set the hostname for the server to redis which will point to an IP on the docker-machine when we docker-compose up.
The Dockerfile
Now we have to build the image for this application.
FROM golang


ENV GOPATH /opt/go:$GOPATH
ENV PATH /opt/go/bin:$PATH
ADD . /opt/go/src/local/myorg/myapp
WORKDIR /opt/go/src/local/myorg/myapp


RUN go get github.com/derekparker/delve/cmd/dlv
RUN go build -o main main.go
CMD ["./main"]
When this image will be built, it will basically copy the application code, set up the environment and build the Go application. The application’s entrypoint will be the main executable that will be built. We also install the Delve command line tool but we won’t use it if we run a container from this image directly (i.e. docker run).
Note the GOPATH variable and the path to which we copy our code. This path is very important for Delve and our debug configuration.
The Docker Compose file
Now that we have the Dockerfile to build the image, we have to define the docker-compose.yml file. Here, however we will overwrite the entrypoint for the container to launch Delve. Also the code that we copied will be replaced with a volume that will point to the code on the host machine, and we will also remove some security constraints that prevent Delve from forking the process.
Essentially, for the context I mentioned above we try not to touch the base image for the application since it might get accidentally pushed to the Docker Hub with debugging parameters. So in order to avoid that we have our Docker Compose process override the image with what we need to go about debugging.
Here’s the docker-compose.yml file :
version: '2'
services:
  redis:
    image: redis
    ports:
      - "6379:6379"
    expose:
      - "6379"
  myapp:
    build: .
    security_opt:
      - seccomp:unconfined
    entrypoint: dlv debug local/myorg/myapp -l 0.0.0.0:2345 --headless=true --log=true -- server
    volumes:
      - .:/opt/go/src/local/myorg/myapp
    ports:
      - "2345:2345"
    expose:
      - "2345"
It's here that we introduce the Redis server dependency we have. Note that for the myapp container we’ve exposed the ports that the Delve command line tool listens to.
So to see that everything is working, you can now run :
docker-compose up --build
This will build the image and start up the redis and myapp containers.
You should see the following output coming from the myapp container:
myapp_1  | 2016/12/15 08:50:39 server.go:71: Using API v1
myapp_1  | 2016/12/15 08:50:39 debugger.go:65: launching process with args: [/opt/go/src/local/myorg/myapp/debug server]
myapp_1  | API server listening at: [::]:2345
Which means that the Delve command line tool compiled our Go code into a debug executable, started it, and it’s listening for remote connections to the debugger on port 2345.
Now we just have to set up our launch.json config in the .vscode folder of our project.
The launch configuration
Here’s how our launch.json should look like:
{
    "version": "0.2.0",
    "configurations": [
       {
           "name": "Remote Docker",
           "type": "go",
           "request": "launch",
           "mode": "remote",
           "remotePath": "/opt/go/src/local/myorg/myapp",
           "port": 2345,
           "host": "192.168.99.100",
           "program": "${workspaceRoot}",
           "env": {},
           "args": []
       }
    ]
}
You might have to change the host IP to what your docker-machine ip output is.
Now all we have to do is set up a few breakpoints and start the debugger using the Remote Docker configuration.
Our docker compose terminal should print something like this from the myapp container :
myapp_1  | 2016/12/15 08:50:45 debugger.go:242: created breakpoint: &api.Breakpoint{ID:1, Name:"", Addr:0x4010af, File:"/opt/go/src/local/myorg/myapp/main.go", Line:11, FunctionName:"main.main", Cond:"", Tracepoint:false, Goroutine:false, Stacktrace:0, Variables:[]string(nil), LoadArgs:(*api.LoadConfig)(nil), LoadLocals:(*api.LoadConfig)(nil), HitCount:map[string]uint64{}, TotalHitCount:0x0}
myapp_1  | 2016/12/15 08:50:45 debugger.go:242: created breakpoint: &api.Breakpoint{ID:2, Name:"", Addr:0x401116, File:"/opt/go/src/local/myorg/myapp/main.go", Line:16, FunctionName:"main.main", Cond:"", Tracepoint:false, Goroutine:false, Stacktrace:0, Variables:[]string(nil), LoadArgs:(*api.LoadConfig)(nil), LoadLocals:(*api.LoadConfig)(nil), HitCount:map[string]uint64{}, TotalHitCount:0x0}
myapp_1  | 2016/12/15 08:50:45 debugger.go:242: created breakpoint: &api.Breakpoint{ID:3, Name:"", Addr:0x4013d1, File:"/opt/go/src/local/myorg/myapp/main.go", Line:22, FunctionName:"main.main", Cond:"", Tracepoint:false, Goroutine:false, Stacktrace:0, Variables:[]string(nil), LoadArgs:(*api.LoadConfig)(nil), LoadLocals:(*api.LoadConfig)(nil), HitCount:map[string]uint64{}, TotalHitCount:0x0}
myapp_1  | 2016/12/15 08:50:45 debugger.go:397: continuing
You can Next and Continue, look at the callstack, see the locals, view contents of specific variables, etc.
Final thoughts
I hope this proves to be as useful to you as it did for us. The tools mentioned in this post really save us a heap of trouble.
We really have to thank the open source community that brought us these tools. They are the real heroes.
Happy debugging!
Start writing tests in Ruby: useful gems
Being a QA engineer is a continuous struggle in finding the right resources in order to get the job done easier and more efficiently. If you are planning to write automated tests in RSpec (Ruby's testing framework), then you should take a look over these gems. Please notice that I am most of the time automating backend tests only, so the libraries I am using are for this purpose mainly.
1. RestClient
gem install rest-client
If you want to make API calls on RESTful endpoints this should definitely be your choice. This library is easy to use and the response includes code, cookies, headers and body.
Let me show you how to make some calls (GET, PUT, POST, DELETE):
response = RestClient.get(url, header){|response, request, result | response}
response = RestClient.put(url, payload, header){|response, request, result | response}
response = RestClient.post(url, payload, header){|response, request, result | response}
response = RestClient.delete(url, header){|response, request, result | response}
Now you simply use this response for your purposes (response.code, response.body, etc.).
2. JSON
gem install json
If I told you about RestClient, then the next one should be json. RESTful services will return JSON format in body most of the times so you should parse that response to be easier to work with.
response = RestClient.post(url, payload, header){|response, request, result | response}
parsed_response = JSON.parse(response.body)
expect(parsed_response['errors'][0]['message']).to eq "Not Found"
See how simple this is? You only JSON.parse that response and that's all!
Since we are talking about JSON, let me show you how to build one:
payload_hash = {
            :key1 => :value1,
            :key2 => :value2
        }
payload_json = payload_hash.to_json
3. Nokogiri
JSON and XML are the most used formats in web development. So you probably guessed that now I will show you some tricks on how to use XML in your awesome tests.
gem install nokogiri
When I have installed this gem on my ubuntu (v14.04) virtual machine, I have had the following error:
ERROR: Error installing nokogiri:
ERROR: Failed to build gem native extension.

/usr/bin/ruby1.9.1 extconf.rb
/usr/lib/ruby/1.9.1/rubygems/custom_require.rb:36:in `require': cannot load such file -- mkmf (LoadError)
from /usr/lib/ruby/1.9.1/rubygems/custom_require.rb:36:in `require'
from extconf.rb:4:in `'
But this was quickly fixed after installing ruby-dev and ruby1.9.1-dev:
sudo apt-get install ruby-dev
 sudo apt-get install ruby1.9.1-dev
Now let's say you have the following XML:
<Envelope xmlns="http://schemas.xmlsoap.org/soap/envelope/">
    <Body>
        <Login>
            <username>username</name>
            <password>secret_password</password>
        </Login>
    </Body>
</Envelope>
If you want to access the values for username and password, simply do this:
your_file = Nokogiri::XML(your_XML_file)
your_file.remove_namespaces!
puts your_file.css('username').text
puts your_file.css('password').text
Also, you can use xpath instead of css.
Let me show you how to build the previous XML file using Nokogiri:
builder = Nokogiri::XML::Builder.new do |xml|
  xml.Envelope {
    xml.Body {
      xml.Login {
        xml.username "username"
        xml.password "secret_password"
      }
    }
  }
end
puts builder.to_xml
4. Sinatra
This gem is used to mock endpoints. See more about it here.
5. Dotenv
gem install dotenv
It is recommended to keep environment variables and stuff like usernames, passwords and URLs in a .env file. In order to load those variables in your tests, you must use this gem.
Dotenv.load

login_url = ENV['VAR_NAME']
signup_url = ENV['VAR_NAME']
First you load the .env file, then use those variables in your tests.
6. Mysql
gem install mysql
The name itself says what this is used for. See below how to open a connection to a MySql database and do a simple operation:
con = Mysql.new(db_host, db_user, db_pass, db_schema, db_port)

rs = con.query("UPDATE table_references SET col_name1= ... WHERE where_condition")

con.close
I will update this post when I will use some new awesome Ruby library. What gems are you using?
How To Mock Endpoints in Automated Acceptance Tests
The purpose of acceptance testing is to reproduce production environment as much as possible in order to evaluate the software in a 'real-world' situation similar to what the customers will experience and this includes using real endpoints.
But using real endpoints has some disadvantages. In automated acceptance tests, the endpoint will be stressed out and this is not performance testing. Also, you must use production data (even usernames and passwords) and this is not good because you might break something there. The list with the reasons could go on and on and this is why you should mock some endpoints in automated acceptance tests. Also, you should keep your endpoint's URL stored in environment variables to be able to change it easily (production URL or mock URL).
I will show you some basic examples of mocking endpoints written in Ruby, Python and GO.
Mock endpoint in Ruby
I have used Sinatra (DSL for quickly creating web applications in Ruby) which is very easy to use.
Install the gem:
gem install sinatra
#myapp.rb

require ‘json’
require ‘sinatra’

get '/:username' do
  if params[:username] != 'your_username'
  	status 404
  else
  	content_type :json
  	{'message' => 'success'}.to_json
  end
end
ruby myapp.rb -o 0.0.0.0 -p 5000 > /dev/null 2>&1 &
This will start the process in background and your endpoint on http://localhost:5000.
If you make a GET request on http://localhost:5000/your_username you will get a ‘success’ message, else a 404 status code.
Mock endpoint in Python
In Python it is very easy to create an endpoint with Flask.
To install it you have to run:
pip install flask-restful
#myapp.py

#!flask/bin/python
from flask import Flask, jsonify
from flask import Response
import json

app = Flask(__name__)

@app.route("/<username>", methods=['GET'])
def put_username(username):
    if username == 'your_username':
        resp = Response("success!\n", mimetype='application/json')
    else:
        resp = Response("", status=404, mimetype='application/json')

    return resp

if __name__ == '__main__':
    app.run(debug=True)
As you can see, this does the exact same thing as the endpoint created in Ruby.
You simply run it with
python myapp.py
Mock endpoint in GO
//myapp.go
package main

import (
	"fmt"
	"net/http"
	"github.com/julienschmidt/httprouter"
)

func username(w http.ResponseWriter, r *http.Request, p httprouter.Params) {
	if p.ByName("username") == "your_username" {
		w.Header().Set("Content-Type", "application/json")
		w.WriteHeader(200)
		fmt.Fprint(w, `{"message":"success"}`)
	} else {
		w.WriteHeader(404)
	}
}

func main() {
	r := httprouter.New()
	r.GET("/:username", username)
	http.ListenAndServe("localhost:5000", r)
}
This does the same thing as the previous two endpoints and you run it with:
go run myapp.go
Thanks for reading this. What other ways of mocking an endpoint did you find?
Symfony2 Doctrine Migrations with Unique Indexes (Slugs)
This is something me and my colleagues encounter from time to time.
The Problem
One of the problems of adding unique indexes to existing data, like adding the sluggable Doctrine behaviour using the StofDoctrineExtensionsBundle, is that the generated migration will end up throwing an error:
SQLSTATE[23000]: Integrity constraint violation: 1062 Duplicate entry '' for key 'UNIQ_BDAFD8C8989D9B62'
Causes
Since the default values for the new MySQL column are not unique, adding the unique index is not possible - which is what the error above is telling us. So we will need to change the migration to also generate the unique values before adding the index.
Solution
In order to do so, we will have to split the generated migration into 2 different migrations, one for adding the new column, which could be a slug, and the other to add the unique index. After running the first migration, we need to execute the code that generates the unique values needed for the index. We can use the postUp method in a Doctrine migration to execute code after the “up” migration finished. We will also need to instantiate and boot the kernel in order to gain access to the Symfony framework and build our functionality like we would do in a controller:
<?php

namespace Application\Migrations;

use Doctrine\DBAL\Migrations\AbstractMigration;
use Doctrine\DBAL\Schema\Schema;

/**
 * Auto-generated Migration: Please modify to your needs!
 */
class Version20151021133750 extends AbstractMigration
{
    protected static $class = 'AppKernel';
    protected static $kernel;

    /**
     * Creates a Kernel.
     *
     * Available options:
     *
     *  * environment
     *  * debug
     *
     * @param array $options An array of options
     *
     * @return HttpKernelInterface A HttpKernelInterface instance
     */
    protected static function createKernel(array $options = array())
    {
        if (null === static::$class) {
            static::$class = static::getKernelClass();
        }

        return new static::$class(
            isset($options['environment']) ? $options['environment'] : 'test',
            isset($options['debug']) ? $options['debug'] : true
        );
    }

    /**
     * Creates a Client.
     *
     * @param array $options An array of options to pass to the createKernel class
     * @param array $server  An array of server parameters
     *
     * @return Client A Client instance
     */
    protected static function createClient(array $options = array(), array $server = array())
    {
        if (null !== static::$kernel) {
            static::$kernel->shutdown();
        }

        static::$kernel = static::createKernel($options);
        static::$kernel->boot();

        $client = static::$kernel->getContainer()->get('test.client');
        $client->setServerParameters($server);

        return $client;
    }

    /**
     * @param Schema $schema
     */
    public function up(Schema $schema)
    {
        // this up() migration is auto-generated, please modify it to your needs
        $this->abortIf($this->connection->getDatabasePlatform()->getName() != 'mysql', 'Migration can only be executed safely on \'mysql\'.');

        $this->addSql('ALTER TABLE book ADD slug VARCHAR(128) DEFAULT ""');
        //$this->addSql('CREATE UNIQUE INDEX UNIQ_CBE5A331989D9B62 ON book (slug)');
    }

    public function postUp(Schema $schema)
    {
        $this->client = self::createClient();
        $this->em = $this->client->getKernel()->getContainer()->get('doctrine')->getEntityManager();

        $books = $this->em->getRepository('AppBundle:Book')->findAll();
        foreach($books as $book){
            // need this so we force the generation of a new slug
            $book->setSlug(null);
            $this->em->persist($book);
        }
        $this->em->flush();
    }

    /**
     * @param Schema $schema
     */
    public function down(Schema $schema)
    {
        // this down() migration is auto-generated, please modify it to your needs
        $this->abortIf($this->connection->getDatabasePlatform()->getName() != 'mysql', 'Migration can only be executed safely on \'mysql\'.');

        //$this->addSql('DROP INDEX UNIQ_CBE5A331989D9B62 ON book');
        $this->addSql('ALTER TABLE book DROP slug');
    }
}
For the second migration file we only add the code necessary to add/remove the unique indexes:
<?php

namespace Application\Migrations;

use Doctrine\DBAL\Migrations\AbstractMigration;
use Doctrine\DBAL\Schema\Schema;

/**
 * Auto-generated Migration: Please modify to your needs!
 */
class Version20151021141028 extends AbstractMigration
{
    /**
     * @param Schema $schema
     */
    public function up(Schema $schema)
    {
        // this up() migration is auto-generated, please modify it to your needs
        $this->abortIf($this->connection->getDatabasePlatform()->getName() != 'mysql', 'Migration can only be executed safely on \'mysql\'.');

        $this->addSql('ALTER TABLE book CHANGE slug slug VARCHAR(128) NOT NULL');
        $this->addSql('CREATE UNIQUE INDEX UNIQ_CBE5A331989D9B62 ON book (slug)');
    }

    /**
     * @param Schema $schema
     */
    public function down(Schema $schema)
    {
        // this down() migration is auto-generated, please modify it to your needs
        $this->abortIf($this->connection->getDatabasePlatform()->getName() != 'mysql', 'Migration can only be executed safely on \'mysql\'.');

        $this->addSql('DROP INDEX UNIQ_CBE5A331989D9B62 ON book');
        $this->addSql('ALTER TABLE book CHANGE slug slug VARCHAR(128) DEFAULT \'\' COLLATE utf8_unicode_ci');
    }
}
You can generate an empty migration file using the doctrine:migratios:generate command.
If you now run the doctrine:migrations:migrate command everything should be fine and the database should be populated with the unique values we needed in the first place.
Conclusion
Luckily I solved this issue before an important deadline. Let me know if you found any other way around it, or a quicker solution to this issue.

How to Fix Symfony2 Ajax Login Redirect
You probably noticed that sometimes an Ajax request will return the login page instead of the actual content is should return. This happens when the user has beed logged out in the background and the current page does not reflect that (it could happen if the session expired or if the user simply logged out from another browser window/tab).
Here's a quick way to fix this: we will create an event listener that will catch this authentication exception, check for an Ajax request and, if found, it will return a 403 http code instead of redirecting to the login page. The JavaScript code will then know to reload the page and thus redirect to login in case of 403 instead of loading and showing the received content to the user.
Here's the Symfony2 event listener:
<?php
// src/AppBundle/EventListener/AjaxAuthenticationListener.php

namespace AppBundle\EventListener;

use Symfony\Component\HttpFoundation\Response;
use Symfony\Component\Security\Core\Exception\AuthenticationException;
use Symfony\Component\Security\Core\Exception\AccessDeniedException;
use Symfony\Component\HttpKernel\Event\GetResponseForExceptionEvent;
/**
 */
class AjaxAuthenticationListener
{

    /**
     * Handles security related exceptions.
     *
     * @param GetResponseForExceptionEvent $event An GetResponseForExceptionEvent instance
     */
    public function onCoreException(GetResponseForExceptionEvent $event)
    {
        $exception = $event->getException();
        $request = $event->getRequest();

        if ($request->isXmlHttpRequest()) {
            if ($exception instanceof AuthenticationException || $exception instanceof AccessDeniedException) {
                $event->setResponse(new Response('', 403));
            }
        }
    }
}
As always, we will have to register it as a service:
services:
    ajax.authentication.listener:
        class: AppBundle\EventListener\AjaxAuthenticationListener
        tags:
          - { name: kernel.event_listener, event: kernel.exception, method: onCoreException, priority: 1000 }
In the JavaScript code we add the following to make jQuery treat the Ajax errors by reloading the window in case of a 403 error. What will actually happen is that the user will end on the login page as he is no longer authenticated.
$(document).ready(function() {
    $(document).ajaxError(function (event, jqXHR) {
        if (403 === jqXHR.status) {
            window.location.reload();
        }
    });
});

How To Enable Email Confirmation On Fosuserbundle Profile Edit
We all know and use FOSUserBundle in our Symfony applications, so much it became kind of a standard. It provides everything you need for user management: login, registration, email confirmation and much more control over the access of the user in your application. But we found a thing missing from this awesome package: email confirmation after the initial email address has been changed through a profile edit. In the following lines we will show you how to extend the FOSUserBundle to implement this.
This post assumes you are familiar (even advanced) with the Symfony framework and FOSUserBundle.
To get started we will need a listener to be triggered when a profile edit has happened, FOSUserBundle fires two events that we are interested in: FOSUserEvents::PROFILE_EDIT_INITIALIZE and FOSUserEvents::PROFILE_EDIT_SUCCESS. The first one is triggered before the actual profile data is changed so we will use that to get a hold on the original email address. When the second event is fired, we will compare the initial email address with the current one and, if they are not the same, we will start the confirmation process:
<?php
// src/AppBundle/EventListener/ProfileEditListener.php

namespace AppBundle\EventListener;

use FOS\UserBundle\FOSUserEvents;
use FOS\UserBundle\Event\FormEvent;
use FOS\UserBundle\Event\GetResponseUserEvent;
use FOS\UserBundle\Mailer\MailerInterface;
use FOS\UserBundle\Util\TokenGeneratorInterface;
use Symfony\Component\EventDispatcher\EventSubscriberInterface;
use Symfony\Component\HttpFoundation\RedirectResponse;
use Symfony\Component\Routing\Generator\UrlGeneratorInterface;
use Symfony\Component\HttpFoundation\Session\SessionInterface;

class ProfileEditListener implements EventSubscriberInterface
{
    private $oldEmail;
    private $mailer;
    private $tokenGenerator;
    private $router;
    private $session;
    private $tokenStorage;

    public function __construct(MailerInterface $mailer, TokenGeneratorInterface $tokenGenerator, UrlGeneratorInterface $router, SessionInterface $session, TokenStorageInterface $tokenStorage)
    {
        $this->mailer = $mailer;
        $this->tokenGenerator = $tokenGenerator;
        $this->router = $router;
        $this->session = $session;
        $this->tokenStorage = $tokenStorage;
    }

    public static function getSubscribedEvents()
    {
        return array(
            FOSUserEvents::PROFILE_EDIT_INITIALIZE => 'onProfileEditInitialize',
            FOSUserEvents::PROFILE_EDIT_SUCCESS => 'onProfileEditSuccess'
        );
    }

    public function onProfileEditInitialize(GetResponseUserEvent $event)
    {
        $this->oldEmail = $event->getUser()->getEmail();
    }

    public function onProfileEditSuccess(FormEvent $event)
    {
        $user = $event->getForm()->getData();
        if ($user->getEmail() !== $this->oldEmail)
        {
            // disable user
            $user->setEnabled(false);

            // send confirmation token to new email
            $user->setConfirmationToken($this->tokenGenerator->generateToken());
            $this->mailer->sendConfirmationEmailMessage($user);

            // force user to log-out
            $this->tokenStorage->setToken();

            // redirect user to check email page
            $this->session->set('fos_user_send_confirmation_email/email', $user->getEmail());
            $url = $this->router->generate('fos_user_registration_check_email');
            $event->setResponse(new RedirectResponse($url));
        }
    }
}
Now, add this to your services.yml file and you're good to go:
    app.profile_edit_listener:
        class: AppBundle\EventListener\ProfileEditListener
        arguments: [@fos_user.mailer, @fos_user.util.token_generator, @router, @session, @security.token_storage]
        tags:
            - { name: kernel.event_subscriber }
One last thing: you will probably want to change the email template that is sent to the user with the confirmation link. You can overwrite it by creating app/Resources/FOSUserBundle/views/Registration/email.txt.twig and put what you need in there (use the original one from vendor/friendsofsymfony/user-bundle/Resources/views/Registration/email.txt.twig to see how to get the confirmation link).
iOS vs. Android – Which One Should You Choose?
Six users, six questions. After a (very) long research about which mobile OS is better between the two, I realized that the simplest way to find that out is by actually talking to people that use them. As you might expect, everyone has its own requirements and tastes, but in the end, one of the two OSs clearly stands out.