
Emulate a Redis Failover with Docker
Reading the Redis documentation can be a bit confusing without the hands-on experience. You could in theory create multiple processes of the Redis Server on your machine and configure each of them in part, but what if you could do it in a few commands? Not only that but emulate the network they’re connected to as well.
I’ve been looking into this and there’s a few examples out there on Web, the best one I could find was this one: https://github.com/AliyunContainerService/redis-cluster
So, starting from that example, I’ve tried to do the next best thing, which is to create a single docker-compose.yml file for all of it. Removing the need to build each image, just to do a docker-compose up and scale as needed.
Here’s what I got:
master:
  image: redis
slave:
  image: redis
  command: redis-server --slaveof master 6379
  links:
    - master
sentinel:
  image: redis
  command: >
    bash -c "echo 'port 26379' > sentinel.conf &&
    echo 'dir /tmp' >> sentinel.conf &&
    echo 'sentinel monitor master master 6379 2' >> sentinel.conf &&
    echo 'sentinel down-after-milliseconds master 5000' >> sentinel.conf &&
    echo 'sentinel parallel-syncs master 1' >> sentinel.conf &&
    echo 'sentinel failover-timeout master 5000' >> sentinel.conf &&
    cat sentinel.conf &&
    redis-server sentinel.conf --sentinel"
  links:
    - master
    - slave
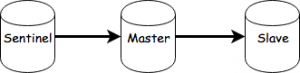
Basically, after saving this into a docker-compose.yml file and running docker-compose up in that folder you’ll get this:
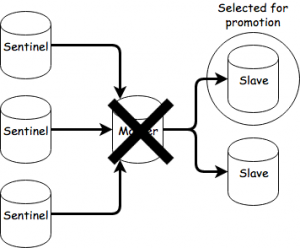
You can now scale as needed. For example, by running:
docker-compose scale slave=2 sentinel=3
You’ll end up with:

To initiale a failover, you’ll need to take the master out of the picture, you can do that with:
docker-compose pause master
You can now observe the communication between the sentinels and slaves. After the down-after-milliseconds and failover timeout passes, one of the slaves will be selected for promotion.
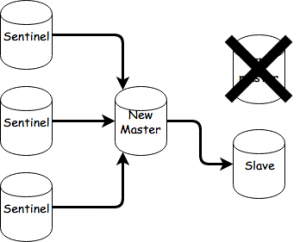
After the sentinels agree on the selection, the slave will become the new master.
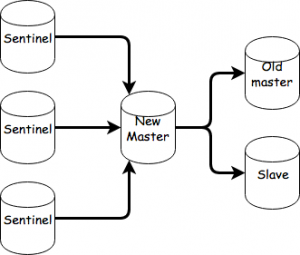
You can now unpause the old master by doing this:
docker-compose unpause master
The old master will now become a slave of the new master and perform a sync.
That’s about it. As an exercise you could try setting up a cluster starting from this and observe failovers there.

Counting lines and words using Go
For those who need to count words and lines in text files, an easy approach for this matter is to use bufio.ScanWords and bufio.ScanLine in order to quickly solve the problem.
To count words:
input := "Spicy jalapeno pastrami ut ham turducken.\n Lorem sed ullamco, leberkas sint short loin strip steak ut shoulder shankle porchetta venison prosciutto turducken swine.\n Deserunt kevin frankfurter tongue aliqua incididunt tri-tip shank nostrud.\n"
scanner := bufio.NewScanner(strings.NewReader(input))

// Set the split function for the scanning operation.
scanner.Split(bufio.ScanWords)

// Count the words.
count := 0
for scanner.Scan() {
    count++
}

if err := scanner.Err(); err != nil {
    fmt.Fprintln(os.Stderr, "reading input:", err)
}

fmt.Printf("%d\n", count)
ScanWords is a split function for a Scanner that returns each space-separated (checks unicode.IsSpace) word of text, with trimmed whitespace.
To count lines:
input := "Spicy jalapeno pastrami ut ham turducken.\n Lorem sed ullamco, leberkas sint short loin strip steak ut shoulder shankle porchetta venison prosciutto turducken swine.\n Deserunt kevin frankfurter tongue aliqua incididunt tri-tip shank nostrud.\n"
scanner := bufio.NewScanner(strings.NewReader(input))

// Set the split function for the scanning operation.
scanner.Split(bufio. ScanLines)

// Count the lines.
count := 0
for scanner.Scan() {
    count++
}

if err := scanner.Err(); err != nil {
    fmt.Fprintln(os.Stderr, "reading input:", err)
}

fmt.Printf("%d\n", count)
ScanLines is a split function for a Scanner that returns each line of text (separated by "\r?\n"). It returns also empty lines and the last line is returned even if it has no newline at the end.
Setup Docker Machine for Symfony Development
If you need a development environment for Symfony, hosted by Docker, you can use the fazy/apache-symfony docker image to start with, then extend it to your need.
In your Symfony project's folder add the Dockerfile and docker-compose.yml files.
In the first one, we added mysql and composer, then we used the docker-compose.yml file to mount a local volume to the docker container with file sync.
This way you can code on your machine and test in the docker environment.
The Dockerfile:
FROM fazy/apache-symfony
ADD . /app

RUN    apt-get update \
    && apt-get -yq install \
        mysql-server \
        php5-mysql \
    && rm -rf /var/lib/apt/lists/*

RUN curl -s https://getcomposer.org/installer | php
RUN mv composer.phar /usr/local/bin/composer
ENV COMPOSER_ALLOW_SUPERUSER 1
RUN service mysql start
The docker-compose.yml file:
version: "2"
services:
    site:
        build: .
        ports:
            - "8080:80"
        expose:
            - "80"
        volumes:
          - .:/app
To build the Docker container use:
docker-compose up --build
To start it when it's down just remove the --build parameter:
docker-compose up
Once is running, you can view it's ID by running:
docker ps
Now grab the first 3 characters from the id and use them in the next command to be able to log in the running container:
docker exec -t -i ID bash
Finally, to access the Symfony project in your browser, go to http://localhost:8080/app_dev.php and have fun!

What Nobody Tells You When You're a Junior Developer
Hooray! You've landed your dream job and you can now proudly call yourself a Junior Developer. The future looks nothing but bright and your awesome life story is underway. But now the hard part actually begins. Here's how you can stay on top of things with some useful tips I wish I knew when I was in your shoes as a junior developer.
Symfony2 Doctrine Migrations with Unique Indexes (Slugs)
This is something me and my colleagues encounter from time to time.
The Problem
One of the problems of adding unique indexes to existing data, like adding the sluggable Doctrine behaviour using the StofDoctrineExtensionsBundle, is that the generated migration will end up throwing an error:
SQLSTATE[23000]: Integrity constraint violation: 1062 Duplicate entry '' for key 'UNIQ_BDAFD8C8989D9B62'
Causes
Since the default values for the new MySQL column are not unique, adding the unique index is not possible - which is what the error above is telling us. So we will need to change the migration to also generate the unique values before adding the index.
Solution
In order to do so, we will have to split the generated migration into 2 different migrations, one for adding the new column, which could be a slug, and the other to add the unique index. After running the first migration, we need to execute the code that generates the unique values needed for the index. We can use the postUp method in a Doctrine migration to execute code after the “up” migration finished. We will also need to instantiate and boot the kernel in order to gain access to the Symfony framework and build our functionality like we would do in a controller:
<?php

namespace Application\Migrations;

use Doctrine\DBAL\Migrations\AbstractMigration;
use Doctrine\DBAL\Schema\Schema;

/**
 * Auto-generated Migration: Please modify to your needs!
 */
class Version20151021133750 extends AbstractMigration
{
    protected static $class = 'AppKernel';
    protected static $kernel;

    /**
     * Creates a Kernel.
     *
     * Available options:
     *
     *  * environment
     *  * debug
     *
     * @param array $options An array of options
     *
     * @return HttpKernelInterface A HttpKernelInterface instance
     */
    protected static function createKernel(array $options = array())
    {
        if (null === static::$class) {
            static::$class = static::getKernelClass();
        }

        return new static::$class(
            isset($options['environment']) ? $options['environment'] : 'test',
            isset($options['debug']) ? $options['debug'] : true
        );
    }

    /**
     * Creates a Client.
     *
     * @param array $options An array of options to pass to the createKernel class
     * @param array $server  An array of server parameters
     *
     * @return Client A Client instance
     */
    protected static function createClient(array $options = array(), array $server = array())
    {
        if (null !== static::$kernel) {
            static::$kernel->shutdown();
        }

        static::$kernel = static::createKernel($options);
        static::$kernel->boot();

        $client = static::$kernel->getContainer()->get('test.client');
        $client->setServerParameters($server);

        return $client;
    }

    /**
     * @param Schema $schema
     */
    public function up(Schema $schema)
    {
        // this up() migration is auto-generated, please modify it to your needs
        $this->abortIf($this->connection->getDatabasePlatform()->getName() != 'mysql', 'Migration can only be executed safely on \'mysql\'.');

        $this->addSql('ALTER TABLE book ADD slug VARCHAR(128) DEFAULT ""');
        //$this->addSql('CREATE UNIQUE INDEX UNIQ_CBE5A331989D9B62 ON book (slug)');
    }

    public function postUp(Schema $schema)
    {
        $this->client = self::createClient();
        $this->em = $this->client->getKernel()->getContainer()->get('doctrine')->getEntityManager();

        $books = $this->em->getRepository('AppBundle:Book')->findAll();
        foreach($books as $book){
            // need this so we force the generation of a new slug
            $book->setSlug(null);
            $this->em->persist($book);
        }
        $this->em->flush();
    }

    /**
     * @param Schema $schema
     */
    public function down(Schema $schema)
    {
        // this down() migration is auto-generated, please modify it to your needs
        $this->abortIf($this->connection->getDatabasePlatform()->getName() != 'mysql', 'Migration can only be executed safely on \'mysql\'.');

        //$this->addSql('DROP INDEX UNIQ_CBE5A331989D9B62 ON book');
        $this->addSql('ALTER TABLE book DROP slug');
    }
}
For the second migration file we only add the code necessary to add/remove the unique indexes:
<?php

namespace Application\Migrations;

use Doctrine\DBAL\Migrations\AbstractMigration;
use Doctrine\DBAL\Schema\Schema;

/**
 * Auto-generated Migration: Please modify to your needs!
 */
class Version20151021141028 extends AbstractMigration
{
    /**
     * @param Schema $schema
     */
    public function up(Schema $schema)
    {
        // this up() migration is auto-generated, please modify it to your needs
        $this->abortIf($this->connection->getDatabasePlatform()->getName() != 'mysql', 'Migration can only be executed safely on \'mysql\'.');

        $this->addSql('ALTER TABLE book CHANGE slug slug VARCHAR(128) NOT NULL');
        $this->addSql('CREATE UNIQUE INDEX UNIQ_CBE5A331989D9B62 ON book (slug)');
    }

    /**
     * @param Schema $schema
     */
    public function down(Schema $schema)
    {
        // this down() migration is auto-generated, please modify it to your needs
        $this->abortIf($this->connection->getDatabasePlatform()->getName() != 'mysql', 'Migration can only be executed safely on \'mysql\'.');

        $this->addSql('DROP INDEX UNIQ_CBE5A331989D9B62 ON book');
        $this->addSql('ALTER TABLE book CHANGE slug slug VARCHAR(128) DEFAULT \'\' COLLATE utf8_unicode_ci');
    }
}
You can generate an empty migration file using the doctrine:migratios:generate command.
If you now run the doctrine:migrations:migrate command everything should be fine and the database should be populated with the unique values we needed in the first place.
Conclusion
Luckily I solved this issue before an important deadline. Let me know if you found any other way around it, or a quicker solution to this issue.