
Android vs. iOS App Development: A Comparison & Decision Guide [Infographic]
There’s a revolution in mobile app development happening right now with the number of apps available for download in major app stores being at an all-time high. App developers are burying themselves in work, creating the latest software applications for mobile devices and hoping that their creations make enough money for them at Apple’s App Store and the Google Play Store. Apparently, the numbers are more than encouraging.
As of March 2017, the App Store had slightly more apps available at 2.2 billion compared with Play Store’s 2.8 million apps. Also in Q1 2017, combined iOS and Android app downloads were up 15% year-over-year, reaching a total of about 25 billion new downloads globally.
With re-installs, these numbers could go much higher. In terms of in-app purchases, revenue likewise increased 45% year-over-year for a staggering $15 billion across the iOS and Android systems running worldwide.
It’s definitely a good time for mobile app companies to continue hiring app developers to work on a wide array of mobile app products—from mobile music apps to instant messaging and mobile game apps. These apps are forecast to generate close to $200 billion in in-app and in-advertising revenues in less than three years’ time. But the question is, should you develop Android or iOS apps?
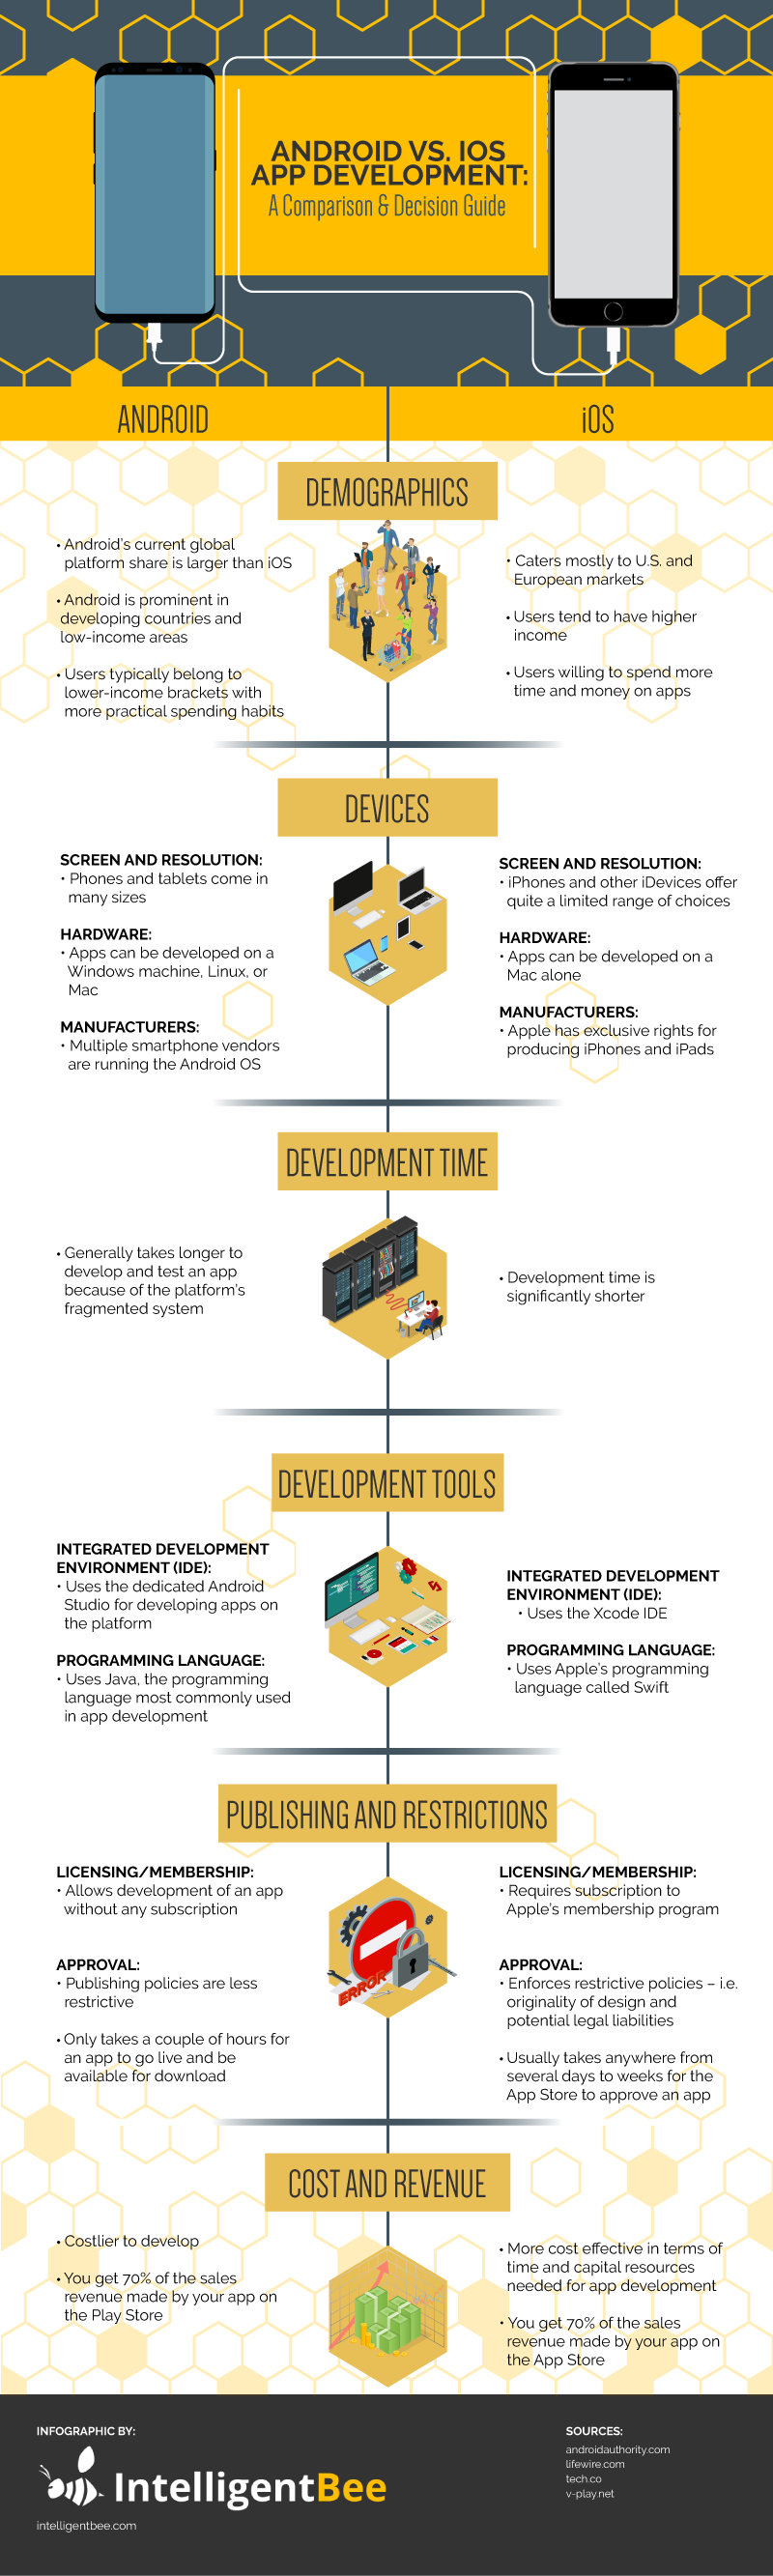
The following infographic gives you a comprehensive comparison between Android and iOS app development services in terms of demographics, the range of devices, time frame of development, hardware, publishing and restrictions, cost, and revenue. These are the factors you will need to consider as you decide whether to develop on the Android or iOS platform.
Share this Image On Your Site
The Android and iOS platforms both provide a venue for your mobile app development, but they have very distinct functionalities on their own. Sometimes, you get a clear-cut distinction between the two. However, there are also areas where they go neck and neck so you’ll have to rely on your judgment and preference when choosing the appropriate platform to develop your ware.
Demographics
Market share-wise, Android has a greater reach than its competitor, although iOS users’ income levels and spending capabilities may balance things out in the overall picture.
Devices
Screen and Resolution
The operating systems of Android and iOS differ from one another to a great extent. In designing your app, you need to factor in how your app will run given a particular device’s screen and resolution, the hardware compatible with the platform, and the individual features and capabilities of various phone models.
It might be a little more challenging to develop apps on the Android platform since you’ll be designing for different screen sizes and resolution. Meanwhile, iOS has a more uniform size range so that may free you up from having too many considerations to worry about.
Manufacturers
With Android, you’re developing not only for one Android-based device but thousands of other devices produced by different vendors. Since Android has an open nature system, you can leverage it to run your apps not just on mobile phones but also on smart TVs, wearables, or media streaming devices.
Since different Android devices have different capabilities that are unique from one another, your apps should be designed to allow compatibility with all Android devices. You have to consider the whole Android family—from low-range to mid- and high-range iterations when developing and designing your apps. Otherwise, you might be leaving out a large portion of the Android market from running your apps.
On the other hand, developing your apps for iOS means you’ll have fewer configurations to make, as you only have a limited lineup of gadgets at your disposal. This also means you’ll have fewer fragmentation issues developing your apps within the iOS system.
Development Time
As a developer, you’re naturally concerned about how much time it will take you to develop your app and put it on the App Store or the Play Store. Spending more time on app development may cause a dent on your resources and your chance to generate revenue for the company.
Testing your app across Android’s wide range of devices will naturally require more time as you look for and fix issues on one device after another. If the app works well on one Android device but not on another, you have to make the necessary modifications to the app.
Development Tools
Integrated Development Environment (IDE):
Android Studio replaced Eclipse, the previous iteration of Android’s IDE. Although Android Studio has been padded with improvements, iOS’s Xcode is deemed more mature. Specifically, in terms of debugging capability, the mobile simulator, which you use to build a prototype of your app for mobile, of iOS is deemed better than that of the Android simulator. However, Android Studio makes up for this by having a better autocomplete functionality for your coding work.
Programming Language
Java and Swift have a fairly similar structure. What differentiates them is that the former may be a bit complex if you’re just beginning to code, while the latter is based on Objective-C and touted to be generally error-free.
Publishing and Restrictions
From membership application all the way to submitting and publishing an app, it would seem like you’ll have to do a look-for-a-needle-in-the-haystack sort of thing with iOS apps, with no certainty whether your app will get approved on the App Store. In contrast, you can readily publish your app on the Play Store just by signing up and uploading your APK.
The strict quality standards of iOS may benefit users on the one hand but may scare freelance developers off on the other. That said, you’re more likely to have a better experience with Android’s mobile development policies, especially if you’re a startup developer and you’re not willing to spend on annual fees.
Cost and Revenue
Both the Play Store and the App Store put developers on equal footing when it comes to revenue generation, but the interplay of cost and revenue seems to favor iOS more. This may be attributed to iOS users’ willingness to spend on app purchases. Thus, iOS would seem to be the better choice over Android cost- and revenue-wise since it’s faster and less complicated to develop on the iOS platform.
Apple devices are known to be of premium quality and work well with a wide range of peripherals. These factors make the iOS platform effective for mobile app development as you need a shorter time to design, test, and release your app.
And the Winner Is?
After pitting Android and iOS against each other, both fared fairly the same.
Android may be your go-to platform in terms of compatibility with any hardware, more lenient rules for membership and approval of apps, and affordability of publishing fees. On the other hand, iOS shows better mileage in terms of uniformity in the screen size and resolution of devices for which the apps are intended, a more streamlined interface, shorter time frame of development, and cost and revenue model.
It’s a draw between Android and iOS when you consider market demographics, IDE features, and the nature of programming language used.
With all things considered, no one can claim to be better than the other. What one lacks, the other compensates for in another area of app development. It’s really your own choice to make, depending on your business goals and availability of resources.
Introduction to iBeacons on iOS
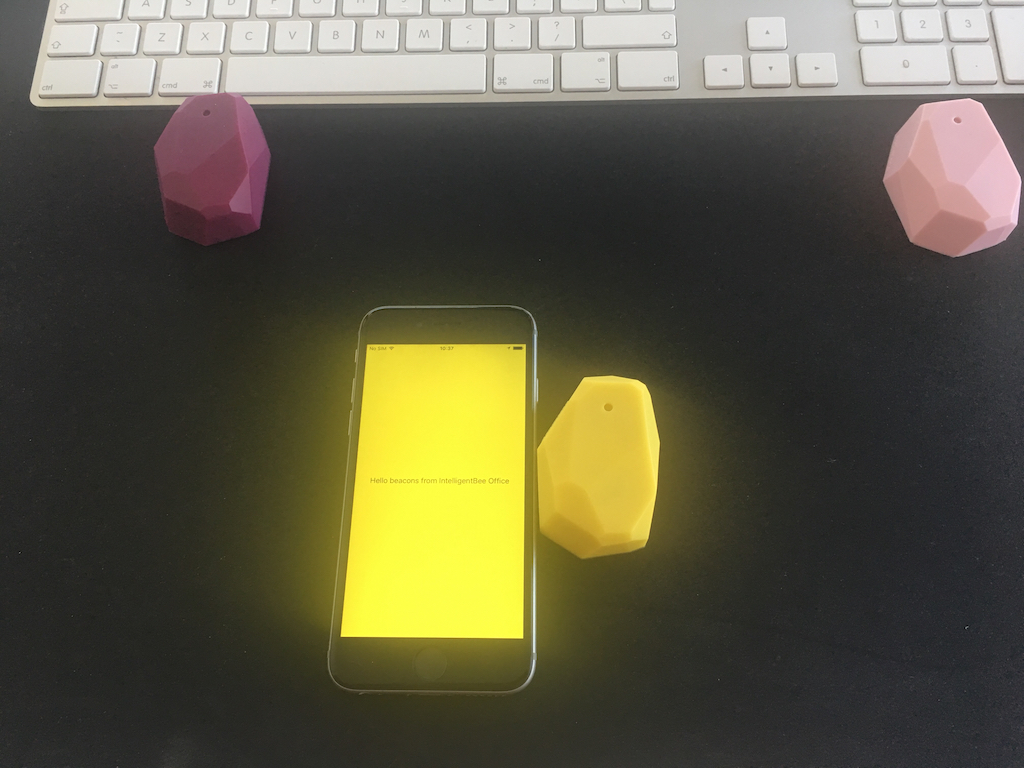
Hello, I got my hands on some interesting devices from Estimote called iBeacons which they are used for sending signals to the users (iOS/ Android) phone using Bluetooth.
What I’m going to do next is to build an iOS app using these devices which changes the background color accordingly to the nearest one of these 3 beacons.
![]()
The first thing that you have to do after you create a new project from XCode of Single View Application type is to install ‘EstimoteSDK’ using Cocoa pods. If you don’t have Cocoapods installed on your Mac please do it by following the instructions from here.
From the terminal window use "cd" to navigate into your project directory and run "pod init". This will create a podfile in your project directory. Open it and under "# Pods for your project name" add the following line:
pod 'EstimoteSDK'
Then run "pod install" command in your terminal. After the installation of the cocoapod close the project and open the .workspace file and create a bridging header. Import there the EstimoteSDK with the code below.
#import <EstimoteSDK/EstimoteSDK.h>
Now let’s continue by creating a ‘iBeaconViewController’ with a UILabel inside of it having full width and height and the text aligned center, after this please create an IBOutlet to it and name it 'label' . Then set the new created view controller as the root view for the window.
 func application(_ application: UIApplication, didFinishLaunchingWithOptions launchOptions: [UIApplicationLaunchOptionsKey: Any]?) -> Bool {
        // Override point for customization after application launch.

        window?.rootViewController = UIBeaconViewController(nibName: String(describing: UIBeaconViewController.self), bundle: nil)

        return true
    }
The next step is creating the ‘BeaconManager’< file, you have it’s content below.
import UIKit

enum MyBeacon: String {

    case pink = "4045"
    case magenta = "20372"
    case yellow = "22270"
}

let BeaconsUUID: String = "B9407F30-F5F8-466E-AFF9-25556B57FE6D"
let RegionIdentifier: String  = "IntelligentBee Office"
let BeaconsMajorID: UInt16  = 11111

class BeaconManager: ESTBeaconManager {

    static let main : BeaconManager = BeaconManager()

}
But let’s first explain what is the purpose of each item in this file. So an iBeacon contains the following main properties, an UUID, MajorID, MinorID. All of these properties represents a way for the phone to know which device should listen to.
The MajorID is used when having groups of beacons and the MinorID is to know each specific device, the minor ids are represented in the MyBeacon enum among with the beacon color. The RegionIdentifier represents a way for the app to know what region are the beacons part of and it’s used to differentiate all the regions that are monitored by the app.
Now let’s go back on the UIBeaconViewController and start writing some action.
import UIKit

class UIBeaconViewController: UIViewController, ESTBeaconManagerDelegate {

    // MARK: - Props

    let region = CLBeaconRegion(
        proximityUUID: UUID(uuidString: BeaconsUUID)!,
        major: BeaconsMajorID, identifier: RegionIdentifier)

    let colors: [MyBeacon : UIColor] =
        [MyBeacon.pink: UIColor(red: 240/255.0, green: 183/255.0, blue: 183/255.0, alpha: 1),
         MyBeacon.magenta : UIColor(red: 149/255.0, green: 70/255.0, blue: 91/255.0, alpha: 1),
         MyBeacon.yellow : UIColor(red: 251/255.0, green: 254/255.0, blue: 53/255.0, alpha: 1)]

    // MARK: - IBOutlets

    @IBOutlet weak var label: UILabel!
You can guess what region does, it defines a location to detect beacons, pretty intuitive. The colors is an array which contains the mapping between the minorID and the color of each beacon.
// MARK: - UI Utilities

    func resetBackgroundColor() {
        self.view.backgroundColor = UIColor.green
    }

    // MARK: - ESTBeaconManagerDelegate - Utilities

    func setupBeaconManager() {
        BeaconManager.main.delegate = self

        if (BeaconManager.main.isAuthorizedForMonitoring() && BeaconManager.main.isAuthorizedForRanging()) == false {
            BeaconManager.main.requestAlwaysAuthorization()
        }
    }

    func startMonitoring() {

        BeaconManager.main.startMonitoring(for: region)
        BeaconManager.main.startRangingBeacons(in: region)
    }
The functions above are pretty self describing from their names, one thing I need to describe is Monitoring and Ranging. The monitoring actions are triggered when the phone enters/ exits a beacons area and the ranging is based on the proximity of the beacon.
    // MARK: - ESTBeaconManagerDelegate

    func beaconManager(_ manager: Any, didChange status: CLAuthorizationStatus) {

        if status == .authorizedAlways ||
            status == .authorizedWhenInUse {
            startMonitoring()
        }
    }

    func beaconManager(_ manager: Any, monitoringDidFailFor region: CLBeaconRegion?, withError error: Error) {
        label.text = "FAIL " + (region?.proximityUUID.uuidString)!
    }

    func beaconManager(_ manager: Any, didEnter region: CLBeaconRegion) {

        label.text = "Hello beacons from \(region.identifier)"
    }

    func beaconManager(_ manager: Any, didExitRegion region: CLBeaconRegion) {

        label.text = "Bye bye beacons from \(region.identifier)"
    }

    func beaconManager(_ manager: Any, didRangeBeacons beacons: [CLBeacon], in region: CLBeaconRegion) {

        let knownBeacons = beacons.filter { (beacon) -> Bool in

            return beacon.proximity != CLProximity.unknown
        }

        if let firstBeacon = knownBeacons.first,
            let myBeacon = MyBeacon(rawValue:firstBeacon.minor.stringValue)   {

            let beaconColor = colors[myBeacon]
            self.view.backgroundColor = beaconColor
        }
        else {
            resetBackgroundColor()
        }
    }

    func beaconManager(_ manager: Any, didFailWithError error: Error) {
        label.text = "DID FAIL WITH ERROR" + error.localizedDescription
    }
}
After the insertion of all the code, the app should run with no errors or warning and should look like this:
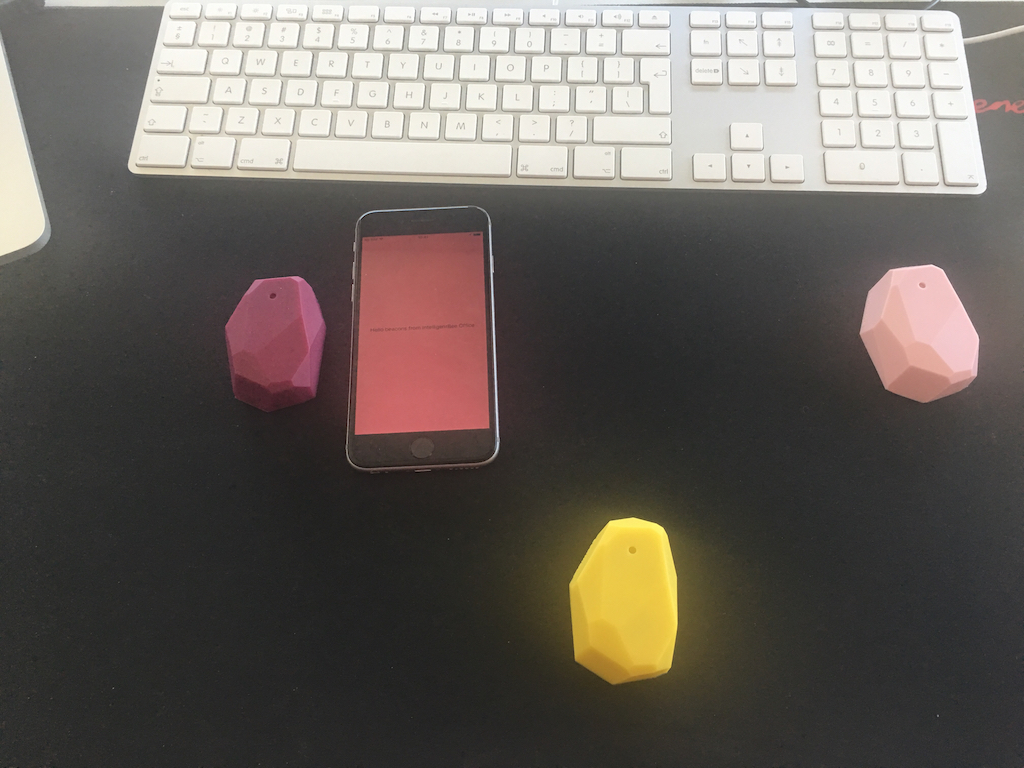
I hope this is a good introduction for iBeacons in iOS Mobile App Development. If you have any improvements or suggestions please leave a comment below.
You can get the code from here: https://github.com/intelligentbee/iBeaconTest

How to create a bridging header in iOS
Hello ! If you want to import a Objective-C code into a Swift Xcode project you definitely have to create a bridging header (this allows you to communicate with your old Objective-C classes from your Swift classes).
The process of doing this is very easy. Go to File -> New -> File… , a window will appear in which you will select “Objective-C File” , name the file however you choose, then select Create. A pop-up will appear asking you if you want to create a bridging header like in the image bellow.
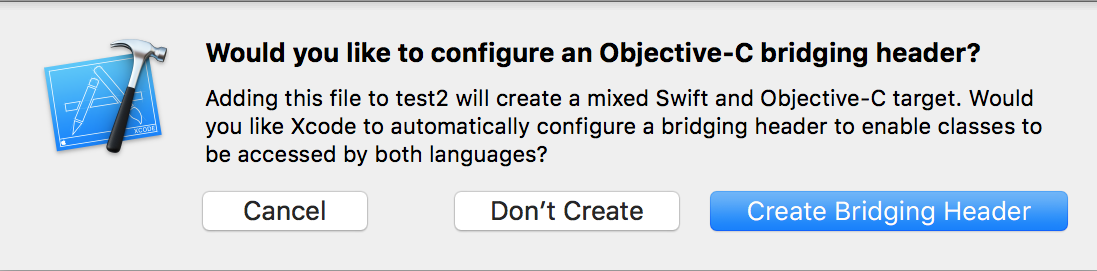
Choose “Create Bridging Header” and voila, you a have it.
To complete the process delete the .m file that you choose the name and move the bridging header to a more suitable group inside the project navigator.
Read more iOS related articles.
If you want to create this manually follow the steps from here.
That’s it, hope you find this post useful and if you have suggestions please leave a comment below.

Face Detection with Apple’s iOS 11 Vision Framework
Great stuff is coming from Apple this autumn! Among a lot of new APIs there is the Vision Framework which helps with detection of faces, face features, object tracking and others.
In this post we will take a look at how can one put the face detection to work. We will make a simple application that can take a photo (using the camera of from the library) and will draw some lines on the faces it detects to show you the power of Vision.
Select an Image
I will go fast through this so if you are a really beginner and you find this too hard to follow, please check the my previous iOS related post, Building a Travel Photo Sharing iOS App, first, as it has the same photo selection functionality but explained in greater detail.
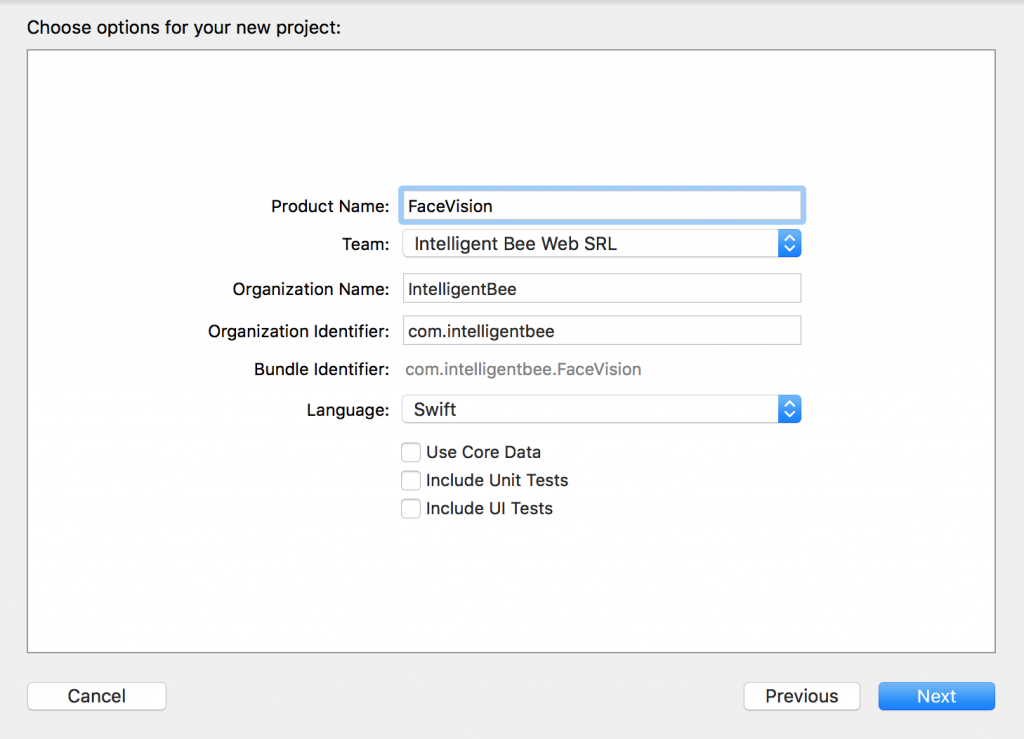
You will need Xcode 9 beta and a device running iOS 11 beta to test this. Let’s start by creating a new Single View App project named FaceVision:
Open the Main.storyboard and drag a button Take Photo to the center of it. Use the constraints to make it stay there :) Create a takePhoto action for it:
@IBAction func takePhoto(_ sender: UIButton) {
    let picker = UIImagePickerController()
    picker.delegate = self
    let alert = UIAlertController(title: nil, message: nil, preferredStyle: .actionSheet)
    if UIImagePickerController.isSourceTypeAvailable(.camera) {
        alert.addAction(UIAlertAction(title: "Camera", style: .default, handler: {action in
            picker.sourceType = .camera
            self.present(picker, animated: true, completion: nil)
        }))
    }
    alert.addAction(UIAlertAction(title: "Photo Library", style: .default, handler: { action in
        picker.sourceType = .photoLibrary
        // on iPad we are required to present this as a popover
        if UIDevice.current.userInterfaceIdiom == .pad {
            picker.modalPresentationStyle = .popover
            picker.popoverPresentationController?.sourceView = self.view
            picker.popoverPresentationController?.sourceRect = self.takePhotoButton.frame
        }
        self.present(picker, animated: true, completion: nil)
    }))
    alert.addAction(UIAlertAction(title: "Cancel", style: .cancel, handler: nil))
    // on iPad this is a popover
    alert.popoverPresentationController?.sourceView = self.view
    alert.popoverPresentationController?.sourceRect = takePhotoButton.frame
    self.present(alert, animated: true, completion: nil)
}
Here we used an UIImagePickerController to get an image so we have to make our ViewController implement the UIImagePickerControllerDelegate and UINavigationControllerDelegate protocols:
class ViewController: UIViewController, UIImagePickerControllerDelegate, UINavigationControllerDelegate {We also need an outlet for the button:
@IBOutlet weak var takePhotoButton: UIButton!
And an image var:
var image: UIImage!
We also need to add the following in the Info.plist to be able to access the camera and the photo library:
Privacy - Camera Usage Description: Access to the camera is needed in order to be able to take a photo to be analyzed by the appPrivacy - Photo Library Usage Description: Access to the photo library is needed in order to be able to choose a photo to be analyzed by the app
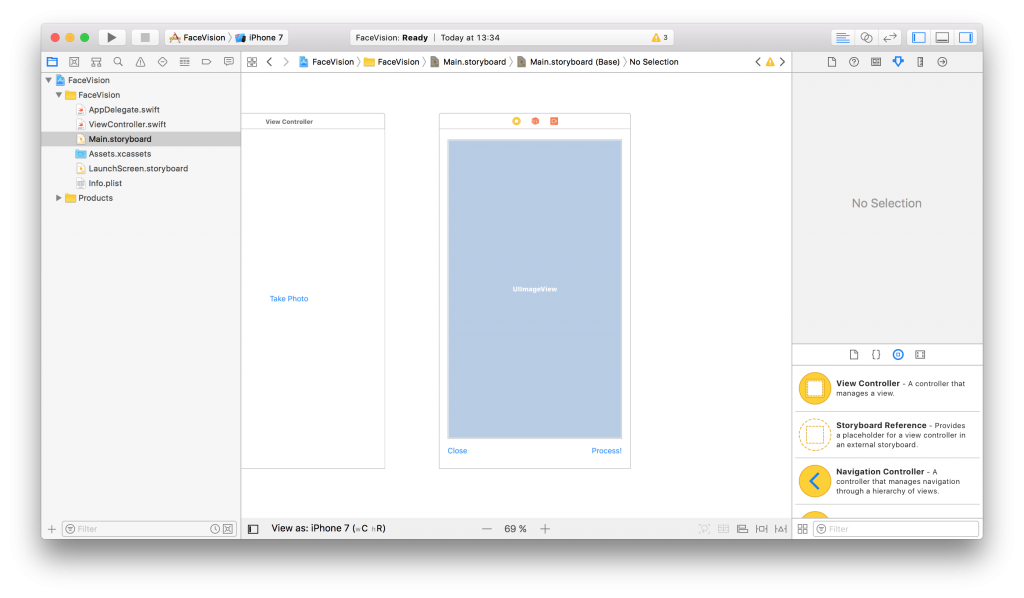
After the users chooses an image we will use another view controller to show it and to let the user start the processing or go back to the first screen. Add a new View Controller in the Main.storyboard. In it, add an Image View with an Aspect Fit Content Mode and two buttons like in the image below (don’t forget to use the necessary constraints):
Now, create a new UIViewController class named ImageViewControler.swift and set it to be the class of the new View Controller you just added in the Main.storyboard:
import UIKit

class ImageViewController: UIViewController {

    override func viewDidLoad() {
        super.viewDidLoad()

        // Do any additional setup after loading the view.
    }
}
Still in the Main.storyboard, create a Present Modally kind segue between the two view controllers with the showImageSegue identifier:

Also add an outlet for the Image View and a new property to hold the image from the user:
@IBOutlet weak var imageView: UIImageView!

var image: UIImage!
Now, back to our initial ViewController class, we need to present the new ImageViewController and set the selected image:
func imagePickerController(_ picker: UIImagePickerController, didFinishPickingMediaWithInfo info: [String : Any]) {
    dismiss(animated: true, completion: nil)
    image = info[UIImagePickerControllerOriginalImage] as! UIImage
    performSegue(withIdentifier: "showImageSegue", sender: self)
}

override func prepare(for segue: UIStoryboardSegue, sender: Any?) {
    if segue.identifier == "showImageSegue" {
        if let imageViewController = segue.destination as? ImageViewController {
            imageViewController.image = self.image
        }
    }
}
We also need an exit method to be called when we press the Close button from the Image View Controller:
@IBAction func exit(unwindSegue: UIStoryboardSegue) {
    image = nil
}
To make this work, head back to the Main.storyboard and Ctrl+drag from the Close button to the exit icon of the Image View Controller and select the exit method from the popup.
To actually show the selected image to the user we have to set it to the imageView:
override func viewDidLoad() {
    super.viewDidLoad()

    // Do any additional setup after loading the view.
    imageView.image = image
}
If you run the app now you should be able to select a photo either from the camera or from the library and it will be presented to you in the second view controller with the Close and Process! buttons below it.
![]()
Detect Face Features
It’s time to get to the fun part, detect the faces and faces features in the image.
Create a new process action for the Process! button with the following content:
@IBAction func process(_ sender: UIButton) {
    var orientation:Int32 = 0

    // detect image orientation, we need it to be accurate for the face detection to work
    switch image.imageOrientation {
    case .up:
        orientation = 1
    case .right:
        orientation = 6
    case .down:
        orientation = 3
    case .left:
        orientation = 8
    default:
        orientation = 1
    }

    // vision
    let faceLandmarksRequest = VNDetectFaceLandmarksRequest(completionHandler: self.handleFaceFeatures)
    let requestHandler = VNImageRequestHandler(cgImage: image.cgImage!, orientation: orientation ,options: [:])
    do {
        try requestHandler.perform([faceLandmarksRequest])
    } catch {
        print(error)
    }
}
After translating the image orientation from UIImageOrientation values to kCGImagePropertyOrientation values (not sure why Apple didn’t make them the same), the code will start the detection process from the Vision framework. Don’t forget to import Vision to have access to it’s API.
We’ll add now the method that will be called when the Vision’s processing is done:
func handleFaceFeatures(request: VNRequest, errror: Error?) {
    guard let observations = request.results as? [VNFaceObservation] else {
        fatalError("unexpected result type!")
    }

    for face in observations {
        addFaceLandmarksToImage(face)
    }
}
This also calls yet another method that does the actual drawing on the image based on the data received from the detect face landmarks request:
func addFaceLandmarksToImage(_ face: VNFaceObservation) {
    UIGraphicsBeginImageContextWithOptions(image.size, true, 0.0)
    let context = UIGraphicsGetCurrentContext()

    // draw the image
    image.draw(in: CGRect(x: 0, y: 0, width: image.size.width, height: image.size.height))

    context?.translateBy(x: 0, y: image.size.height)
    context?.scaleBy(x: 1.0, y: -1.0)

    // draw the face rect
    let w = face.boundingBox.size.width * image.size.width
    let h = face.boundingBox.size.height * image.size.height
    let x = face.boundingBox.origin.x * image.size.width
    let y = face.boundingBox.origin.y * image.size.height
    let faceRect = CGRect(x: x, y: y, width: w, height: h)
    context?.saveGState()
    context?.setStrokeColor(UIColor.red.cgColor)
    context?.setLineWidth(8.0)
    context?.addRect(faceRect)
    context?.drawPath(using: .stroke)
    context?.restoreGState()

    // face contour
    context?.saveGState()
    context?.setStrokeColor(UIColor.yellow.cgColor)
    if let landmark = face.landmarks?.faceContour {
        for i in 0...landmark.pointCount - 1 { // last point is 0,0
            let point = landmark.point(at: i)
            if i == 0 {
                context?.move(to: CGPoint(x: x + CGFloat(point.x) * w, y: y + CGFloat(point.y) * h))
            } else {
                context?.addLine(to: CGPoint(x: x + CGFloat(point.x) * w, y: y + CGFloat(point.y) * h))
            }
        }
    }
    context?.setLineWidth(8.0)
    context?.drawPath(using: .stroke)
    context?.saveGState()

    // outer lips
    context?.saveGState()
    context?.setStrokeColor(UIColor.yellow.cgColor)
    if let landmark = face.landmarks?.outerLips {
        for i in 0...landmark.pointCount - 1 { // last point is 0,0
            let point = landmark.point(at: i)
            if i == 0 {
                context?.move(to: CGPoint(x: x + CGFloat(point.x) * w, y: y + CGFloat(point.y) * h))
            } else {
                context?.addLine(to: CGPoint(x: x + CGFloat(point.x) * w, y: y + CGFloat(point.y) * h))
            }
        }
    }
    context?.closePath()
    context?.setLineWidth(8.0)
    context?.drawPath(using: .stroke)
    context?.saveGState()

    // inner lips
    context?.saveGState()
    context?.setStrokeColor(UIColor.yellow.cgColor)
    if let landmark = face.landmarks?.innerLips {
        for i in 0...landmark.pointCount - 1 { // last point is 0,0
            let point = landmark.point(at: i)
            if i == 0 {
                context?.move(to: CGPoint(x: x + CGFloat(point.x) * w, y: y + CGFloat(point.y) * h))
            } else {
                context?.addLine(to: CGPoint(x: x + CGFloat(point.x) * w, y: y + CGFloat(point.y) * h))
            }
        }
    }
    context?.closePath()
    context?.setLineWidth(8.0)
    context?.drawPath(using: .stroke)
    context?.saveGState()

    // left eye
    context?.saveGState()
    context?.setStrokeColor(UIColor.yellow.cgColor)
    if let landmark = face.landmarks?.leftEye {
        for i in 0...landmark.pointCount - 1 { // last point is 0,0
            let point = landmark.point(at: i)
            if i == 0 {
                context?.move(to: CGPoint(x: x + CGFloat(point.x) * w, y: y + CGFloat(point.y) * h))
            } else {
                context?.addLine(to: CGPoint(x: x + CGFloat(point.x) * w, y: y + CGFloat(point.y) * h))
            }
        }
    }
    context?.closePath()
    context?.setLineWidth(8.0)
    context?.drawPath(using: .stroke)
    context?.saveGState()

    // right eye
    context?.saveGState()
    context?.setStrokeColor(UIColor.yellow.cgColor)
    if let landmark = face.landmarks?.rightEye {
        for i in 0...landmark.pointCount - 1 { // last point is 0,0
            let point = landmark.point(at: i)
            if i == 0 {
                context?.move(to: CGPoint(x: x + CGFloat(point.x) * w, y: y + CGFloat(point.y) * h))
            } else {
                context?.addLine(to: CGPoint(x: x + CGFloat(point.x) * w, y: y + CGFloat(point.y) * h))
            }
        }
    }
    context?.closePath()
    context?.setLineWidth(8.0)
    context?.drawPath(using: .stroke)
    context?.saveGState()

    // left pupil
    context?.saveGState()
    context?.setStrokeColor(UIColor.yellow.cgColor)
    if let landmark = face.landmarks?.leftPupil {
        for i in 0...landmark.pointCount - 1 { // last point is 0,0
            let point = landmark.point(at: i)
            if i == 0 {
                context?.move(to: CGPoint(x: x + CGFloat(point.x) * w, y: y + CGFloat(point.y) * h))
            } else {
                context?.addLine(to: CGPoint(x: x + CGFloat(point.x) * w, y: y + CGFloat(point.y) * h))
            }
        }
    }
    context?.closePath()
    context?.setLineWidth(8.0)
    context?.drawPath(using: .stroke)
    context?.saveGState()

    // right pupil
    context?.saveGState()
    context?.setStrokeColor(UIColor.yellow.cgColor)
    if let landmark = face.landmarks?.rightPupil {
        for i in 0...landmark.pointCount - 1 { // last point is 0,0
            let point = landmark.point(at: i)
            if i == 0 {
                context?.move(to: CGPoint(x: x + CGFloat(point.x) * w, y: y + CGFloat(point.y) * h))
            } else {
                context?.addLine(to: CGPoint(x: x + CGFloat(point.x) * w, y: y + CGFloat(point.y) * h))
            }
        }
    }
    context?.closePath()
    context?.setLineWidth(8.0)
    context?.drawPath(using: .stroke)
    context?.saveGState()

    // left eyebrow
    context?.saveGState()
    context?.setStrokeColor(UIColor.yellow.cgColor)
    if let landmark = face.landmarks?.leftEyebrow {
        for i in 0...landmark.pointCount - 1 { // last point is 0,0
            let point = landmark.point(at: i)
            if i == 0 {
                context?.move(to: CGPoint(x: x + CGFloat(point.x) * w, y: y + CGFloat(point.y) * h))
            } else {
                context?.addLine(to: CGPoint(x: x + CGFloat(point.x) * w, y: y + CGFloat(point.y) * h))
            }
        }
    }
    context?.setLineWidth(8.0)
    context?.drawPath(using: .stroke)
    context?.saveGState()

    // right eyebrow
    context?.saveGState()
    context?.setStrokeColor(UIColor.yellow.cgColor)
    if let landmark = face.landmarks?.rightEyebrow {
        for i in 0...landmark.pointCount - 1 { // last point is 0,0
            let point = landmark.point(at: i)
            if i == 0 {
                context?.move(to: CGPoint(x: x + CGFloat(point.x) * w, y: y + CGFloat(point.y) * h))
            } else {
                context?.addLine(to: CGPoint(x: x + CGFloat(point.x) * w, y: y + CGFloat(point.y) * h))
            }
        }
    }
    context?.setLineWidth(8.0)
    context?.drawPath(using: .stroke)
    context?.saveGState()

    // nose
    context?.saveGState()
    context?.setStrokeColor(UIColor.yellow.cgColor)
    if let landmark = face.landmarks?.nose {
        for i in 0...landmark.pointCount - 1 { // last point is 0,0
            let point = landmark.point(at: i)
            if i == 0 {
                context?.move(to: CGPoint(x: x + CGFloat(point.x) * w, y: y + CGFloat(point.y) * h))
            } else {
                context?.addLine(to: CGPoint(x: x + CGFloat(point.x) * w, y: y + CGFloat(point.y) * h))
            }
        }
    }
    context?.closePath()
    context?.setLineWidth(8.0)
    context?.drawPath(using: .stroke)
    context?.saveGState()

    // nose crest
    context?.saveGState()
    context?.setStrokeColor(UIColor.yellow.cgColor)
    if let landmark = face.landmarks?.noseCrest {
        for i in 0...landmark.pointCount - 1 { // last point is 0,0
            let point = landmark.point(at: i)
            if i == 0 {
                context?.move(to: CGPoint(x: x + CGFloat(point.x) * w, y: y + CGFloat(point.y) * h))
            } else {
                context?.addLine(to: CGPoint(x: x + CGFloat(point.x) * w, y: y + CGFloat(point.y) * h))
            }
        }
    }
    context?.setLineWidth(8.0)
    context?.drawPath(using: .stroke)
    context?.saveGState()

    // median line
    context?.saveGState()
    context?.setStrokeColor(UIColor.yellow.cgColor)
    if let landmark = face.landmarks?.medianLine {
        for i in 0...landmark.pointCount - 1 { // last point is 0,0
            let point = landmark.point(at: i)
            if i == 0 {
                context?.move(to: CGPoint(x: x + CGFloat(point.x) * w, y: y + CGFloat(point.y) * h))
            } else {
                context?.addLine(to: CGPoint(x: x + CGFloat(point.x) * w, y: y + CGFloat(point.y) * h))
            }
        }
    }
    context?.setLineWidth(8.0)
    context?.drawPath(using: .stroke)
    context?.saveGState()

    // get the final image
    let finalImage = UIGraphicsGetImageFromCurrentImageContext()

    // end drawing context
    UIGraphicsEndImageContext()

    imageView.image = finalImage
}
As you can see we have quite a lot of features that Vision is able to identify: the face contour, the mouth (both inner and outer lips), the eyes together with the pupils and eyebrows, the nose and the nose crest and, finally, the median line of the faces.
You can now run the app and take some unusual selfies of yourself. Here’s mine:
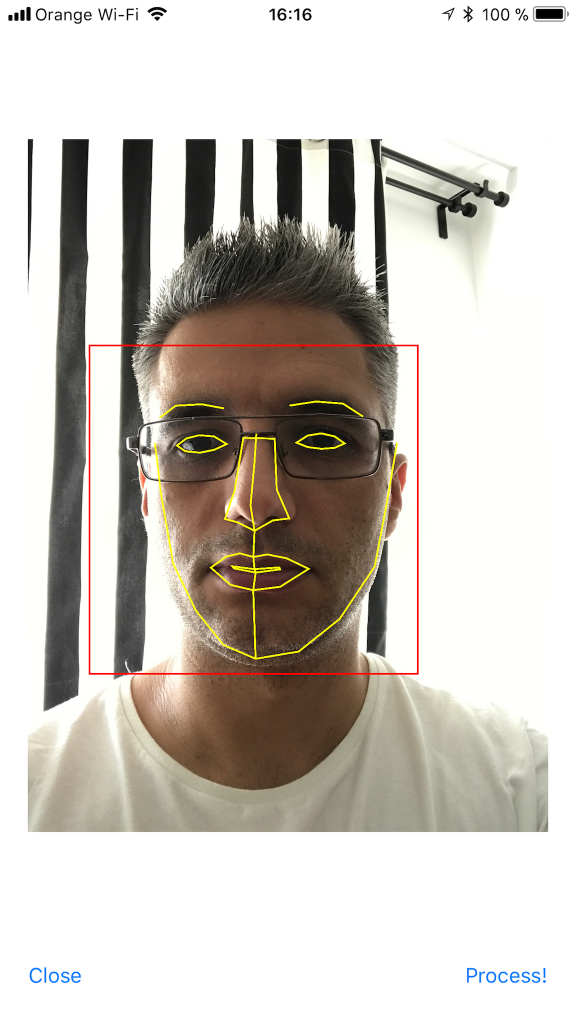
I hope you enjoyed this, please let me know in the comments how did it go and if there are things that can be improved. Also, some pictures taken with the app wouldn’t hurt at all :)
You can get the code from here: https://github.com/intelligentbee/FaceVision
Thanks!

Building a Travel Photo Sharing iOS App
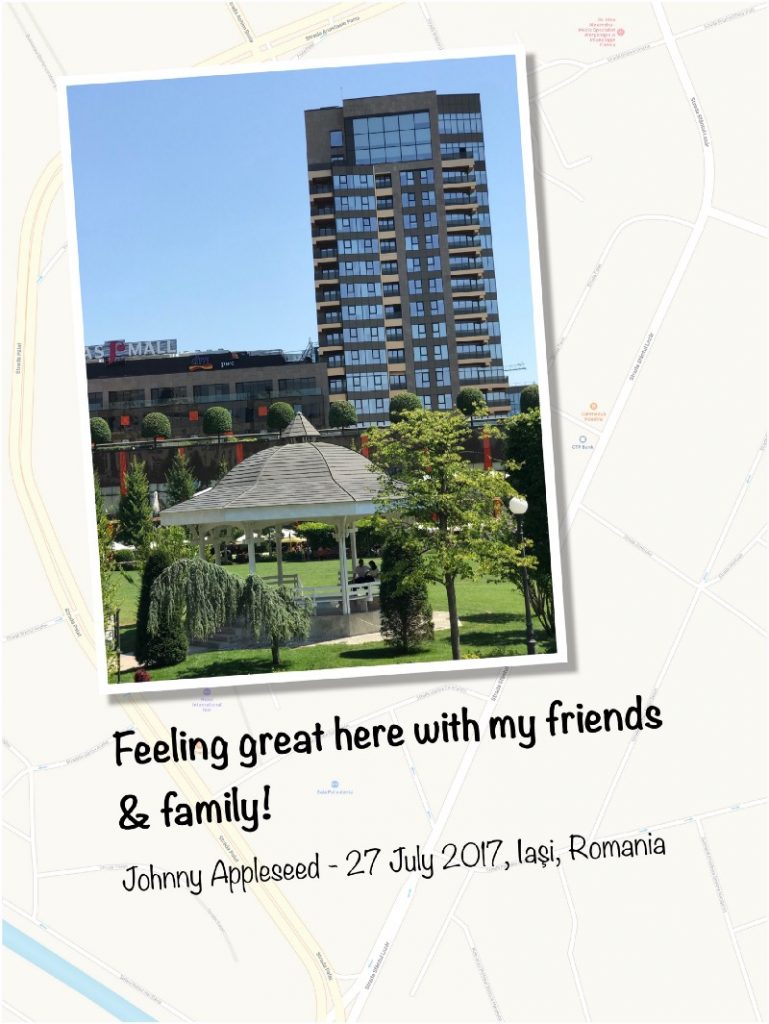
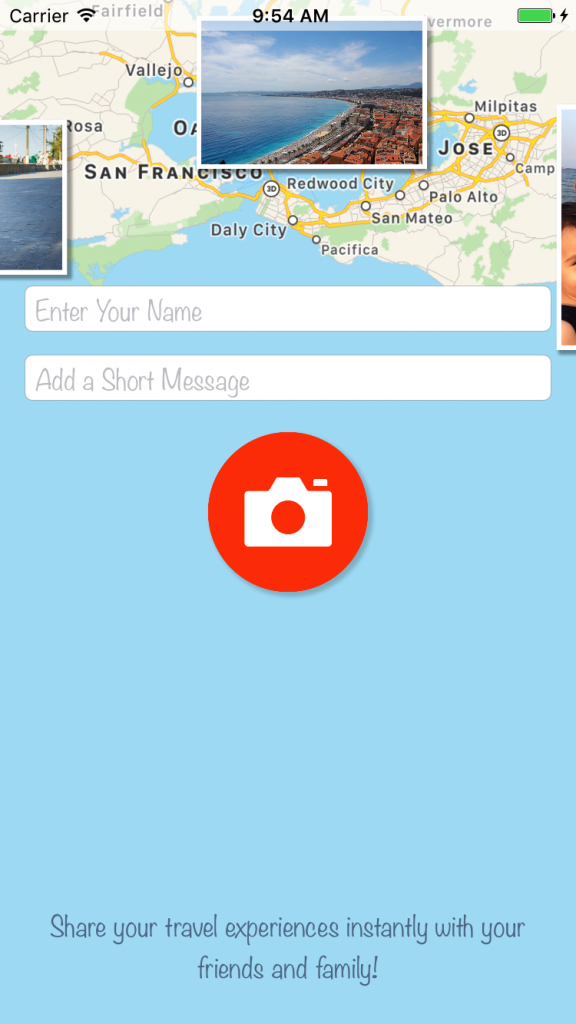
Hello! I want to show you how to build a relative simple photo sharing app with a twist: your images will be placed on a map background of your current location. You will also be able to add a short message and your name, to end up with an image looking like this (so you can brag to your friends with what you visited in the awesome vacation you have):
To follow this tutorial you need an Apple computer with xCode installed and an Apple developer account.
Create the Project
Open xCode and create a new project named PicTravel. Choose the Single View Application template:
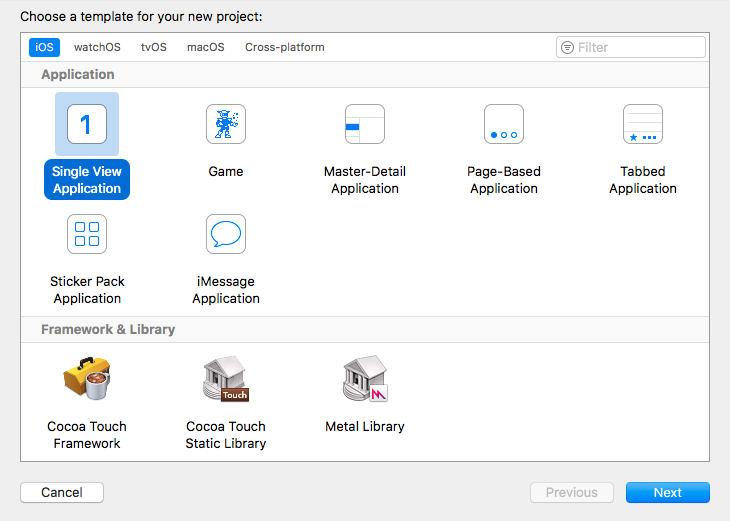
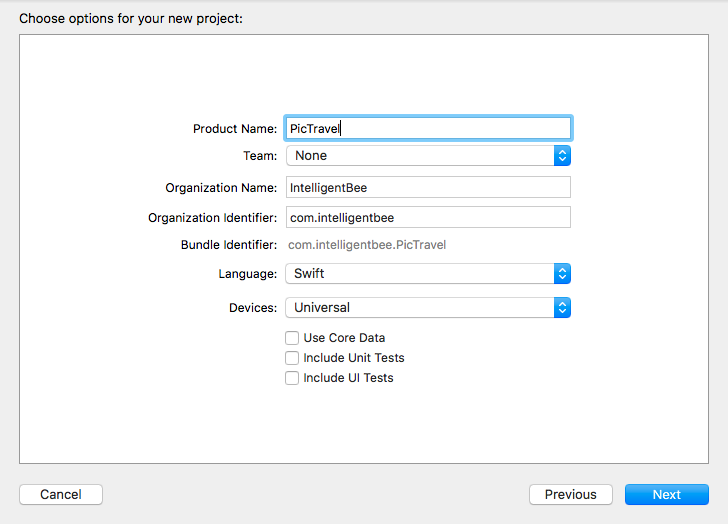
Give the project a name, we chose PicTravel but you ca choose what other name you like. Also fill in the organization name and the organization identifier for your project:
The last step is to save the newly created project in your Developer folder.
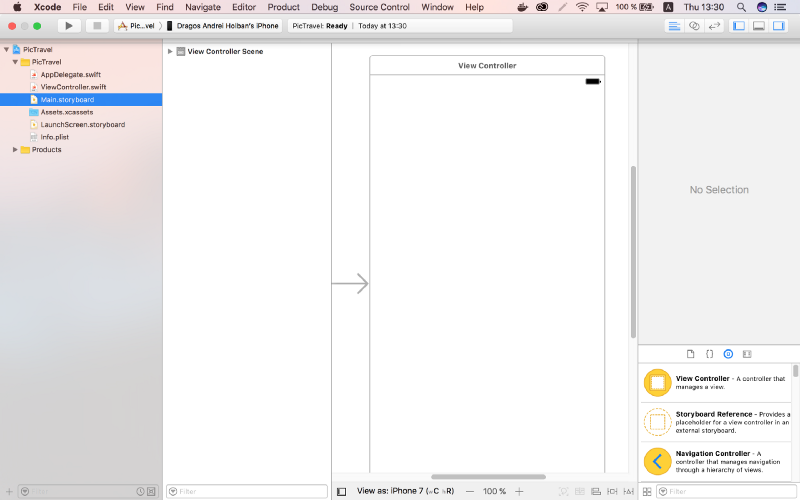
Building the Interface
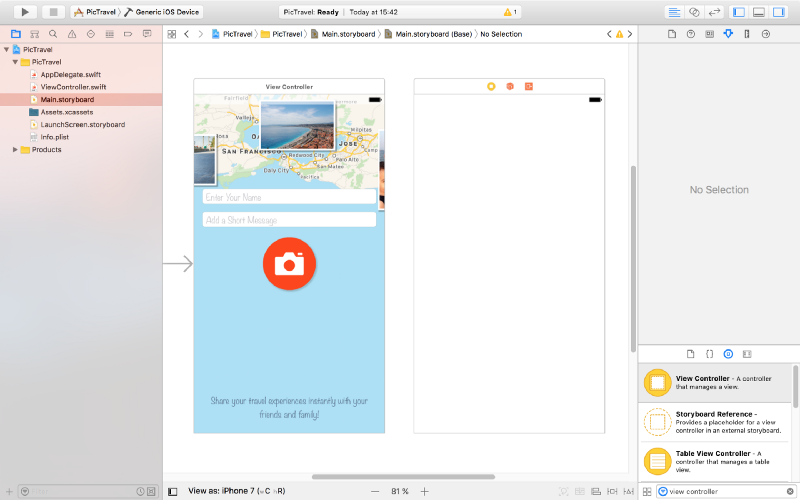
From the left panel, open the Main.storyboard. This is where we will build our app interface.
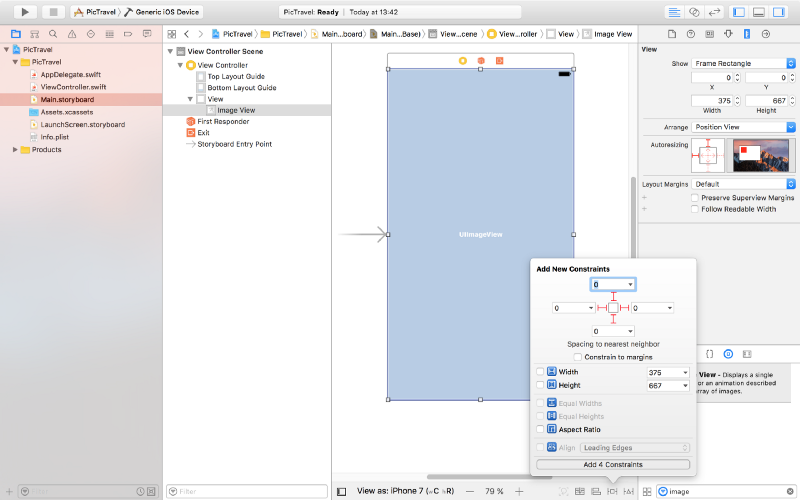
From the right panel, the bottom part, drag an ImageView and place it in the center of the scene. Resize it so it covers everything (snap it to the blue lines that appear).
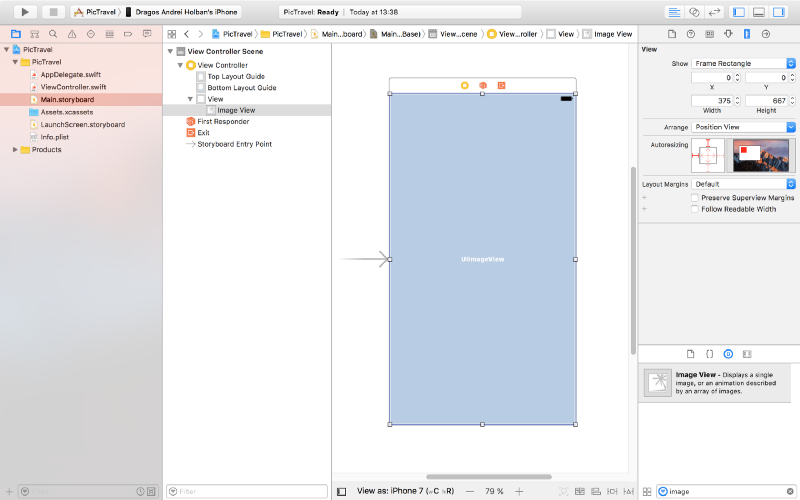
Pin the ImageView to the scene margins using the constraints dialog like you see in the image below:
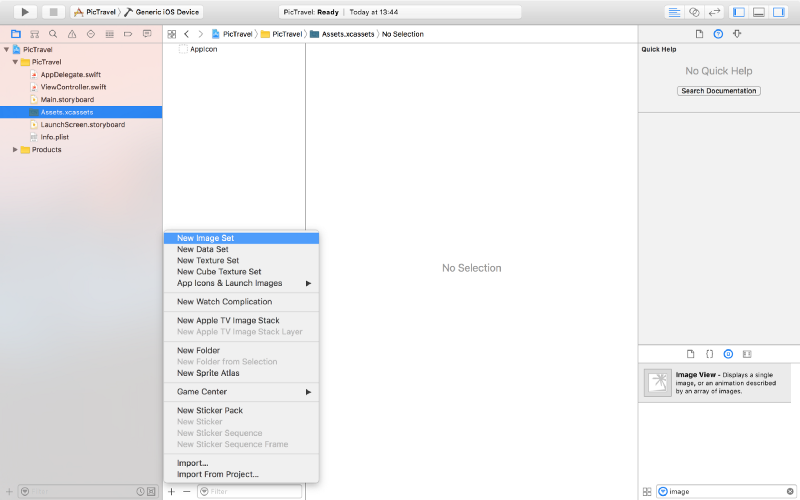
We will use this to put a background image for our app’s main screen. Download the background image from here then open the Assets.xcassets item from the left panel, click on the “+” button from the bottom and add a new image set named Background.
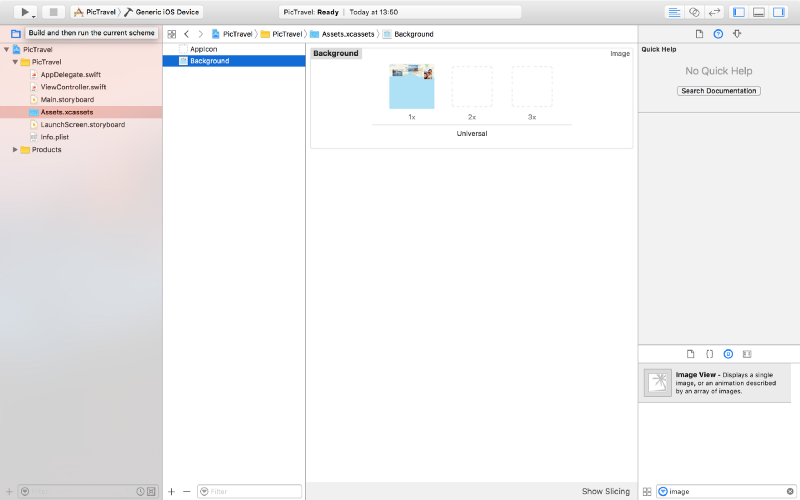
Drag the downloaded image to the “1x” placeholder to end up with something like this (we will not use the “2x” and “3x” placeholder for this tutorial, but you can add bigger resolution images to it if you want).
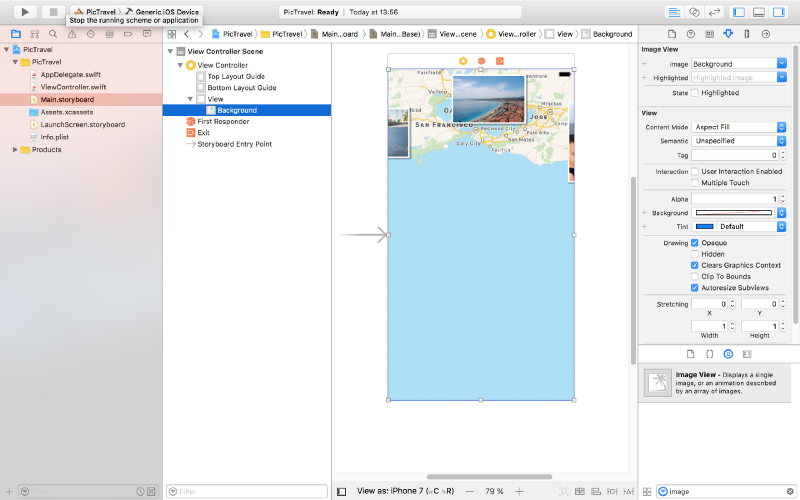
Now, back to the Main.storyboard, select the ImageView and, from the Attributes Inspector, select the Background image and set the Content Mode to Aspect Fill.
It’s time to add a new image to our assets that we will use for the take a photo button we are about to add. Download the image from here, create a new Image Set named Button in the Assets.xcassets and drag the image into the 1x placeholder like we did earlier with the background.
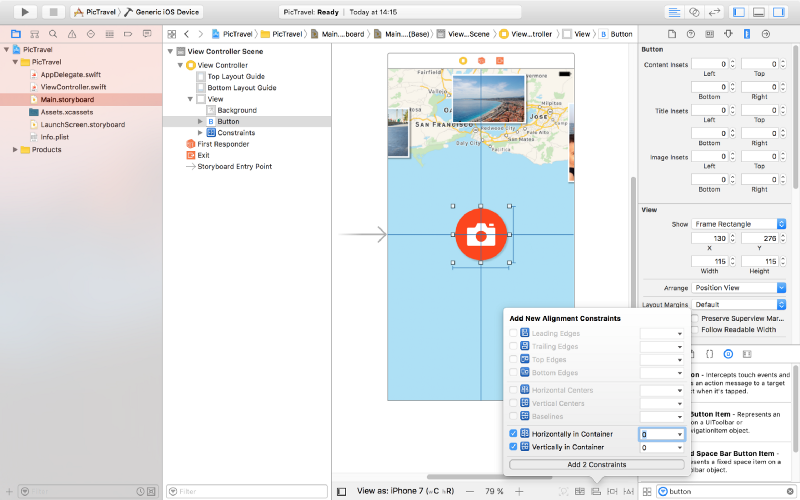
Next, in the Main.storybord, drag a button to the center of the scene. Set it’s Type to Custom, clear the Title and set the Background to the Button image we just created. From the Size Inspector, set the button with and height to 115.
Add two new constraints for the button’s with and heigh (115 each), then, from the Alignment Constriants, align the button horizontally and vertically in the container.
Now let’s add two text fields for the user’s name and message. Place them like in the image below, with the constraints listed below. Don’t forget the blue guides that make the placement easier for you. To create constrains between two elements you can Ctrl+drag from one to another and select the type of constraint you want from the popup that appears.
For the message text field:
- Top Space to the name text field:
15 - Bottom Space to the button:
15 - Width <=
500 - Align Center X to superview
- Trailing Space to superview:
0with a Priority of900- that’s very important as it will keep the text field pinned to the margin on iPhones but on bigger devices the width constraint will be stronger so it will not grow larger than 500. - Leading Space to superview:
0with a Priority of900
For the name field:
- Bottom Space to the message text field:
15 - Width <=
500 - Align Center X to superview
- Trailing Space to superview:
0with a Priority of900 - Leading Space to superview:
0with a Priority of900
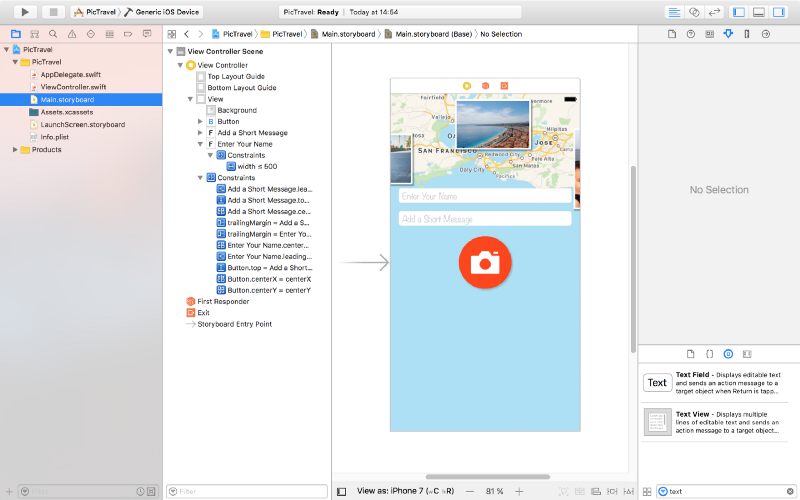
Set the placeholders for each of the text fields to “Enter Your Name” and “Add a Short Message” so the user knows what to do. Set the Font to Noteworthy Light with a size of 17 for both.
Also, for the name field set the Capitalization to Words, Correction and SpellChecking, both to No. For the message field set the Capitalization to Sentences.
Here’s the result:
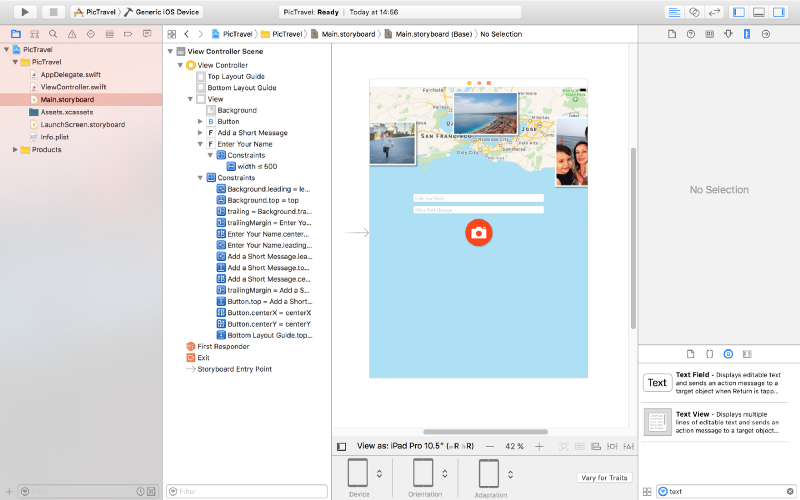
And here’s how it looks on an iPad (you can use the bottom bar under the scene to select on what device you want to preview the interface):
There are two more small elements to add and our main screen will be finished.
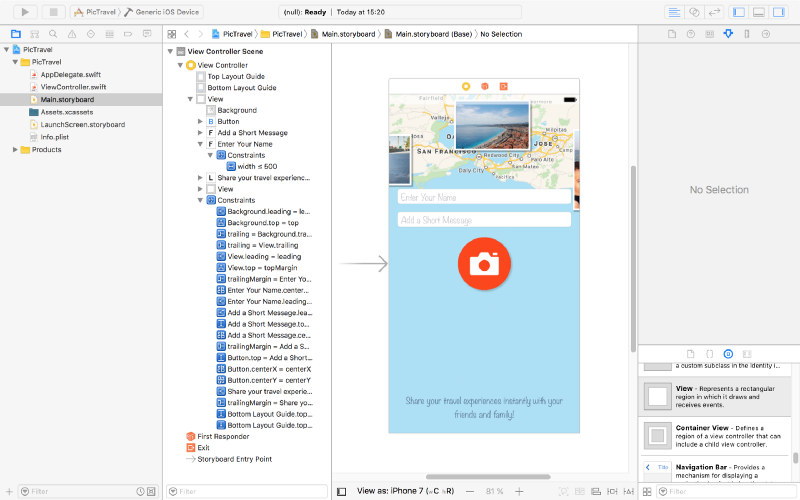
Add a label at the bottom with the following text: “Share your travel experiences instantly with your friends & family!”. Set it’s Font to Noteworthly Light 17, Alignment to center, Color to #5E7A96 and Lines to 0. Use the following constrains:
- Trailing Space to superview’s margins:
0 - Leading Space to superview’s margins:
0 - Bottom Space to Bottom Layout:
20 - Height:
64
Finally, add a new view at the top, having a white background with a opacity of 60%. Constrains used are:
- Trailing Space to superview:
0 - Leading Space to superview:
0 - Bottom Space to Top Layout:
20 - Height:
20
Here is the final design:
We will use this screen to get the user’s name and message and open the camera or photo library to take a photo. But after we gel all we need from the user, we need a new screen to show the final image and let him share it. So let’s add a new screen to our app.
From the Object Library, drag a new View Controller near the first one:
Set the background for the view of this new View Controller to #ACE0F6.
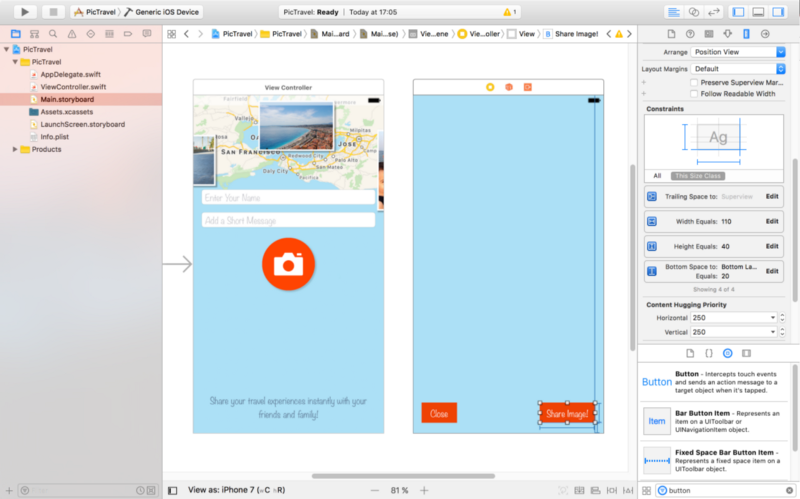
Next, add two buttons like in the image below. Type is custom, background color is #EE4205, font Noteworthy Light 17. Height 40, width 70 and 110. They are pinned to the bottom layout + 20, left or right of the container and also have constraints on with and height.
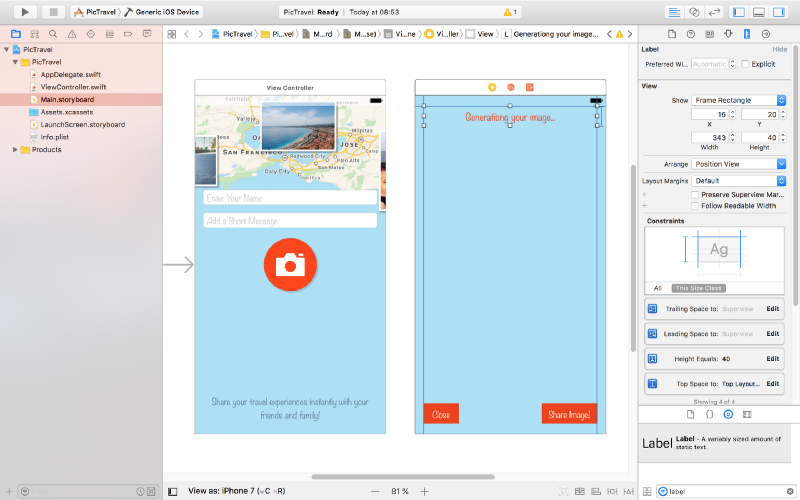
At the top, add a label to show the current status of the app to the user. Pin it to the top, left and right margins using constrains with a height of 40. Set the font to Noteworthy Light 19 and color to #EE4205. The initial text will be “Generating your image…” center aligned.
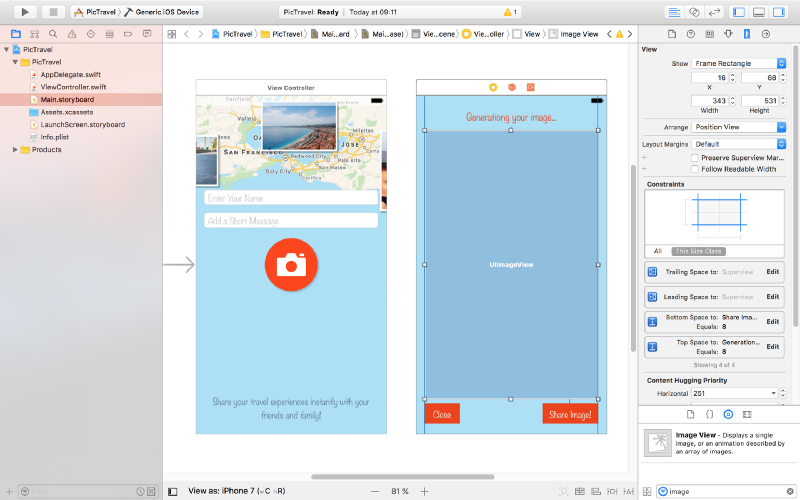
To show the generated image we need an Image View. Drag it to the center of the second screen and create the following constraints for it:
- Top Space to “Generating your image…” label:
8 - Bottom Space to “Share Image!” button:
8 - Leading Space to superview margin:
0 - Trailing Space to superview margin:
0
Also set it’s Content Mode to Aspect Fit
The last piece of the puzzle is an Activity Indicator View that we will use to visually inform the user that something happens behind the scenes (final image generation) and he has to wait for a few seconds.
Drag it from the Object Library and place it in the middle of the screen. Add constraints to center it horizontally and vertically in the container and set its Behavior to Animating and Hides When Stopped.
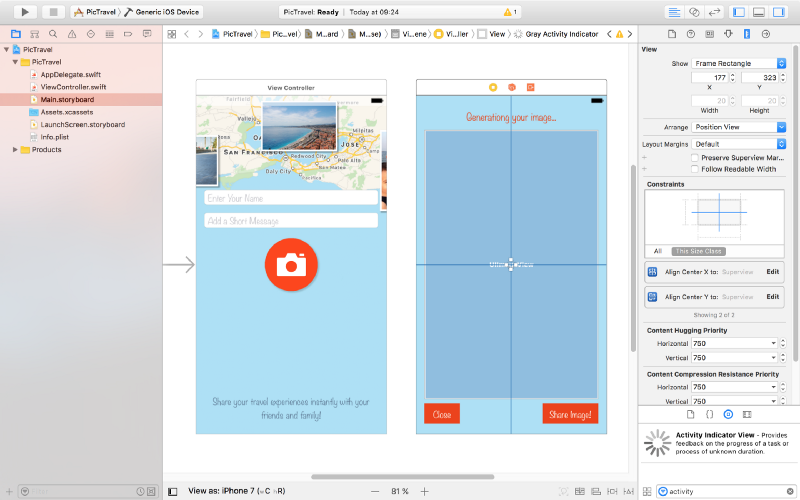
That’s it, our app’s interface is done. Run the app in the simulator to see how it looks.
Now it’s time to write some code.
Taking a Photo
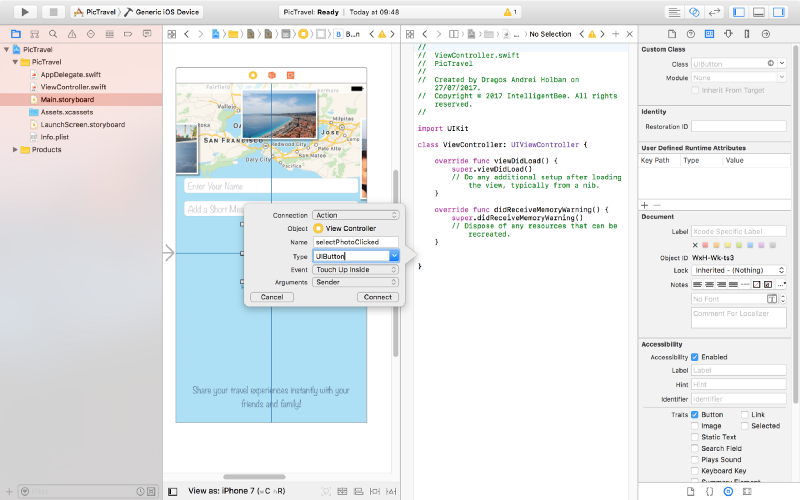
With the main.storyboard still open, select the button from the first screen then open the Assistant editor and be sure you have the ViewController.swit file open on the right side. Use the manual mode if you have in case the Assistant editor has a problem figuring this out.
Now, Ctrl+drag from the button to the code to create a new action (be sure to select Action as the Connection , set the Name to selectPhotoClicked and the Type to UIButton):
@IBAction func selectPhotoClicked(_ sender: UIButton) {

}
Also Ctrl+drag from the two text fields and the button to the code and create three outlets:
@IBOutlet weak var name: UITextField!
@IBOutlet weak var message: UITextField!
@IBOutlet weak var selectPhotoButton: UIButton!
Now let’s start with the most interesting part, choosing a photo. The user will be given a choice to take a photo using the camera or to choose one from the photo library. For this we will use an action sheet.
Edit the selectPhotoClicked method to add the code for this:
@IBAction func selectPhotoClicked(_ sender: UIButton) {
    let picker = UIImagePickerController()
    picker.delegate = self
    let alert = UIAlertController(title: nil, message: nil, preferredStyle: .actionSheet)
    alert.addAction(UIAlertAction(title: "Camera", style: .default, handler: {action in
        picker.sourceType = .camera
        self.present(picker, animated: true, completion: nil)
    }))
    alert.addAction(UIAlertAction(title: "Photo Library", style: .default, handler: { action in
        picker.sourceType = .photoLibrary
        self.present(picker, animated: true, completion: nil)
    }))
    alert.addAction(UIAlertAction(title: "Cancel", style: .cancel, handler: nil))
    self.present(alert, animated: true, completion: nil)
}
To make this code work we need to make our ViewController a delegate for both UIImagePickerControllerDelegate and UINavigationControllerDelegate. To do this change the line defining the ViewController class to the following:
class ViewController: UIViewController, UIImagePickerControllerDelegate, UINavigationControllerDelegate {If you test now the app will crash with an error like “This app has crashed because it attempted to access privacy-sensitive data without a usage description…”. That’s because the app has to ask the user’s permission to access the photo library or the camera and we have to provide a reason for this, reason that will be presented to the user. To do this open the Info.plist file and add a two new items:
Privacy - Photo Library Usage Descriptionwith a string value ofAccess to the photo library is needed in order to be able to choose a photo to be shared by the app.Privacy - Camera Usage Descriptionwith a string value ofAccess to the camera is needed in order to be able to take a photo to be shared by the app.
Also, if you try to choose the “camera” option in the simulator, the app will crash again because the simulator has no camera (“Source type 1 not available”). We need to add a test for this and only present the option if the camera is available:
if UIImagePickerController.isSourceTypeAvailable(.camera) {
    alert.addAction(UIAlertAction(title: "Camera", style: .default, handler: {action in
        picker.sourceType = .camera
        self.present(picker, animated: true, completion: nil)
    }))
}
One more thing to fix before we start handling the actual images: try to run the app on an iPad (in the simulator or on a real device). The app crashes one more time :(
Your application has presented a UIAlertController of style UIAlertControllerStyleActionSheet. The modalPresentationStyle of a UIAlertController with this style is UIModalPresentationPopover. You must provide location information for this popover through the alert controller’s popoverPresentationController. You must provide either a sourceView and sourceRect or a barButtonItem. If this information is not known when you present the alert controller, you may provide it in the UIPopoverPresentationControllerDelegate method -prepareForPopoverPresentation.
That’s because the UIAlertController on an iPad is presented like a popover (UIModalPresentationPopover) and it needs a position to be shown at. To do this we will have to test if we have a popoverPresentationController in the alert and, if true, set it’s sourceView and sourceRect (we are using an Swift optional for this, as the code after the question mark will be executed only if the popoverPresentationController is not nil):
alert.addAction(UIAlertAction(title: "Cancel", style: .cancel, handler: nil))
// on iPad this is a popover
alert.popoverPresentationController?.sourceView = self.view
alert.popoverPresentationController?.sourceRect = selectPhotoButton.frame
self.present(alert, animated: true, completion: nil)
We also need to make the photo selection from the library to be shown as a popover on an iPad:
alert.addAction(UIAlertAction(title: "Photo Library", style: .default, handler: { action in
    picker.sourceType = .photoLibrary
    // on iPad we are required to present this as a popover
    if UIDevice.current.userInterfaceIdiom == .pad {
        picker.modalPresentationStyle = .popover
        picker.popoverPresentationController?.sourceView = self.view
        picker.popoverPresentationController?.sourceRect = self.selectPhotoButton.frame
    }
    self.present(picker, animated: true, completion: nil)
}))
Now everything should be fine. Let’s see how to handle the image the user chooses.
We already added a View Controller in the Main.storyboard to show the final image to the user but we need an associated view controller class for it so we have a place to write the code involved in the process.
From the File menu select New -> File… then choose the Cocoa Touch Class option and click Next. Name the new class ShareViewController and be sure to set it as a subclass of UIViewController, no XIB, Swift language.
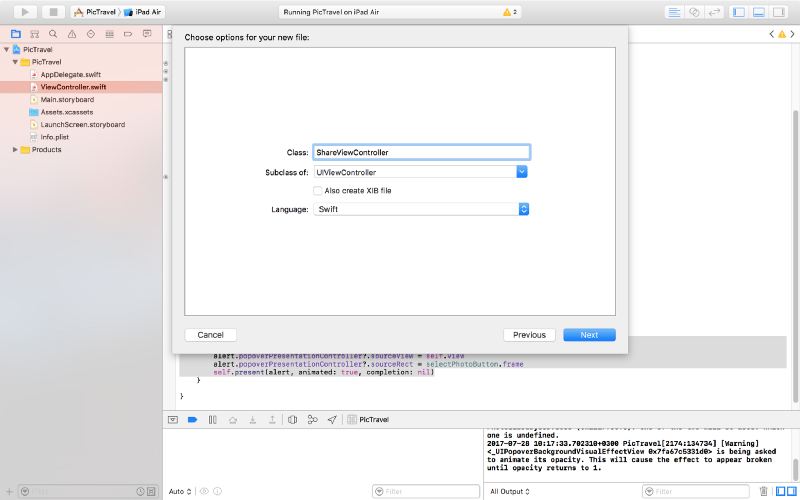
Click Next one more time and be sure to have the PicTravel Group selected and PicTravel target checked. Then Create the file.
Go back to the Main.storyboard and select the second view controller and set it’s class to the new ShareViewController we just created (you can do this from the Identity inspector, the Class dropdown).
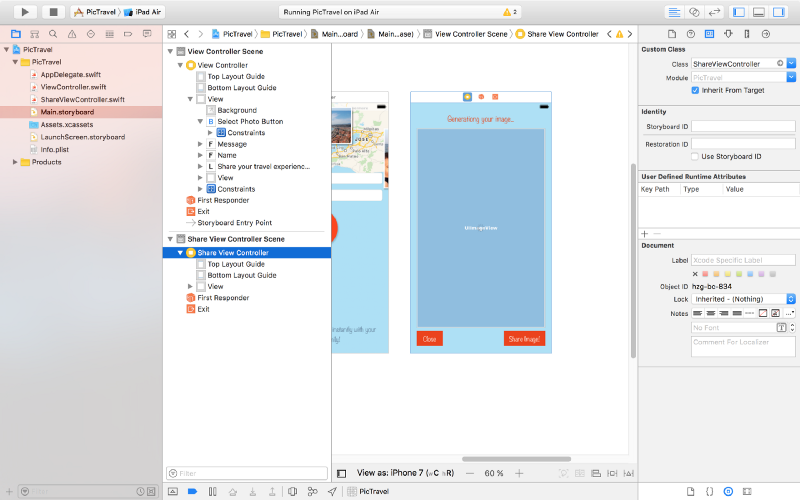
Now, with the view controller still selected, open the assistant editor and make sure it is set to automatically open the associated file. This should be the ShareViewController class. Ctrl+drag from the Image View, Activity Indicator and the Label to the class to create outlets for them:
@IBOutlet weak var imageView: UIImageView!
@IBOutlet weak var activityIndicator: UIActivityIndicatorView!
@IBOutlet weak var titleLabel: UILabel!

Also add some new variables for the user’s image, name and message:
var image: UIImage!
var name: String!
var message: String!
So, here’s what we will do next: when the user chooses an image, we instantiate the ShareViewController, set its image, name and message properties to the user’s data then present the ShareViewController.
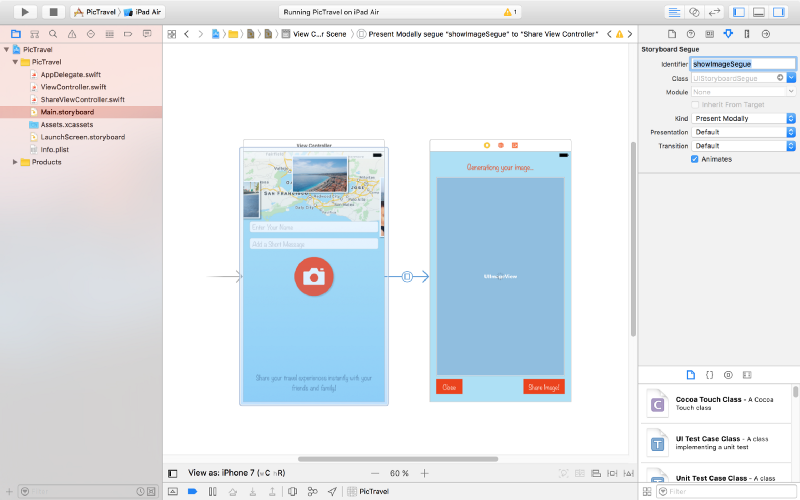
To do this we need to create a segue (transition). Close the assistant editor then, in the Main.storyboard, Ctrl+drag from the first “View Controller” (click on the yellow symbol from the top-right) to the “Share View Controller” and define a “Present Modally” segue. then click on the created segue and set it’s identifier to showImageSegue (we will need this later in the code to identify this specific segue).
Now open our ViewController class. Add a new method to be called when the user selects an image (this is part of the UIImagePickerControllerDelegate):
func imagePickerController(_ picker: UIImagePickerController, didFinishPickingMediaWithInfo info: [String : Any]) {
    dismiss(animated: true, completion: nil)
    image = info[UIImagePickerControllerOriginalImage] as! UIImage
    performSegue(withIdentifier: "showImageSegue", sender: self)
}
Here’s what this method does:
- dismiss the image picker controller
- get the image in a class variable
- present the ShareViewController by performing the
showImageSeguesegue
For this we need a new image variable to be defined in our ViewController class:
var image: UIImage!
To send the data to the ShareViewController, we will use a method that is called just before the segue to the new view controller happens:
override func prepare(for segue: UIStoryboardSegue, sender: Any?) {
    if segue.identifier == "showImageSegue" {
        if let shareViewController = segue.destination as? ShareViewController {
            shareViewController.image = self.image
            shareViewController.name = name.text ?? ""
            shareViewController.message = message.text ?? ""
        }
    }
}
Now run the app. After the user selects an image, the second view controller should be presented to the user. But… we have no way to close it. Let’s do this next.
Still in the ViewController, create an action that will be called when the ShareViewController will exit (here we will also set the image to nil to free the memory because we don’t need it anymore):
@IBAction func exit(unwindSegue: UIStoryboardSegue) {
    image = nil
}
Back to the Main.storyboard, Ctrl+drag from the Close button to the exit symbol from the top-right of the ShareViewController and select the exit method when prompted.
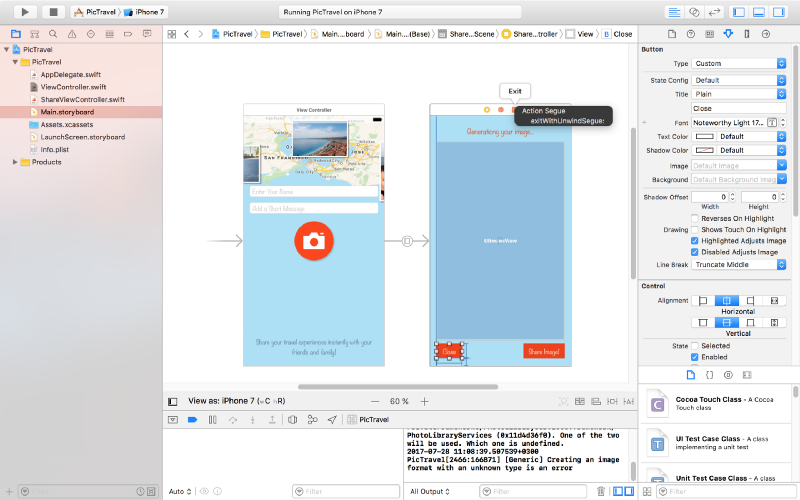
This should solve our problem of closing the second screen.
Let’s get now to the main objective of our app: get the user’s location, generate a map image and put the photo the user selected on top of it together with the name, location and message.
To continue, add some constants to the ShareViewController class that will be used in the code that follows:
// some constants used to generate the final image
let finalImageMaxDimension: CGFloat = 2048
let finalImageBorderWidth: CGFloat = 4
let userImageMaxDimension: CGFloat = 1200
let userImageBorderWidth: CGFloat = 20
let userImageX: CGFloat = 100
let userImageY: CGFloat = 160
let mapRegionDistance: CLLocationDistance = 600
let rotateContentByDegrees: CGFloat = -4
let userMessageMaxLength = 100
let textMargin: CGFloat = 280
let userMessageTopMargin: CGFloat = 60
let userNameTopMargin: CGFloat = 80
let userNameHeight: CGFloat = 120
Getting Current User Location
First we need to add a new key to Info.plist, Privacy - Location When In Use Usage Description with the value of Current location is needed to generate a map image of your location.
Now we need to import CoreLocation into our ShareViewController:
import UIKit
import CoreLocation
Declare a new locationManager variable:
var locationManager:CLLocationManager!
Add a new method that will start the process of finding the user location:
func getCurrentLocation() {
    locationManager = CLLocationManager()
    locationManager.delegate = self
    locationManager.desiredAccuracy = kCLLocationAccuracyNearestTenMeters
    locationManager.requestWhenInUseAuthorization()
    if (CLLocationManager.authorizationStatus() == .denied) {
        showError(title: "Location Access Denied", message: "The location permission was not authorized. Please enable it in Privacy Settings to allow the app to get your location and generate a map image based on that.")
    }

    if CLLocationManager.locationServicesEnabled() {
        locationManager.startUpdatingLocation()
    }
}
For this to work we need to implement the CLLocationManagerDelegate protocol:
class ShareViewController: UIViewController, CLLocationManagerDelegate {We also need to define the showError function:
func showError(title: String, message: String)
{
    let alert = UIAlertController(title: title, message: message, preferredStyle: .alert)
    let action = UIAlertAction(title: "OK", style: .default, handler: { _ in
        self.dismiss(animated: true, completion: nil)
    })
    alert.addAction(action)

    present(alert, animated: true, completion: nil)
}
Now implement the method of the CLLocationManagerDelegate protocol that is called when we get a location update:
func locationManager(_ manager: CLLocationManager, didUpdateLocations locations: [CLLocation]) {
    let location = locations[0]
    manager.stopUpdatingLocation()

    // get city & country name
    let geocoder = CLGeocoder()
    geocoder.reverseGeocodeLocation(location, completionHandler: { placemarks, error in
        if error != nil {
            self.showError(title: "Whoops...", message: error!.localizedDescription)
        } else {
            let placemark = placemarks?[0]
            self.locationString = (placemark?.administrativeArea ?? "") + ", " + (placemark?.country ?? "")
            self.generateMapImage(location: location)
        }
    })
}
This method will receive the user’s location, stop the location updates (because we don’t need them anymore) and calls a generateMapImage function (that we’ll define later) with the retrieved location as an argument. It also uses the Apple’s geocoder service to find out the city and country name for the retrieved location and puts them in a new class variable locationString:
var locationString = ""
Generate the Map Image
To generate the map image we will use the following function:
func generateMapImage(location userLocation: CLLocation) {
    let mapSnapshotOptions = MKMapSnapshotOptions()

    // Set the region of the map that is rendered.
    let location = CLLocationCoordinate2DMake(userLocation.coordinate.latitude, userLocation.coordinate.longitude)
    let region = MKCoordinateRegionMakeWithDistance(location, mapRegionDistance, mapRegionDistance)
    mapSnapshotOptions.region = region

    // Set the size of the image output.
    mapSnapshotOptions.size = calculateMapImageSize(image: self.image)

    let snapShotter = MKMapSnapshotter(options: mapSnapshotOptions)
    snapShotter.start(completionHandler: { snapShot, error in
        if error != nil {
            self.showError(title: "Whoops1...", message: error!.localizedDescription)
        } else {
            self.mapImage = snapShot?.image
            self.activityIndicator.stopAnimating()
            self.generateFinalImage()
        }
    })
}
You need to import MapKit into ShareViewController:
import MapKit
Also a new class variable is used:
var mapImage: UIImage!
To calculate the map size we used another function, calculateMapImageSize that returns a CGSize object to be used when generating the map image:
func calculateMapImageSize() -> CGSize  {
    let maxSize = finalImageMaxDimension - 2 * finalImageBorderWidth
    if image.size.width > image.size.height {
        return CGSize(width: maxSize, height: round(maxSize * image.size.height / image.size.width))
    } else {
        return CGSize(width: round(maxSize * image.size.width / image.size.height), height: maxSize)
    }
}
Building the Final Image
The last thing we need to do is to generate the final image with all the pieces put together:
func generateFinalImage() {
let size = CGSize(width: mapImage.size.width + 2 * finalImageBorderWidth, height: mapImage.size.height + 2 * finalImageBorderWidth)
let userImageSize = calculateUserImageFinalSize()
// start drawing context
UIGraphicsBeginImageContextWithOptions(size, true, 0.0)
let context = UIGraphicsGetCurrentContext()
// draw the white background
let bgRectangle = CGRect(x: 0, y: 0, width: mapImage.size.width + 2 * finalImageBorderWidth, height: mapImage.size.height + 2 * finalImageBorderWidth)
context!.saveGState()
context!.setFillColor(UIColor.white.cgColor)
context!.addRect(bgRectangle)
context!.drawPath(using: .fill)
context!.restoreGState()
// draw the map
mapImage.draw(in: CGRect(x: finalImageBorderWidth, y: finalImageBorderWidth, width: mapImage.size.width, height: mapImage.size.height))
// draw a semitransparent white rectage over the map to dim it
let transparentRectangle = CGRect(x: finalImageBorderWidth, y: finalImageBorderWidth, width: mapImage.size.width, height: mapImage.size.height)
context!.saveGState()
context!.setFillColor(UIColor(colorLiteralRed: 255, green: 255, blue: 255, alpha: 0.3).cgColor)
context!.addRect(transparentRectangle)
context!.drawPath(using: .fill)
context!.restoreGState()
// rotate the context
context!.rotate(by: (rotateContentByDegrees * CGFloat.pi / 180))
// draw white rectangle
let rectangle = CGRect(x: userImageX, y: userImageY, width: userImageSize.width + 2 * userImageBorderWidth, height: userImageSize.height + 2 * userImageBorderWidth)
context!.saveGState()
context!.setFillColor(UIColor.white.cgColor)
context!.setShadow(offset: CGSize(width: userImageBorderWidth, height: userImageBorderWidth), blur: 8.0)
context!.addRect(rectangle)
context!.drawPath(using: .fill)
context!.restoreGState()
// draw user image
image.draw(in: CGRect(x: userImageX + userImageBorderWidth, y: userImageY + userImageBorderWidth, width: userImageSize.width, height: userImageSize.height))
// draw message
var truncatedMessage = message
if (message.distance(from: message.startIndex, to: message.endIndex) > userMessageMaxLength) {
truncatedMessage = message.substring(to: message.index(message.startIndex, offsetBy: userMessageMaxLength))
}
let messageFont = UIFont(name: "Noteworthy-Bold", size: 80)!
let messageFontAttributes = [
NSFontAttributeName: messageFont,
NSForegroundColorAttributeName: UIColor.black,
] as [String : Any]
let messageSize = sizeOfString(string: truncatedMessage!, constrainedToWidth: Double(size.width - textMargin), attributes: messageFontAttributes)
truncatedMessage!.draw(in: CGRect(x: userImageX + userImageBorderWidth, y: userImageY + userImageBorderWidth + userImageSize.height + userMessageTopMargin, width: size.width - textMargin, height: messageSize.height), withAttributes: messageFontAttributes)
// draw name, location & date
let nameFont = UIFont(name: "Noteworthy", size: 58)!
let nameFontAttributes = [
NSFontAttributeName: nameFont,
NSForegroundColorAttributeName: UIColor.black,
] as [String : Any]
let dateFormatter = DateFormatter()
dateFormatter.dateStyle = .long
dateFormatter.timeStyle = .none
var nameString = ""
if(name != "") {
nameString = name + " - " + dateFormatter.string(from: Date()) + ", " + locationString
} else {
nameString = dateFormatter.string(from: Date()) + ", " + locationString
}
nameString.draw(in: CGRect(x: userImageX + userImageBorderWidth, y: userImageY + userImageBorderWidth + userImageSize.height + messageSize.height + userNameTopMargin, width: size.width - textMargin, height: userNameHeight), withAttributes: nameFontAttributes)
// get final image
let finalImage = UIGraphicsGetImageFromCurrentImageContext()
// end drawing context
UIGraphicsEndImageContext()
// show the final image to the user & update tha status label
imageView.image = finalImage
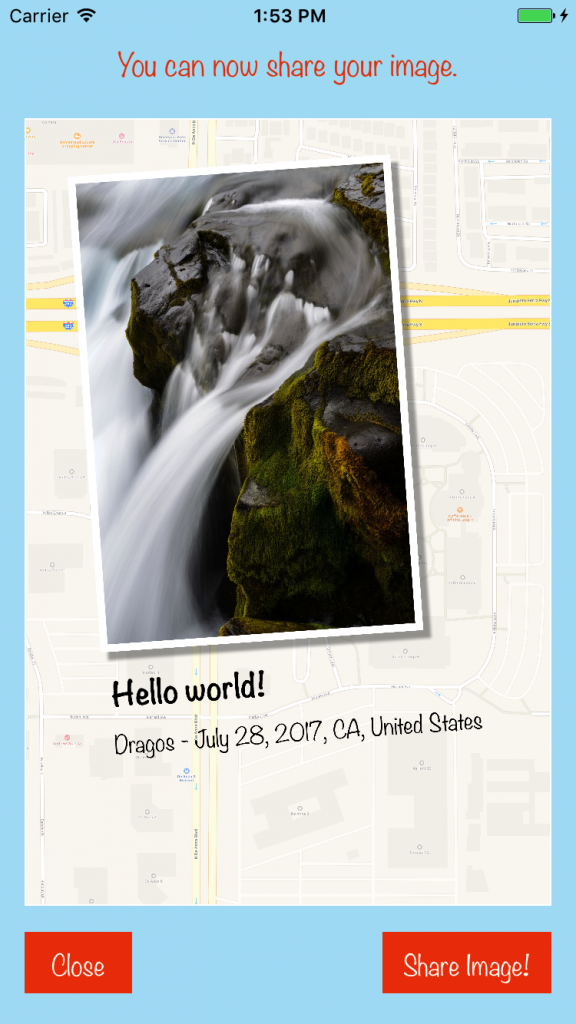
titleLabel.text = "You can now share your image."
}Here we used two helper methods, calculateUserImageFinalSize and sizeOfString. The last one deserves a little attention because it will return a CGSize object with the dimensions needed to draw a text with specific attributes.
func calculateUserImageFinalSize() -> CGSize  {
    if image.size.width > image.size.height {
        return CGSize(width: userImageMaxDimension, height: round(userImageMaxDimension * image.size.height / image.size.width))
    } else {
        return CGSize(width: round(userImageMaxDimension * image.size.width / image.size.height), height: userImageMaxDimension)
    }
}

func sizeOfString (string: String, constrainedToWidth width: Double, attributes: [String: Any]) -> CGSize {
    let attString = NSAttributedString(string: string,attributes: attributes)
    let framesetter = CTFramesetterCreateWithAttributedString(attString)

    return CTFramesetterSuggestFrameSizeWithConstraints(framesetter, CFRange(location: 0,length: 0), nil, CGSize(width: width, height: .greatestFiniteMagnitude), nil)
}
Now that we have everything in place, we need to start the whole process when the ShareViewController is loaded and presented to the user:
override func viewDidAppear(_ animated: Bool) {
    super.viewDidAppear(animated)
    getCurrentLocation()
}
Test the app. Enter your name, a short message and select a photo. You should get the following result:
Sharing the Final Image
Ok, now let’s see how do we share the resulted image. To do this we will use an UIActivityViewController.
Add a new shareImage action for the Share Image! button using Ctrl+drag into the ShareViewController like we did earlier for the photo button:
@IBAction func shareImage(_ sender: UIButton) {
}
The code for the actual sharing is pretty simple:
@IBAction func shareImage(_ sender: UIButton) {
    let activityViewController = UIActivityViewController(activityItems: [image], applicationActivities: nil)
    activityViewController.popoverPresentationController?.sourceView = self.view
    present(activityViewController, animated: true, completion: nil)
}
Try it! Now you can save the image or share it with your friends & family using the installed apps on your device.
Final Touches
To finish the app we need to do two more things:
- add an app icon
- make the startup screen look good
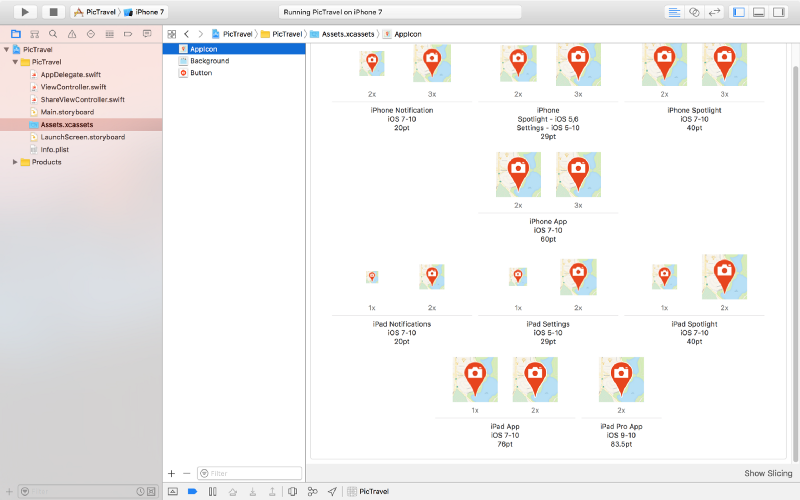
To add an app icon, first download the images from here, then open the Assets.xcassets from the left panel, select the AppIcon item and drag&drop downloaded images to their respective placeholders.
To change the startup screen , which is white right now, open the LaunchScreen.storyboard from the left panel and drag an Image View to it. Add constraints so it covers the entire screen, select the Background Image and set the Content Mode to Aspect Fill (it will look exactly like our main app's screen background).
That’s it! You can now run the app and even install it on your device to take it out in the wild.
The code for this app is available on github: https://github.com/intelligentbee/PicTravel
You can also download the final app from the App Store: https://itunes.apple.com/us/app/pictravel/id1263495901?mt=8