Android Vs iOS: What Platform Should You Build Your Mobile App For?
Now that we live in a society that’s heavily reliant on mobile technology, mobile app development has seen a boom over the last few years. As smartphones get an upgrade with each brand’s release of their flagship device, apps become more advanced. They dish out more features that not only help users but also businesses to expand their operations through this platform. Apple has even trademarked the catchphrase “there’s an app for that” to let users know there is one that can actually help with just about any particular task.
According to an App Annie report, the mobile app industry earned a whopping US$41.1 billion in gross annual revenue and according to Statista, it’s projected to hit US$101.1 billion by 2020. With the population of smartphone users growing each year, the market is far from saturated.
Internet on-the-go is clearly a necessity for many users, and there’s nowhere to go but up. More companies are starting to jump into the mobile app arena after regarding smartphones as a catalyst that can grow their business. The mobile app platform has become a channel to boost sales, increase brand awareness and deliver content through branded apps.
But how do you jump into the fray? Like all things technical, there’s a process you need to go through. Here’s how it currently goes:
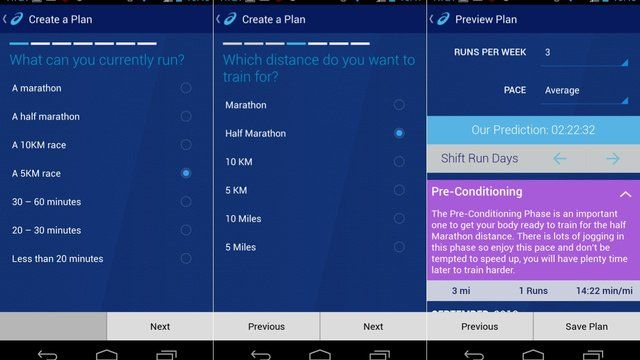
Choose an initial platform for the app
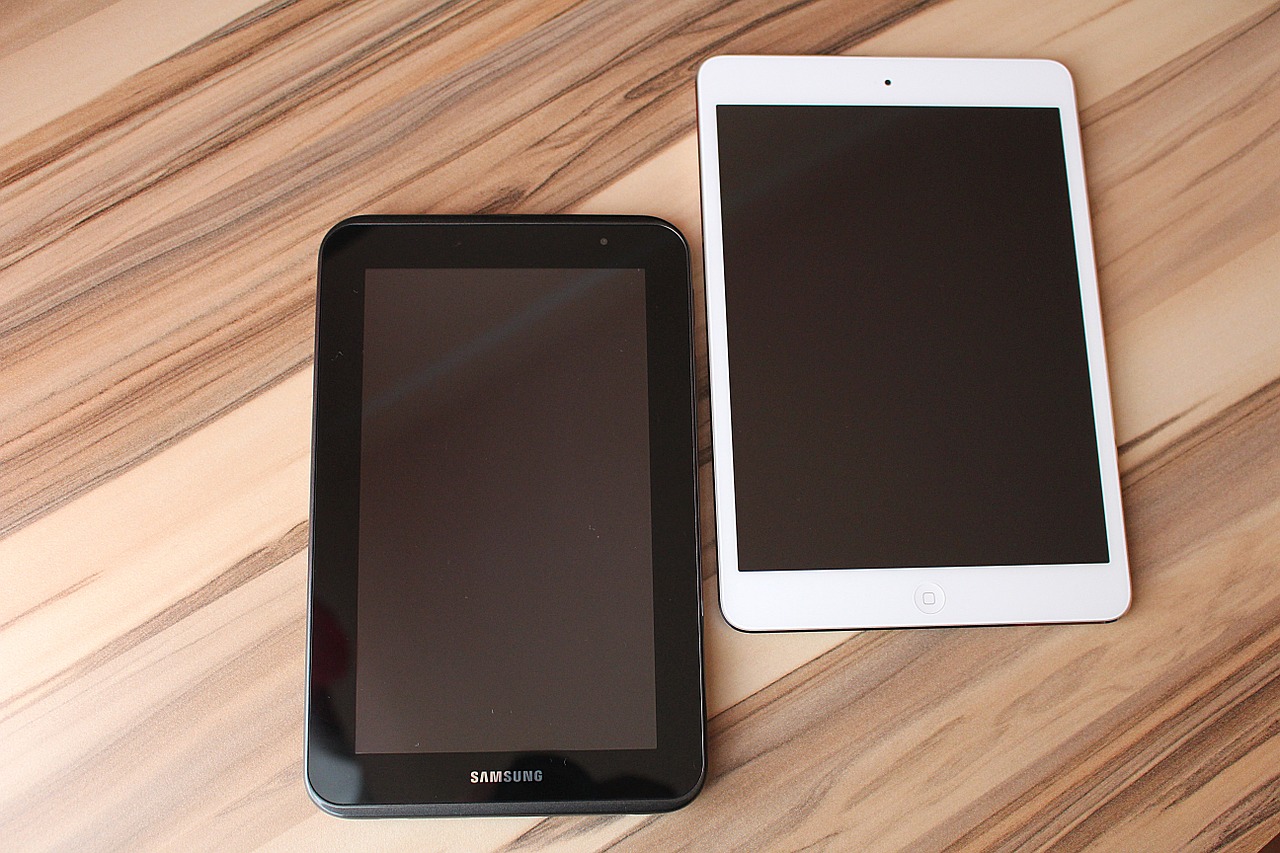
There are two giants that dominate the current smartphone market: Android and iOS. To find out which one has more users, a study by Gartner found that 87.8% of smartphones sold in Q3 of 2016 globally were Android. In contrast, Apple only had 11.5%. While there is a huge difference, that doesn’t mean going for Android is the better choice.
Test and get feedback
Once you’ve developed your app on your preferred platform, you will need to beta test it to an intended audience and collect feedback on how it works. During this process, you will know if everything about how the app is designed works perfectly. You will also find out if there are bugs you need to fix and improvements that would make your app better.
Make iterations and expand features
After zeroing in on the bugs and identifying what you need to improve on, you can release new versions packed with all the new features. This is a continuous process; as your business improves, so does your app to deliver the best user experience you can offer.
Build and release the app on the other platform
You will eventually be able to figure out how everything works on your initial operating system. The next step is to widen your reach, so your next move is to release your app on the other platform.
But for your initial development, testing, and optimization processes, you should be able to address the question: Which platform should you go for? Let’s weigh up the differences.
Android
The Pros: With its open-source software, Android offers app developers a low barrier of entry and allows the use of crowd-created frameworks and plugins. This results in a platform that’s more flexible, which gives developers the freedom to play around with their app’s features and functionalities. This kind of technical environment enables them to modify apps to make the necessary improvements.
As mentioned earlier, Android operating systems have a huge monopoly over the smartphone market. Although this makes Android look like the obvious first choice, there are many other factors that come into play.
The Cons: Although Android’s open-source nature is favorable for developers, it’s a double-edged sword. Android app development is more complex, taking more time to master. And while the OS covers a wide variety of devices and iterations, this benefit causes a large amount of fragmentation. This results in varied user experiences across all devices.
With its highly-fragmented platform, developers are faced with a real challenge as apps need to be optimized for various screen sizes and operating systems. This leads to a lot of compatibility and testing required, ultimately increasing development costs. For this reason, app development takes longer than those on iOS.
iOS
The Pros: iOS offers a more stable and exclusive platform for developers, making the apps easier to use. Apple designed it to be a closed platform, so the company can design all of their own hardware and software around it. This gives them the authority to impose strict guidelines, resulting to a quick and responsive platform where apps are designed well with less piracy involved.
Since 2016, over 25% of iOS developers earned over US$5,000 in monthly revenue, while only 16% of Android developers generated the same amount. And when it comes to monthly revenues earned by mobile operating systems, a Statista study estimates iOS earns US$8,100 on average per month, bumping Android to second place with US$4,900. But despite these numbers favoring iOS, a third of developers prefer Android.
Compared to the thousands of devices using Android, iOS runs on a mere 20 devices. And with both resolution and screen size playing a smaller role in the app development process, it’s quicker and easier. This results in significantly less device fragmentation.
To put things into perspective, developing an app compatible with three of the latest iOS version covers about 97% of all iOS users. This makes it a fitting choice for first-timers in app development.
The Cons: Due to its restrictive nature, developer guidelines offer a fixed set of tools to build an app, making customization limited. And with the frameworks used to build an app, many of them licensed, development costs could increase.
Additionally, iOS is widely regarded as a more mature operating system than Android, with established rules and standards. These can make approval from the App Store more difficult, taking 4-5 days for an app to be granted one.
Cross-Platform App Development
The Pros: Essentially, cross-platform app development allows you to develop two apps---both for Android and iOS---at the same time. The tools you can use reduces the time and costs related to app development on both platforms. One of the most influential frameworks currently out there is React Native.
React Native is the brainchild of Facebook with the goal of having a framework for smooth and easy cross-platform mobile development. This means no more creating apps separately for Android and iOS. All it takes is one codebase and you’ll be able to create awesome apps that work on both platforms without compromising user experience or interface.
Since cross-platform app development has a ‘write once, run everywhere’ approach, it greatly reduces costs and development time. This means there is no need to learn multiple technologies; all you need is to master a few and you can set things in motion. Initial deployment for your app will move along much faster due to its single codebase nature.
Additionally, any changes needed to be done on the app can be implemented simultaneously without making separate changes on each platform. In terms of business, it’s ideal to develop cross-platform apps to reach a wider audience, which would ultimately lead to higher revenues.
The Cons: Compared to Android and iOS, cross-platform apps do not perfectly integrate into their target operating systems. This results in some apps failing to perform at an optimal level due to erratic communication between cross-platform code and the device’s Android or iOS components. This may also result in failure when it comes to delivering optimized user experiences.
Conclusion
Your choice will entirely depend on your business goals and budget. Each of these platforms has its strengths and weaknesses, but to help you decide, you should know what’s going to work for your business. After careful consideration of your costing, the time of release, and the reach/target audience you’re aiming for, you may have a clearer picture as to where you would want to build your app.
Looking for a pro to help with your mobile app development project? Contact our seasoned experts at Intelligent Bee to learn what we can do for your business!

9 Examples of Businesses Creating Awesome Mobile Apps
Businesses that venture into the mobile app industry have better chances of interacting with users of their product or service straight on their smartphone. It’s an effective way of engaging consumers, especially since it’s said that an average smartphone user has more or less 17 to 18 apps installed on their phone. Hours spent among smartphone users are also leaning heavily toward app usage, with 90% of time spent in-app.
Indeed, trends state that corporate mobile apps can help companies achieve their objectives – whether that involves building a base of loyal users or finding an extra source of revenue for the company. With multiple ways of monetizing their apps such as download fees, subscription, in-app purchases, advertising, more companies are willing to invest their time and resources in building mobile apps that can establish their brands as industry leaders.
Mobile Apps by Businesses That Set the Standard for Awesome
Here are some of the best examples of corporate mobile apps out there, courtesy of companies that are dead serious about bringing their business on mobile and innovating the way of doing things for customers:
Amazon
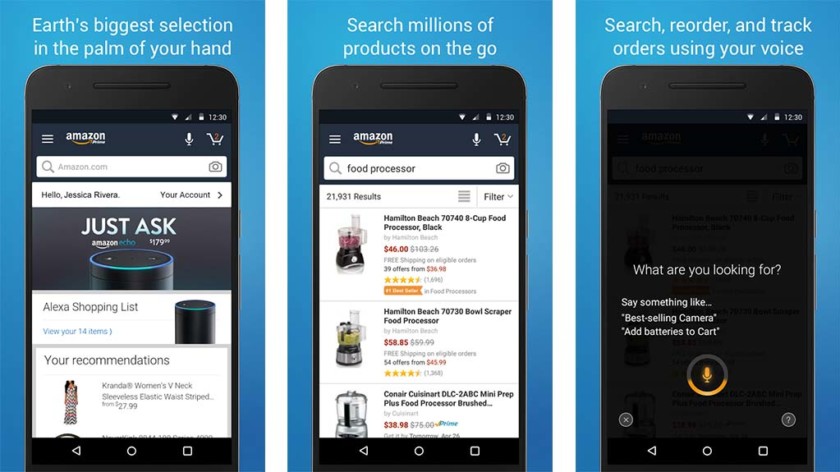
Amazon has become a household name, and its mobile app has a great deal to do with the status it has established. As the leader in America’s online retail industry, Amazon raises the bar with the way its app works for customers as well as for its own business.
The app’s push notifications are very useful for customers, who instantly get alerts when Amazon starts shipping their orders. Customers don’t have to keep checking their account to know the progress of their expected deliveries. This kind of awareness reduces the anxiety and frustration that customers feel before receiving their parcels, not to mention that Amazon’s brand name stays on top of customers’ mind.
To initiate sales, the Amazon app also comes with a wish list feature. Amazon users can share their wish list on their social media pages for their family and friends to see, increasing the chance for Amazon to make a sale.
Domino’s Pizza
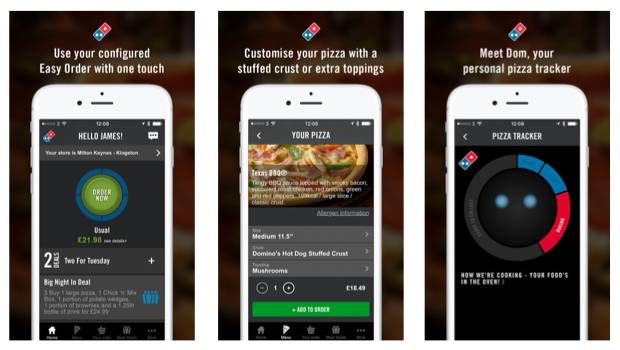
In the case of Domino’s Pizza, the company similarly uses tracking technologies to inform customers about the status of their pizza order – whether it’s on the preparation stage or in the process of delivery. Not only that, as customers can use the app to create tailored takeaway meals from Domino’s standard menu. It’s a perfect example of delivering a personalized experience based on the actual preferences of customers.
easyJet
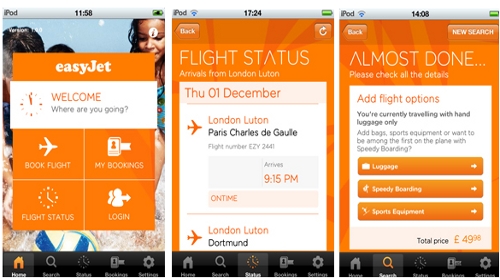
EasyJet is a British airline that enables travelers to manage their flights directly on its app. The easyJet mobile app serves as a one-stop travel shop where passengers can search for and buy tickets for domestic and international destinations. The app also allows adding of seats, online check-in, and downloading of boarding passes, making every transaction as convenient and as worry-free as possible.
easyJet customers can also track the arrival and departure for all flights and even get live updates from the airline’s Control Centre. Beyond these functionalities, the carrier’s mobile app is hailed for reliability, accuracy, and timeliness of service.
iFood Assistant by Kraft
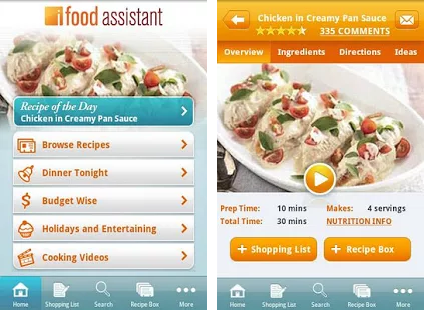
iFood Assistant is Kraft’s corporate mobile app that offers a wealth of dish recipes based on Kraft food products. Users who want to cook up a particular dish can easily create a shopping list within the app, paving way for Kraft to suggest using ingredients that are manufactured by the company. What’s even better about the iFood Assistant app is that it offers coupons that users can use for groceries or other promotions from Kraft.
L’Oreal Makeup Genius
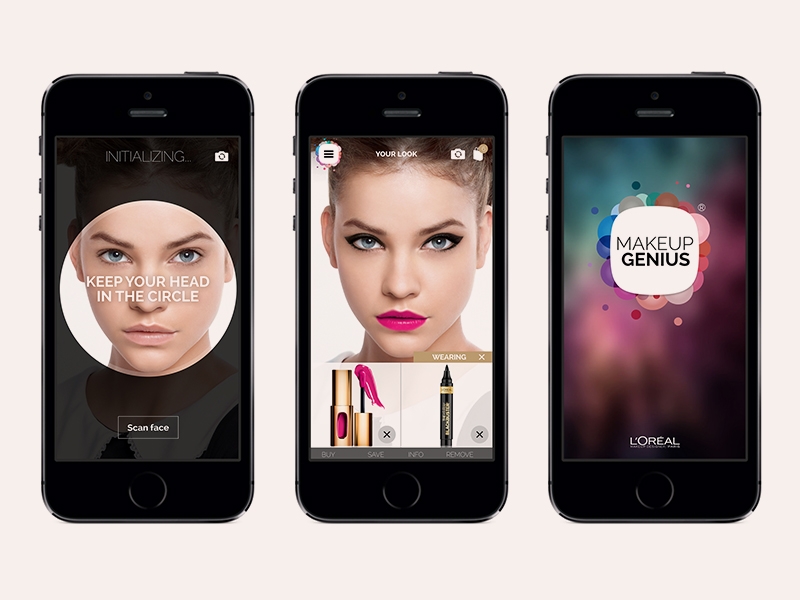
Cosmetics company L’Oreal ventured into the augmented reality (AR) space to give customers a chance to try out its products through the Makeup Genius app in 2014.
Using advanced facial mapping technology, the app allows users to virtually apply makeup on their face and turns the users’ smartphone camera into a virtual mirror, allowing them to see the results of their makeup session in real time. This makes product testing a lot more convenient and enhances the customer experience as a whole.
To make this happen, Makeup Genius scans the users’ face, chooses suitable L’Oreal products, and applies them virtually on the users’ eyes, lips, and other facial contours. The app is smart enough to follow the head movements of users, so they can see how the makeup looks on them from various angles.
MLB.com
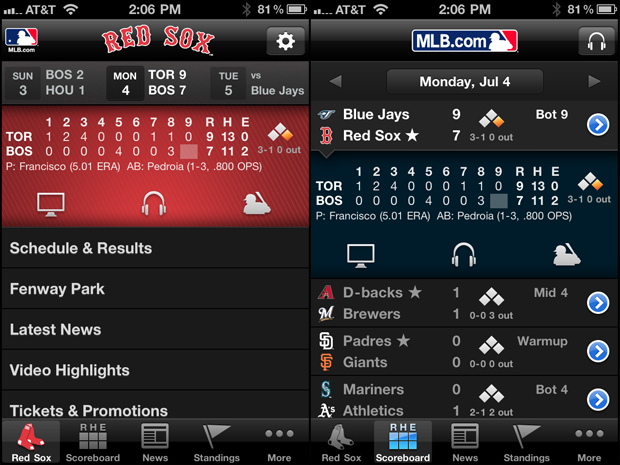
Baseball fans will never miss out on what’s happening in the sport league, thanks to the MLB At Bat mobile app. The app allows users to watch and listen to the games in real time. Users can also check the app’s archives and follow their favorite team as the app shares the latest news, game standings, and other stats. The app caters to Android, BlackBerry, and iPhone users with the same functionalities across platforms.
Midland Medical

Businesses that regularly perform stock inventories can follow Midland Medical’s lead in tapping digital technologies to its processes. As a distributor of medical supplies, Midland Medical needed to speed up its inventory receiving process, so it could respond to customers’ queries with just a quick look at its database.
To achieve this goal, the company took advantage of readily available tools, such as mobile devices and Bluetooth scanners, and went a step further in mobile app development by going for a custom-built software application that enables warehouse personnel to automate the addition of new inventory into the company’s database. In addition, they opened up the customer side of things
MY ASICS
Corporate mobile apps can also be a way for companies to interact with the communities they’re serving. ASICS, an equipment and apparel company, does this by offering customized training plans and helpful content that users can take advantage of on the MY ASICS app. In turn, ASICS receives valuable insights and feedback about the kind of products or services that fitness enthusiasts want.
thetrainline
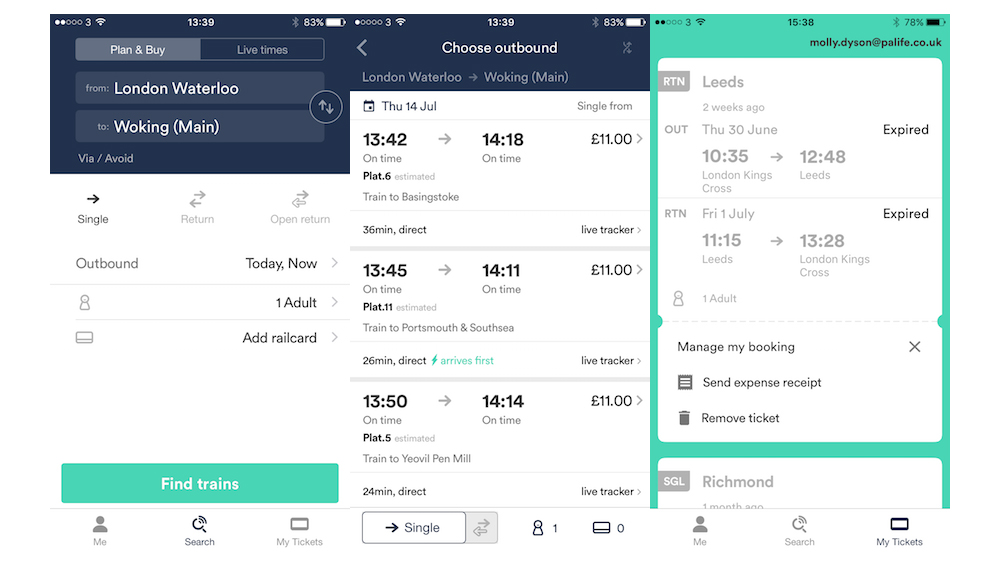
The thetrainline mobile app is for users who prefer to book train tickets in advance. Once they have a confirmed booking on the app, they can just pick up their tickets across UK train stations. The app also gives users a chance to find the best fares and save their favorite journeys to make it easy for them to book their next trip.
On the business end of things, the app also shortens the time it takes to buy a ticket. The reduction in transaction times for train companies simply means more efficiency and more savings in the long run.
Wrap-up
There’s not a doubt that the business landscape looks bright for companies who are venturing into mobile app development. Mobile apps can help enterprises capture a significant share of one of the fastest growing segments in the global economy.
If you haven’t ventured into the mobile app industry, it may be time to do so. You don’t have to focus on the selling aspect through and through, when you can be creative enough to incorporate information about your products or services through other features of your app.
Moreover, you should be ready to experience some challenges along the way—such as finding the right mobile app development company. Just make sure your mobile app development partner truly understands your business model and designs the app accordingly so your company will run more efficiently.
Want some help developing your next mobile app? Contact the team of experts at Intelligent Bee today!

Are You Ready to Build Your First Corporate Mobile App?
If you haven’t noticed, there’s now an app for almost anything. It used to be that apps were associated more with mobile games, but thanks to mobile app development technologies, that’s no longer entirely the case.
Today, there are non-gaming mobile apps that enable people to get things done or get the product or service they need straight from their smartphones. For instance, people no longer need to leave their house if they want to do their groceries. Through e-commerce apps, shoppers can buy household items and then have these delivered at their doorstep – all accomplishable with a few simple taps.
The following data shows that corporate mobile apps are noticeably proliferating across industries:
- As of 2018, the number of apps available to consumers on the leading app store (Android) has already reached 3.8 million. (Statista)
- The increase in mobile app usage outside of the gaming industry is as follows: 332% for device customization slash enhancement apps; 135% for mobile newspapers and magazines; 125% for productivity apps; 81% for lifestyle and shopping apps; and 53%-54% for travel, sport, health and fitness, messaging, and social apps. (Smashing Magazine)
- Revenue from in-app purchases – which enable the app to earn money each time users purchase something within the app – amounted to $37 billion in 2016. (BusinessofApps)
- Companies like Domino’s Pizza and Zara increased their sales by 28% and 60%, respectively, with the use of their mobile app. (KnowTechie)
Keep in mind that these figures are expected to continue growing as the mobile age reaches its maturity. If that’s not enough to convince you of the value that mobile apps bring to the table, why don’t we take a look at some of the most compelling benefits they can help you realize.
The Benefits of Having a Corporate Mobile App
Brand awareness
A mobile app puts your brand in front of consumers and increases their recognition of your business, especially if you take functionality and user-friendliness seriously. Over time, as users try out your app, they’ll become more familiar with your brand, business model, and line-up of products and services. This builds up a level of trust, which makes people more likely to choose you over other businesses, which they have not encountered before.
Customer engagement
Mobile devices are so handy that people have been spending a great deal of time on them, specifically on smartphone apps, which represent about 90% of users’ mobile time. With the right app, you can reach more users online and engage them every step of the way.
Thus, it’s important that you build several features into your app, including those that customers need for placing orders, managing purchases, keeping track of promotions, and communicating with customer service, among others.
Marketing directly to customers
One of the biggest advantages of having a mobile app is it gives you an opportunity to market your business directly to customers. Think about it. A corporate mobile app is like having a whole new marketing channel.
Each time users open your app, you can send them information about new or upcoming products that you think they might be interested in. Moreover, you can use your app to capture important customer data, such as their product views or order history, and then use it to improve their experience within the app.
Added source of revenue
A mobile app can be an income-generating tool for your business. Having an enterprise mobile app not only complements your brick-and-mortar sales but also lets you monetize people’s use of your app in a couple other ways.
For instance, you can bring third-party advertisers into your app and charge them whenever someone clicks on their ad. Another monetization model for your app is to charge users a monthly subscription fee, so they can continue using the full features of your app.
Complementing your website
You might think you no longer need a mobile app if your website is up and running anyway. However, you can design your mobile app in a way that supports your website, so you can serve customers in a more optimized fashion.
Since users who have no internet connection will not be able to access your website through a browser, they can have your app installed on their mobile devices, so they may still enjoy certain functionalities through offline mode. That said, you can build an app that allows users to save the information or files they need for offline viewing or reading.
Questions to Ask Before Venturing into Corporate Mobile Apps
Before springing into action, it helps to know the ins and outs of mobile app development. Here are some questions to ask yourself before proceeding with your project:
- How much will it cost? The cost of building an app depends on several factors, including the type, size, and functionalities of your app, to mention a few. Your app’s overall goal will tie into your budget to determine what to build and how much to spend on it.
- Which platforms will the app support? Your two main markets are iOS and Android devices, but you should also take into consideration that there are Windows phone users.
- What’s your goal? In developing your app, you should also identify how it’s going to help your other business goals. Revenue wise, you can choose whether you will charge for in-app purchases, app downloads, or third-party ads. In terms of customer experience, you could prioritize between functionality and a pleasing user interface.
- Do we have the skills? You’ll need tech wizards to visualize, design, develop, test, and maintain your mobile app. If your team doesn’t have these specialized skill sets, you can outsource your mobile app project to a software development company instead.
- Is there a need being fulfilled? You’ll want a winning app that fulfills an unmet need in your target market. Your app should fill the gap between what users want and what options are available to them so far.
- How to market the app? To get your mobile app into the hands of users, you’ll need to promote it on multiple channels, such as blogs, social media, email platforms, app stores, PR events, paid advertising media, and the like.
- What integrations will you build into the app? You can leverage your app by into it, or by allowing users to log into your app using their social media credentials. This will make it easy for users to share information from your app to social sites in a seamless manner.
Conclusion
To maximize your corporate mobile app’s chance for success, you should be able to answer these questions. Now, the million dollar question is: Are you ready to build your first corporate mobile app?
It will all boil down to how useful your app is for both your business and your customers. Make your app great enough that customers would want to install and keep it in their device for as long as possible.
Want an experienced team of developers to build your next corporate mobile app? Contact the experts at Intelligent Bee today!

Why Your Business Needs a Mobile App to Grow
Nowadays, you can do almost anything on your mobile device—from instantly messaging colleagues and organizing your work schedule to tracking your expenses. Mobile technology has become so advanced that there’s probably an app for almost anything and everything imaginable.
Businesses have also been benefitting from the mobile app revolution more than ever. Up to 83% of marketers claim that having a mobile app is crucial in their marketing strategy.
So, if your business do not have a mobile app yet, it’s time for you to hire a mobile app developer and start building one.
5 Reasons to Have a Mobile App for Your Business
1. Increase Brand Visibility and Awareness
People spend more than two hours a day on their mobile devices, and 90% of this time is spent on mobile apps. This means that a mobile app can help you reach your consumers wherever they are through their mobile devices.
It can work in many ways. When users think of a service or a function that they need to address, they go to the app store and see what apps are available. Here, they can encounter your brand through your app. It can also happen the other way around where they find your website and see that you offer a mobile app.
Seeing your brand on multiple platforms can increase brand visibility and awareness. Having a mobile app also shows your audience that your brand keeps up with the modern trend, constantly finding ways to provide convenient services.
2. Directly Market to Your Audience
When a mobile app is open on any device, it’s the only app visible on the screen. While smartphones and tablets have a multitasking capability, often, users use only one app at a time, which makes mobile apps a direct marketing channel.
All the information you’d like your audience to receive is on one marketing platform. Sales and promotional messages is now immediately accessible to your audience. You can even send them push notifications to remind them about your products and services.
3. Increase Customer Engagement
No matter what product or service you offer, a mobile app allows you to directly send and receive messages from your customers. This direct interaction is what customers value today.
Users are more impatient now than ever, and a messaging system within your app allows your brand to provide real-time responses. Whether that’s a simple way for them to check your store hours or follow up on an order, a mobile app will go a long way in terms of increasing customer engagement and improving client service.
4. Improve Website Performance
When a user searches for services to meet specific needs, your mobile app will likely be suggested to them, whether they’re doing this on a search engine or app store. Not only will you be attracting users to download your mobile app, but you’re also routing traffic back to your website.
Once your mobile app generates buzz, your app and website can also earn backlinks and mentions on high-authority pages. Eventually, your website will rank higher on SERPs, and your mobile app will rank higher on app stores.
5. Collect a Vast Amount of Customer Data
Mobile apps can help businesses collect priceless customer information and data. When customers are using your app, you can gather customer details and data that can help your business determine which regions and demographic segments offer the best ROI. You can also determine which features and functions of your app are more useful to your clients.
When people try out your apps, they can post highly useful reviews that you can use to create a more profitable and helpful mobile application. Customer data can help you better address client needs, problems, and wants, thereby making your product and service more helpful to your customers.
There are many advantages to creating and building your own mobile app for your business. A mobile app not only enables your business to keep up with consumer demands and business trends, but also help your brand stand out from an already saturated market.
Consult with a professional mobile app developer today, and start building a mobile app that will help you reach your audience and increase your business revenue. At Intelligent Bee, you can be sure that your mobile app is optimized specifically for your target audience, and will exhibit a great user interface and experience.

Symfony OAuth Authentication for Your Mobile Application
Let’s say you built an API using Symfony and you need to access it from a mobile application using authenticated requests on behalf of your users.
Here’s how to make this work using Symfony 2.8 and Doctrine.
Install FOSOAuthServerBundle
We will use the FOSOAuthServerBundle to implement this feature. Install it using the following command:
composer require friendsofsymfony/oauth-server-bundle
Next, enable the bundle in the AppKernel.php file:
public function registerBundles()
{
    $bundles = array(
        // ...
        new FOS\OAuthServerBundle\FOSOAuthServerBundle(),
    );
}
Create OAuth model classes
To create the OAuth model classes just add the following files to your project. Here we already have FOSUserBundle installed and set up to use the ApiBundle\Entity\User class.
src/ApiBundle/Entity/Client.php
<?php
namespace ApiBundle\Entity;

use FOS\OAuthServerBundle\Entity\Client as BaseClient;
use Doctrine\ORM\Mapping as ORM;

/**
 * @ORM\Entity
 */
class Client extends BaseClient
{
    /**
     * @ORM\Id
     * @ORM\Column(type="integer")
     * @ORM\GeneratedValue(strategy="AUTO")
     */
    protected $id;

    public function __construct()
    {
        parent::__construct();
        // your own logic
    }
}
src/ApiBundle/Entity/AccessToken.php
<?php
namespace ApiBundle\Entity;

use FOS\OAuthServerBundle\Entity\AccessToken as BaseAccessToken;
use Doctrine\ORM\Mapping as ORM;

/**
 * @ORM\Entity
 */
class AccessToken extends BaseAccessToken
{
    /**
     * @ORM\Id
     * @ORM\Column(type="integer")
     * @ORM\GeneratedValue(strategy="AUTO")
     */
    protected $id;

    /**
     * @ORM\ManyToOne(targetEntity="Client")
     * @ORM\JoinColumn(nullable=false)
     */
    protected $client;

    /**
     * @ORM\ManyToOne(targetEntity="User")
     */
    protected $user;
}
src/ApiBundle/Entity/RefreshToken.php
<?php
namespace ApiBundle\Entity;

use FOS\OAuthServerBundle\Entity\RefreshToken as BaseRefreshToken;
use Doctrine\ORM\Mapping as ORM;

/**
 * @ORM\Entity
 */
class RefreshToken extends BaseRefreshToken
{
    /**
     * @ORM\Id
     * @ORM\Column(type="integer")
     * @ORM\GeneratedValue(strategy="AUTO")
     */
    protected $id;

    /**
     * @ORM\ManyToOne(targetEntity="Client")
     * @ORM\JoinColumn(nullable=false)
     */
    protected $client;

    /**
     * @ORM\ManyToOne(targetEntity="User")
     */
    protected $user;
}
src/ApiBundle/Entity/AuthCode.php
<?php
namespace ApiBundle\Entity;

use FOS\OAuthServerBundle\Entity\AuthCode as BaseAuthCode;
use Doctrine\ORM\Mapping as ORM;

/**
 * @ORM\Entity
 */
class AuthCode extends BaseAuthCode
{
    /**
     * @ORM\Id
     * @ORM\Column(type="integer")
     * @ORM\GeneratedValue(strategy="AUTO")
     */
    protected $id;

    /**
     * @ORM\ManyToOne(targetEntity="Client")
     * @ORM\JoinColumn(nullable=false)
     */
    protected $client;

    /**
     * @ORM\ManyToOne(targetEntity="User")
     */
    protected $user;
}
Configure FOSOAuthServerBundle
Import the routing configuration in your app/config/routing.yml file:
fos_oauth_server_token:
    resource: "@FOSOAuthServerBundle/Resources/config/routing/token.xml"
fos_oauth_server_authorize:
    resource: "@FOSOAuthServerBundle/Resources/config/routing/authorize.xml"
Add FOSOAuthServerBundle settings in app/config/config.yml:
fos_oauth_server:
    db_driver: orm       # Drivers available: orm, mongodb, or propel
    client_class:        ApiBundle\Entity\Client
    access_token_class:  ApiBundle\Entity\AccessToken
    refresh_token_class: ApiBundle\Entity\RefreshToken
    auth_code_class:     ApiBundle\Entity\AuthCode
    service:
        user_provider: fos_user.user_provider.username
Back to the models
Generate a migration and migrate the database:
php app/console doctrine:migrations:diff
php app/console doctrine:migrations:migrate
…or, if you’re not using migrations, just update the database schema:
php app/console doctrine:schema:update --force
Configure your application’s security
Edit your app/config/security.yml file to add FOSOAuthServerBundle specific configuration:
# ...

    firewalls:
        oauth_token: # Everyone can access the access token URL.
            pattern: ^/oauth/v2/token
            security: false

        api:
            pattern:    ^/api
            fos_oauth:  true
            stateless:  true
            anonymous:  true # can be omitted as its default value

    # ...

    access_control:
        - { path: ^/api, role: IS_AUTHENTICATED_FULLY }
Create a client
Before you can generate tokens, you need to create a Client using the ClientManager. For this, create a new Symfony command:
<?php
namespace ApiBundle\Command;

use Symfony\Bundle\FrameworkBundle\Command\ContainerAwareCommand;
use Symfony\Component\Console\Input\InputInterface;
use Symfony\Component\Console\Output\OutputInterface;

class OAuthAddClientCommand extends ContainerAwareCommand
{
    protected function configure()
    {
        $this
            ->setName('oauth:add-client')
            ->setDescription("Ads a new client for OAuth")
        ;
    }

    protected function execute(InputInterface $input, OutputInterface $output)
    {
        $redirectUri = $this->getContainer()->getParameter('router.request_context.scheme') . "://" . $this->getContainer()->getParameter('router.request_context.host');
        $clientManager = $this->getContainer()->get('fos_oauth_server.client_manager.default');
        $client = $clientManager->createClient();
        $client->setRedirectUris(array($redirectUri));
        $client->setAllowedGrantTypes(array('refresh_token', 'password'));
        $clientManager->updateClient($client);
    }
}
Now run the above command to generate your first OAuth client:
php app/console oauth:add-client
This client will be able to generate tokens and refresh tokens using the user’s username and password. You can find it’s data in the database client table. The token endpoint is at /oauth/v2/token by default.
Document using NelmioApiDocBundle
If you use the NelmioApiDocBundle to document your API, you can add these OAuth methods too. Create a new YAML file in src/ApiBundle/Resources/apidoc/oauth.yml:
grant_type_password:
    requirements: []
    views: []
    filters: []
    parameters:
        grant_type:
            dataType: string
            required: true
            name: grant_type
            description: Grant Type (password)
            readonly: false
        client_id:
            dataType: string
            required: true
            name: client_id
            description: Client Id
            readonly: false
        client_secret:
            dataType: string
            required: true
            name: client_secret
            description: client Secret
            readonly: false
        username:
            dataType: string
            required: true
            name: username
            description: Username
            readonly: false
        password:
            dataType: string
            required: true
            name: password
            description: Password
            readonly: false
    input: null
    output: null
    link: null
    description: "Get OAuth token for user using username and password"
    section: "OAuth"
    documentation: null
    resource: null
    method: "POST"
    host: ""
    uri: "/oauth/v2/token"
    response:
        token:
            dataType: string
            required: true
            description: OAuth token
            readonly: true
    route:
        path: /oauth/v2/token
        defaults:
            _controller: FOS\UserBundle\Controller\SecurityController::checkAction
        requirements: []
        options:
            compiler_class: Symfony\Component\Routing\RouteCompiler
        host: ''
        schemes: []
        methods: [ 'POST' ]
        condition: ''
    https: false
    authentication: false
    authenticationRoles: []
    cache: null
    deprecated: false
    statusCodes: []
    resourceDescription: null
    responseMap: []
    parsedResponseMap: []
    tags: []

grant_type_refresh_token:
    requirements: []
    views: []
    filters: []
    parameters:
        grant_type:
            dataType: string
            required: true
            name: grant_type
            description: Grant Type (refresh_token)
            readonly: false
        client_id:
            dataType: string
            required: true
            name: client_id
            description: Client Id
            readonly: false
        client_secret:
            dataType: string
            required: true
            name: client_secret
            description: client Secret
            readonly: false
        refresh_token:
            dataType: string
            required: true
            name: refresh_token
            description: Refresh token
            readonly: false
    input: null
    output: null
    link: null
    description: "Get new OAuth token using refresh token"
    section: "OAuth"
    documentation: null
    resource: null
    method: "POST"
    host: ""
    uri: "/oauth/v2/token"
    response:
        token:
            dataType: string
            required: true
            description: OAuth token
            readonly: true
    route:
        path: /oauth/v2/token
        defaults:
            _controller: FOS\UserBundle\Controller\SecurityController::checkAction
        requirements: []
        options:
            compiler_class: Symfony\Component\Routing\RouteCompiler
        host: ''
        schemes: []
        methods: [ 'POST' ]
        condition: ''
    https: false
    authentication: false
    authenticationRoles: []
    cache: null
    deprecated: false
    statusCodes: []
    resourceDescription: null
    responseMap: []
    parsedResponseMap: []
    tags: []
Add a new NelmioApiYmlProvider.php file in src/ApiBundle/Service folder:
<?php

namespace ApiBundle\Service;

use Nelmio\ApiDocBundle\Annotation\ApiDoc;
use Nelmio\ApiDocBundle\Extractor\AnnotationsProviderInterface;
use Symfony\Component\Finder\Finder;
use Symfony\Component\Routing\Route;
use Symfony\Component\Yaml\Yaml;

/**
 * Generate annotations for vendor routes to be displayed in Nelmio ApiDoc.
 */
class NelmioApiYmlProvider implements AnnotationsProviderInterface
{
    private $vendorFolder;

    public function __construct($vendorFolder)
    {
        $this->vendorFolder = $vendorFolder;
    }
    /**
     * {@inheritdoc}
     */
    public function getAnnotations()
    {
        $annotations = [];
        $configDirectories = array($this->vendorFolder);

        $finder = new Finder();

        $finder->files()->in($configDirectories);

        if (count($finder) == 0) {
            return $annotations;
        }

        foreach ($finder as $file_) {
            $data = Yaml::parse(file_get_contents($file_));

            $vendors = array_keys($data);
            foreach ($vendors as $vendor) {
                $apiDoc = new ApiDoc($data[$vendor]);
                $route = new Route(
                    $data[$vendor]['route']['path'],
                    $data[$vendor]['route']['defaults'],
                    $data[$vendor]['route']['requirements'],
                    $data[$vendor]['route']['options'],
                    $data[$vendor]['route']['host'],
                    $data[$vendor]['route']['schemes'],
                    $data[$vendor]['route']['methods'],
                    $data[$vendor]['route']['condition']
                );

                $apiDoc->setRoute($route);
                $apiDoc->setResponse($data[$vendor]['response']);
                $annotations[] = $apiDoc;
            }
        }

        return $annotations;
    }
}
Add a new service in src/ApiBundle/Resources/config/services.yml file:
services:
    nelmio_api_doc.yml_provider.api_yml_provider:
        class: ApiBundle\Service\NelmioApiYmlProvider
        arguments:
            folder: %kernel.root_dir%/../src/ApiBundle/Resources/apidoc
        tags:
            - { name: nelmio_api_doc.extractor.annotations_provider }
You’ll find now two /oauth/v2/token methods with different parameters listed in the api/doc section of your project.
That’s all! You can now use the generated client to authenticate your users in your mobile app using OAuth.
How to use the FOSOAuthServerBundle
First you will need to get an access token by making a POST request to the /oauth/v2/token endpoint with the following parameters:
grant_type=password
client_id=[client's id from the database followed by '_' then the corresponding random id]
client_secret=[client's secret]
username=[user's username]
password=[users's password]
You should get back something like this:
{
  "access_token": "ZDgxZDlkOWI2N2IyZWU2ZjlhY2VlNWQxNzM0ZDhlOWY2ZTIwOTBkNGUzZDUyOGYxOTg1ZTRjZGExOTY2YjNmNw",
  "expires_in": 3600,
  "token_type": "bearer",
  "scope": null,
  "refresh_token": "MDQ3MGIwZTk5MDkwOGM5NjhkMzk5NTUyZDJjZmYwM2YzZWViZDFhZjk0NTIyZmNjNzkyMDM0YjM4ODQ2N2VhNg"
}
Use the access token for authenticated requests by placing it in the request header:
Authorization: Bearer ZDgxZDlkOWI2N2IyZWU2ZjlhY2VlNWQxNzM0ZDhlOWY2ZTIwOTBkNGUzZDUyOGYxOTg1ZTRjZGExOTY2YjNmNw
When the access token expires, you can get a new one using the refresh_token grant type at the same /oauth/v2/token endpoint:
grant_type=refresh_token
client_id=[client's id from the database followed by '_' then the corresponding random id]
client_secret=[client's secret]
refresh_token=[refresh token received earlier]
The response should be similar to:
{
  "access_token": "MjE1NjRjNDc0ZmU4NmU3NjgzOTIyZDZlNDBiMTg5OGNhMTc0MjM5OWU3MjAxN2ZjNzAwOTk4NGQxMjE5ODVhZA",
  "expires_in": 3600,
  "token_type": "bearer",
  "scope": null,
  "refresh_token": "YzM2ZWNiMGQ5MDBmOGExNjhmNDI1YjExZTkyN2U0Mzk5ZmM4NzcwNDdhNjAzZDliMjY3YzE0ZTg5NDFlZjg3MQ"
}
Best Solutions to Top Mobile App Development Challenges
More than half of the world’s population now uses a smartphone. As the price of data plans continue to decrease all over the world, web traffic coming from mobile devices increases year by year. In fact, more than half of today’s global internet traffic comes from mobile devices.
People are spending more time on their mobile devices, thereby increasing the demand for mobile apps. Recent statistics show that 52% of the time individuals spend on digital media is on mobile apps. In 2016, global mobile app revenues amounted to 88.3 billion U.S. dollars, and it’s forecasted that by 2020, global mobile app revenues from app stores and in-app advertising will reach 188.9 billion U.S. dollars.
Indeed, mobile app development is a lucrative business, given the mobile and digital revolution.
But, for every venture comes a challenge. It’s important to know the potential challenges you may face and how to address them before hiring an app developer.

Tight Market Competition
The app market is overcrowded, and it’s becoming a challenge for a mobile application to get noticed. Apple’s App Store has over 2.2 billion apps and Google’s Play Store has over 2.8 million apps as of March 2017. That doesn’t even include the apps in Windows Phone Store and BlackBerry App World.
Solution! Define your target market and the main goal of the app. These two details are fundamental to the overall design, UI, and UX of your mobile app.
Make sure to do your market research to study the apps that already offer similar functionality. Determine your unique selling point, and make sure that your app features a beautiful design and an easy-to-use interface.
Funding
So, you’ve already come up with a solid app idea, and you’re sure that it’s going to be a hit. It’s time to get the funding to get it built.
Mobile app development can be costly, depending on the design, function, and interface of the app. Prepare the funding before you hire an app developer to avoid delays in the launch. You should also take into consideration the cost of marketing your new app.
Solution! If you can’t personally fund your mobile app idea, there are many ways to get funding. You can try crowdfunding websites like GoFundMe, Kickstarter, AppBackr, and the like. You can also ask your relatives or friends to partner up with you. If you want your mobile app to be a solo venture, then you can try for a bank loan or personal loan from people in your social circle.

Screen Size and Device Compatibility
Users have a wide variety of devices that run on different screen sizes, operating systems and platforms. Make sure that your mobile app developer understands the importance of a responsive design. Your mobile app should work for devices of all screen sizes, from the smallest smartphone to the largest tablet computer.
Solution! OS is another aspect to consider. iOS, Android and Windows has its own UI and algorithms. Be prepared to encounter bugs and errors along the way. For this reason, it’s highly recommended to release a beta version.
Interactive UI and User-Friendliness
Poor user experience is one of the top reasons why a lot of mobile apps don’t succeed simply because it turns off users. Your mobile app must be easy to use and understand. It doesn’t need to have a wide plethora of unnecessary features.
Solution! Include a tutorial that users can go back to within the app itself. Also, mobile devices nowadays include high-tech sensors and hardware that offers a range of opportunities for creating an interactive app. Explore the possibilities, but stay true to the goal and function of your mobile app.

Development Approach
There are numerous app development approaches that you can utilize, such as hybrid app development, cross-platform, native app development, or platform specific native app development. Also, you don’t want to waste time and additional resources in developing an app that wouldn’t work for multiple devices and platforms.
Solution! Strategize and decide on the tools and frameworks to use according to the UI and UX needs of your app. Platforms like OpenSourceSDK offers the ability to develop apps using C/C++ or HTML5. It also allows developers to incorporate single API across multiple platforms. Then, there are cross-platform developer tools that you can leverage for your mobile app venture, such as RhoMobile, PhoneGap, Appcelerator, Mosync, and WidgetPad.
Managing Mobile Content
Content is the life of a mobile app. Today’s mobile users demand rich content, image, and animation. However, you need to consider internet speed and bandwidth. Oftentimes, wireless network connection contributes to the failed delivery of mobile app content. As a result, users find it too bothersome to use mobile apps that don’t load quickly.
Solution! Choose a mobile content management system that simplifies content and optimizes bandwidth, such as AirWatch, Alfresco, and MobileIron. These tools can help you deliver rich content reliably.
Balancing Performance and Battery Life
It’s a big challenge to design a well-performing and bug-free app that contains rich media yet doesn’t consume too much battery life. Pokemon Go, for instance, is a great game with rich AR graphics and features. Users were hooked the moment they downloaded the app. But, most users are complaining that the game drains their smartphone quickly. Graphics, animation, content, and function should not compromise battery consumption.
Solution! Run tests to monitor the performance of your app.
Marketing and Promotion
Your mobile app is now among the millions of apps listed in the Apple’s App Store or Google’s Play Store. How do users find it? Branding, marketing and promotions play a huge role in the success of your mobile app.
Solution! Platforms like AppTamin, AppScend , MobileDevHQ, and Smore can help you market your mobile apps. You can also take to social media advertisements to get the word out there. Create a data-driven strategy and consult with marketing professionals about how you can get your target market to download the new app.
It’s true that mobile apps are popping up like mushrooms in app stores. But, mobile app development isn’t as easy as 1, 2, 3, launch! There are challenges that beset creators and developers. Fortunately, these challenges can be overcome with careful planning.
Introduction to iBeacons on iOS
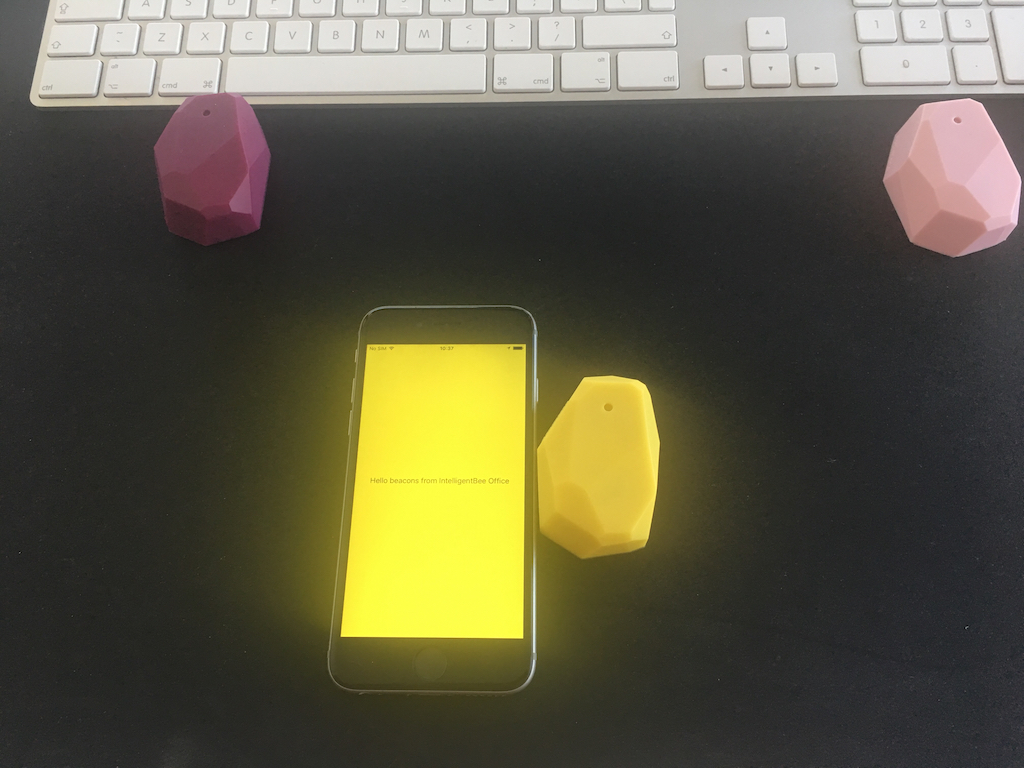
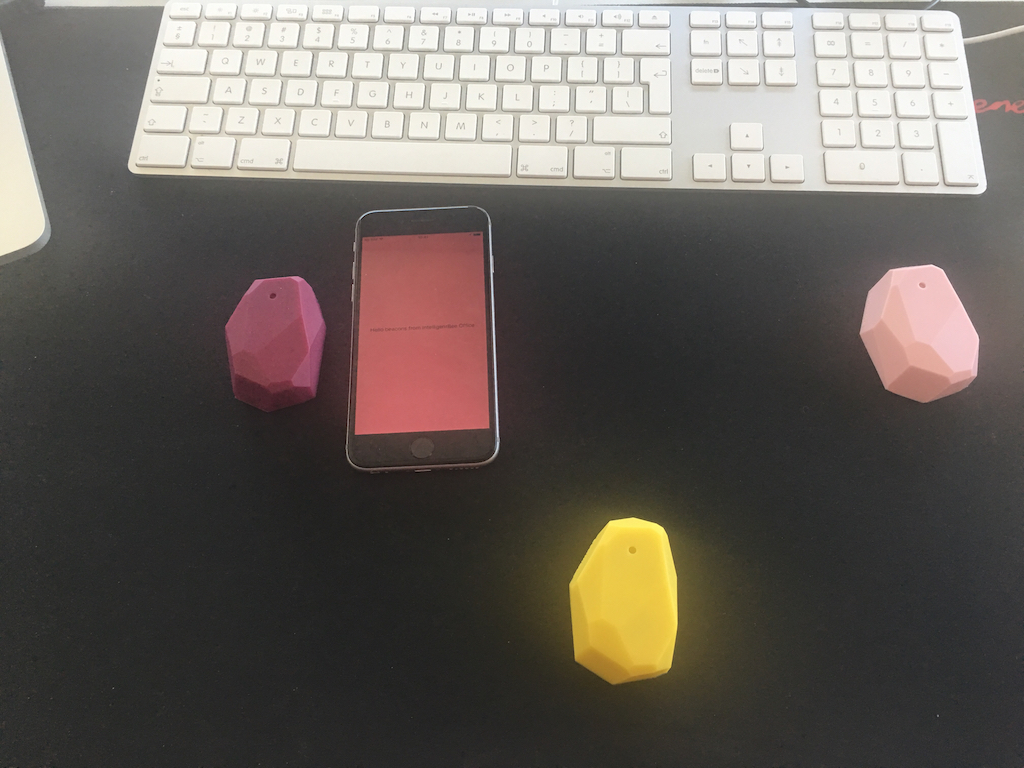
Hello, I got my hands on some interesting devices from Estimote called iBeacons which they are used for sending signals to the users (iOS/ Android) phone using Bluetooth.
What I’m going to do next is to build an iOS app using these devices which changes the background color accordingly to the nearest one of these 3 beacons.
![]()
The first thing that you have to do after you create a new project from XCode of Single View Application type is to install ‘EstimoteSDK’ using Cocoa pods. If you don’t have Cocoapods installed on your Mac please do it by following the instructions from here.
From the terminal window use "cd" to navigate into your project directory and run "pod init". This will create a podfile in your project directory. Open it and under "# Pods for your project name" add the following line:
pod 'EstimoteSDK'
Then run "pod install" command in your terminal. After the installation of the cocoapod close the project and open the .workspace file and create a bridging header. Import there the EstimoteSDK with the code below.
#import <EstimoteSDK/EstimoteSDK.h>
Now let’s continue by creating a ‘iBeaconViewController’ with a UILabel inside of it having full width and height and the text aligned center, after this please create an IBOutlet to it and name it 'label' . Then set the new created view controller as the root view for the window.
 func application(_ application: UIApplication, didFinishLaunchingWithOptions launchOptions: [UIApplicationLaunchOptionsKey: Any]?) -> Bool {
        // Override point for customization after application launch.

        window?.rootViewController = UIBeaconViewController(nibName: String(describing: UIBeaconViewController.self), bundle: nil)

        return true
    }
The next step is creating the ‘BeaconManager’< file, you have it’s content below.
import UIKit

enum MyBeacon: String {

    case pink = "4045"
    case magenta = "20372"
    case yellow = "22270"
}

let BeaconsUUID: String = "B9407F30-F5F8-466E-AFF9-25556B57FE6D"
let RegionIdentifier: String  = "IntelligentBee Office"
let BeaconsMajorID: UInt16  = 11111

class BeaconManager: ESTBeaconManager {

    static let main : BeaconManager = BeaconManager()

}
But let’s first explain what is the purpose of each item in this file. So an iBeacon contains the following main properties, an UUID, MajorID, MinorID. All of these properties represents a way for the phone to know which device should listen to.
The MajorID is used when having groups of beacons and the MinorID is to know each specific device, the minor ids are represented in the MyBeacon enum among with the beacon color. The RegionIdentifier represents a way for the app to know what region are the beacons part of and it’s used to differentiate all the regions that are monitored by the app.
Now let’s go back on the UIBeaconViewController and start writing some action.
import UIKit

class UIBeaconViewController: UIViewController, ESTBeaconManagerDelegate {

    // MARK: - Props

    let region = CLBeaconRegion(
        proximityUUID: UUID(uuidString: BeaconsUUID)!,
        major: BeaconsMajorID, identifier: RegionIdentifier)

    let colors: [MyBeacon : UIColor] =
        [MyBeacon.pink: UIColor(red: 240/255.0, green: 183/255.0, blue: 183/255.0, alpha: 1),
         MyBeacon.magenta : UIColor(red: 149/255.0, green: 70/255.0, blue: 91/255.0, alpha: 1),
         MyBeacon.yellow : UIColor(red: 251/255.0, green: 254/255.0, blue: 53/255.0, alpha: 1)]

    // MARK: - IBOutlets

    @IBOutlet weak var label: UILabel!
You can guess what region does, it defines a location to detect beacons, pretty intuitive. The colors is an array which contains the mapping between the minorID and the color of each beacon.
// MARK: - UI Utilities

    func resetBackgroundColor() {
        self.view.backgroundColor = UIColor.green
    }

    // MARK: - ESTBeaconManagerDelegate - Utilities

    func setupBeaconManager() {
        BeaconManager.main.delegate = self

        if (BeaconManager.main.isAuthorizedForMonitoring() && BeaconManager.main.isAuthorizedForRanging()) == false {
            BeaconManager.main.requestAlwaysAuthorization()
        }
    }

    func startMonitoring() {

        BeaconManager.main.startMonitoring(for: region)
        BeaconManager.main.startRangingBeacons(in: region)
    }
The functions above are pretty self describing from their names, one thing I need to describe is Monitoring and Ranging. The monitoring actions are triggered when the phone enters/ exits a beacons area and the ranging is based on the proximity of the beacon.
    // MARK: - ESTBeaconManagerDelegate

    func beaconManager(_ manager: Any, didChange status: CLAuthorizationStatus) {

        if status == .authorizedAlways ||
            status == .authorizedWhenInUse {
            startMonitoring()
        }
    }

    func beaconManager(_ manager: Any, monitoringDidFailFor region: CLBeaconRegion?, withError error: Error) {
        label.text = "FAIL " + (region?.proximityUUID.uuidString)!
    }

    func beaconManager(_ manager: Any, didEnter region: CLBeaconRegion) {

        label.text = "Hello beacons from \(region.identifier)"
    }

    func beaconManager(_ manager: Any, didExitRegion region: CLBeaconRegion) {

        label.text = "Bye bye beacons from \(region.identifier)"
    }

    func beaconManager(_ manager: Any, didRangeBeacons beacons: [CLBeacon], in region: CLBeaconRegion) {

        let knownBeacons = beacons.filter { (beacon) -> Bool in

            return beacon.proximity != CLProximity.unknown
        }

        if let firstBeacon = knownBeacons.first,
            let myBeacon = MyBeacon(rawValue:firstBeacon.minor.stringValue)   {

            let beaconColor = colors[myBeacon]
            self.view.backgroundColor = beaconColor
        }
        else {
            resetBackgroundColor()
        }
    }

    func beaconManager(_ manager: Any, didFailWithError error: Error) {
        label.text = "DID FAIL WITH ERROR" + error.localizedDescription
    }
}
After the insertion of all the code, the app should run with no errors or warning and should look like this:
I hope this is a good introduction for iBeacons in iOS Mobile App Development. If you have any improvements or suggestions please leave a comment below.
You can get the code from here: https://github.com/intelligentbee/iBeaconTest

How to create a bridging header in iOS
Hello ! If you want to import a Objective-C code into a Swift Xcode project you definitely have to create a bridging header (this allows you to communicate with your old Objective-C classes from your Swift classes).
The process of doing this is very easy. Go to File -> New -> File… , a window will appear in which you will select “Objective-C File” , name the file however you choose, then select Create. A pop-up will appear asking you if you want to create a bridging header like in the image bellow.
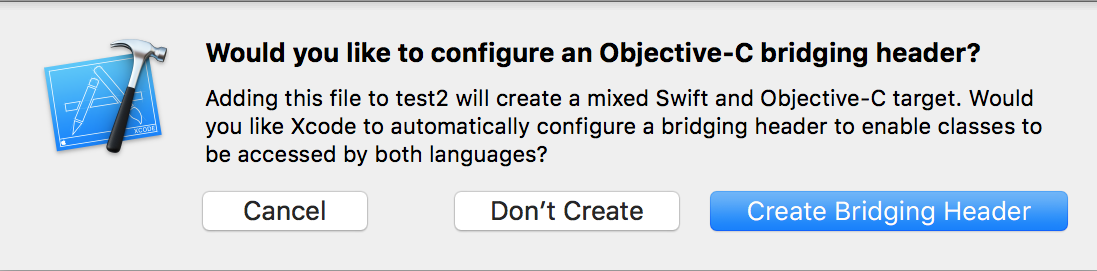
Choose “Create Bridging Header” and voila, you a have it.
To complete the process delete the .m file that you choose the name and move the bridging header to a more suitable group inside the project navigator.
Read more iOS related articles.
If you want to create this manually follow the steps from here.
That’s it, hope you find this post useful and if you have suggestions please leave a comment below.

Face Detection with Apple’s iOS 11 Vision Framework
Great stuff is coming from Apple this autumn! Among a lot of new APIs there is the Vision Framework which helps with detection of faces, face features, object tracking and others.
In this post we will take a look at how can one put the face detection to work. We will make a simple application that can take a photo (using the camera of from the library) and will draw some lines on the faces it detects to show you the power of Vision.
Select an Image
I will go fast through this so if you are a really beginner and you find this too hard to follow, please check the my previous iOS related post, Building a Travel Photo Sharing iOS App, first, as it has the same photo selection functionality but explained in greater detail.
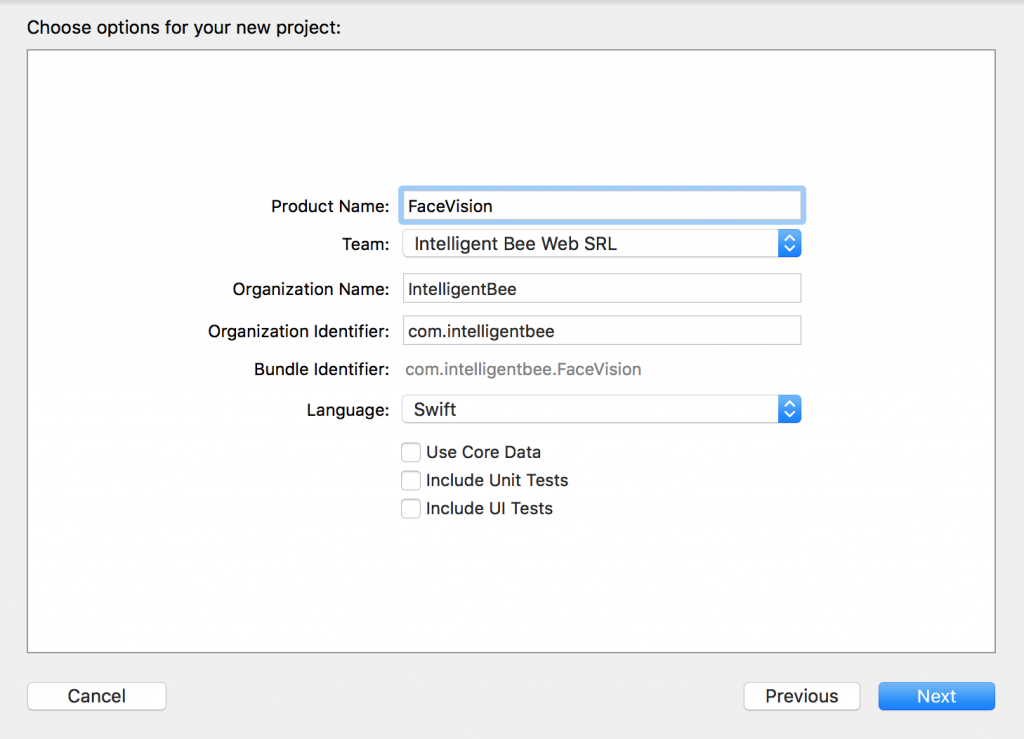
You will need Xcode 9 beta and a device running iOS 11 beta to test this. Let’s start by creating a new Single View App project named FaceVision:
Open the Main.storyboard and drag a button Take Photo to the center of it. Use the constraints to make it stay there :) Create a takePhoto action for it:
@IBAction func takePhoto(_ sender: UIButton) {
    let picker = UIImagePickerController()
    picker.delegate = self
    let alert = UIAlertController(title: nil, message: nil, preferredStyle: .actionSheet)
    if UIImagePickerController.isSourceTypeAvailable(.camera) {
        alert.addAction(UIAlertAction(title: "Camera", style: .default, handler: {action in
            picker.sourceType = .camera
            self.present(picker, animated: true, completion: nil)
        }))
    }
    alert.addAction(UIAlertAction(title: "Photo Library", style: .default, handler: { action in
        picker.sourceType = .photoLibrary
        // on iPad we are required to present this as a popover
        if UIDevice.current.userInterfaceIdiom == .pad {
            picker.modalPresentationStyle = .popover
            picker.popoverPresentationController?.sourceView = self.view
            picker.popoverPresentationController?.sourceRect = self.takePhotoButton.frame
        }
        self.present(picker, animated: true, completion: nil)
    }))
    alert.addAction(UIAlertAction(title: "Cancel", style: .cancel, handler: nil))
    // on iPad this is a popover
    alert.popoverPresentationController?.sourceView = self.view
    alert.popoverPresentationController?.sourceRect = takePhotoButton.frame
    self.present(alert, animated: true, completion: nil)
}
Here we used an UIImagePickerController to get an image so we have to make our ViewController implement the UIImagePickerControllerDelegate and UINavigationControllerDelegate protocols:
class ViewController: UIViewController, UIImagePickerControllerDelegate, UINavigationControllerDelegate {We also need an outlet for the button:
@IBOutlet weak var takePhotoButton: UIButton!
And an image var:
var image: UIImage!
We also need to add the following in the Info.plist to be able to access the camera and the photo library:
Privacy - Camera Usage Description: Access to the camera is needed in order to be able to take a photo to be analyzed by the appPrivacy - Photo Library Usage Description: Access to the photo library is needed in order to be able to choose a photo to be analyzed by the app
After the users chooses an image we will use another view controller to show it and to let the user start the processing or go back to the first screen. Add a new View Controller in the Main.storyboard. In it, add an Image View with an Aspect Fit Content Mode and two buttons like in the image below (don’t forget to use the necessary constraints):
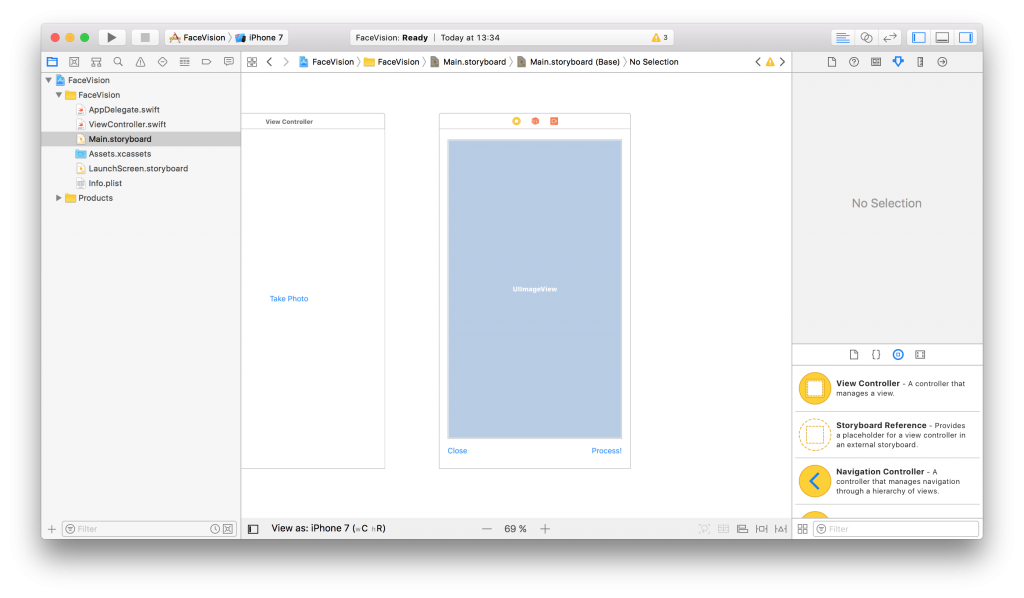
Now, create a new UIViewController class named ImageViewControler.swift and set it to be the class of the new View Controller you just added in the Main.storyboard:
import UIKit

class ImageViewController: UIViewController {

    override func viewDidLoad() {
        super.viewDidLoad()

        // Do any additional setup after loading the view.
    }
}
Still in the Main.storyboard, create a Present Modally kind segue between the two view controllers with the showImageSegue identifier:

Also add an outlet for the Image View and a new property to hold the image from the user:
@IBOutlet weak var imageView: UIImageView!

var image: UIImage!
Now, back to our initial ViewController class, we need to present the new ImageViewController and set the selected image:
func imagePickerController(_ picker: UIImagePickerController, didFinishPickingMediaWithInfo info: [String : Any]) {
    dismiss(animated: true, completion: nil)
    image = info[UIImagePickerControllerOriginalImage] as! UIImage
    performSegue(withIdentifier: "showImageSegue", sender: self)
}

override func prepare(for segue: UIStoryboardSegue, sender: Any?) {
    if segue.identifier == "showImageSegue" {
        if let imageViewController = segue.destination as? ImageViewController {
            imageViewController.image = self.image
        }
    }
}
We also need an exit method to be called when we press the Close button from the Image View Controller:
@IBAction func exit(unwindSegue: UIStoryboardSegue) {
    image = nil
}
To make this work, head back to the Main.storyboard and Ctrl+drag from the Close button to the exit icon of the Image View Controller and select the exit method from the popup.
To actually show the selected image to the user we have to set it to the imageView:
override func viewDidLoad() {
    super.viewDidLoad()

    // Do any additional setup after loading the view.
    imageView.image = image
}
If you run the app now you should be able to select a photo either from the camera or from the library and it will be presented to you in the second view controller with the Close and Process! buttons below it.
![]()
Detect Face Features
It’s time to get to the fun part, detect the faces and faces features in the image.
Create a new process action for the Process! button with the following content:
@IBAction func process(_ sender: UIButton) {
    var orientation:Int32 = 0

    // detect image orientation, we need it to be accurate for the face detection to work
    switch image.imageOrientation {
    case .up:
        orientation = 1
    case .right:
        orientation = 6
    case .down:
        orientation = 3
    case .left:
        orientation = 8
    default:
        orientation = 1
    }

    // vision
    let faceLandmarksRequest = VNDetectFaceLandmarksRequest(completionHandler: self.handleFaceFeatures)
    let requestHandler = VNImageRequestHandler(cgImage: image.cgImage!, orientation: orientation ,options: [:])
    do {
        try requestHandler.perform([faceLandmarksRequest])
    } catch {
        print(error)
    }
}
After translating the image orientation from UIImageOrientation values to kCGImagePropertyOrientation values (not sure why Apple didn’t make them the same), the code will start the detection process from the Vision framework. Don’t forget to import Vision to have access to it’s API.
We’ll add now the method that will be called when the Vision’s processing is done:
func handleFaceFeatures(request: VNRequest, errror: Error?) {
    guard let observations = request.results as? [VNFaceObservation] else {
        fatalError("unexpected result type!")
    }

    for face in observations {
        addFaceLandmarksToImage(face)
    }
}
This also calls yet another method that does the actual drawing on the image based on the data received from the detect face landmarks request:
func addFaceLandmarksToImage(_ face: VNFaceObservation) {
UIGraphicsBeginImageContextWithOptions(image.size, true, 0.0)
let context = UIGraphicsGetCurrentContext()
// draw the image
image.draw(in: CGRect(x: 0, y: 0, width: image.size.width, height: image.size.height))
context?.translateBy(x: 0, y: image.size.height)
context?.scaleBy(x: 1.0, y: -1.0)
// draw the face rect
let w = face.boundingBox.size.width * image.size.width
let h = face.boundingBox.size.height * image.size.height
let x = face.boundingBox.origin.x * image.size.width
let y = face.boundingBox.origin.y * image.size.height
let faceRect = CGRect(x: x, y: y, width: w, height: h)
context?.saveGState()
context?.setStrokeColor(UIColor.red.cgColor)
context?.setLineWidth(8.0)
context?.addRect(faceRect)
context?.drawPath(using: .stroke)
context?.restoreGState()
// face contour
context?.saveGState()
context?.setStrokeColor(UIColor.yellow.cgColor)
if let landmark = face.landmarks?.faceContour {
for i in 0...landmark.pointCount - 1 { // last point is 0,0
let point = landmark.point(at: i)
if i == 0 {
context?.move(to: CGPoint(x: x + CGFloat(point.x) * w, y: y + CGFloat(point.y) * h))
} else {
context?.addLine(to: CGPoint(x: x + CGFloat(point.x) * w, y: y + CGFloat(point.y) * h))
}
}
}
context?.setLineWidth(8.0)
context?.drawPath(using: .stroke)
context?.saveGState()
// outer lips
context?.saveGState()
context?.setStrokeColor(UIColor.yellow.cgColor)
if let landmark = face.landmarks?.outerLips {
for i in 0...landmark.pointCount - 1 { // last point is 0,0
let point = landmark.point(at: i)
if i == 0 {
context?.move(to: CGPoint(x: x + CGFloat(point.x) * w, y: y + CGFloat(point.y) * h))
} else {
context?.addLine(to: CGPoint(x: x + CGFloat(point.x) * w, y: y + CGFloat(point.y) * h))
}
}
}
context?.closePath()
context?.setLineWidth(8.0)
context?.drawPath(using: .stroke)
context?.saveGState()
// inner lips
context?.saveGState()
context?.setStrokeColor(UIColor.yellow.cgColor)
if let landmark = face.landmarks?.innerLips {
for i in 0...landmark.pointCount - 1 { // last point is 0,0
let point = landmark.point(at: i)
if i == 0 {
context?.move(to: CGPoint(x: x + CGFloat(point.x) * w, y: y + CGFloat(point.y) * h))
} else {
context?.addLine(to: CGPoint(x: x + CGFloat(point.x) * w, y: y + CGFloat(point.y) * h))
}
}
}
context?.closePath()
context?.setLineWidth(8.0)
context?.drawPath(using: .stroke)
context?.saveGState()
// left eye
context?.saveGState()
context?.setStrokeColor(UIColor.yellow.cgColor)
if let landmark = face.landmarks?.leftEye {
for i in 0...landmark.pointCount - 1 { // last point is 0,0
let point = landmark.point(at: i)
if i == 0 {
context?.move(to: CGPoint(x: x + CGFloat(point.x) * w, y: y + CGFloat(point.y) * h))
} else {
context?.addLine(to: CGPoint(x: x + CGFloat(point.x) * w, y: y + CGFloat(point.y) * h))
}
}
}
context?.closePath()
context?.setLineWidth(8.0)
context?.drawPath(using: .stroke)
context?.saveGState()
// right eye
context?.saveGState()
context?.setStrokeColor(UIColor.yellow.cgColor)
if let landmark = face.landmarks?.rightEye {
for i in 0...landmark.pointCount - 1 { // last point is 0,0
let point = landmark.point(at: i)
if i == 0 {
context?.move(to: CGPoint(x: x + CGFloat(point.x) * w, y: y + CGFloat(point.y) * h))
} else {
context?.addLine(to: CGPoint(x: x + CGFloat(point.x) * w, y: y + CGFloat(point.y) * h))
}
}
}
context?.closePath()
context?.setLineWidth(8.0)
context?.drawPath(using: .stroke)
context?.saveGState()
// left pupil
context?.saveGState()
context?.setStrokeColor(UIColor.yellow.cgColor)
if let landmark = face.landmarks?.leftPupil {
for i in 0...landmark.pointCount - 1 { // last point is 0,0
let point = landmark.point(at: i)
if i == 0 {
context?.move(to: CGPoint(x: x + CGFloat(point.x) * w, y: y + CGFloat(point.y) * h))
} else {
context?.addLine(to: CGPoint(x: x + CGFloat(point.x) * w, y: y + CGFloat(point.y) * h))
}
}
}
context?.closePath()
context?.setLineWidth(8.0)
context?.drawPath(using: .stroke)
context?.saveGState()
// right pupil
context?.saveGState()
context?.setStrokeColor(UIColor.yellow.cgColor)
if let landmark = face.landmarks?.rightPupil {
for i in 0...landmark.pointCount - 1 { // last point is 0,0
let point = landmark.point(at: i)
if i == 0 {
context?.move(to: CGPoint(x: x + CGFloat(point.x) * w, y: y + CGFloat(point.y) * h))
} else {
context?.addLine(to: CGPoint(x: x + CGFloat(point.x) * w, y: y + CGFloat(point.y) * h))
}
}
}
context?.closePath()
context?.setLineWidth(8.0)
context?.drawPath(using: .stroke)
context?.saveGState()
// left eyebrow
context?.saveGState()
context?.setStrokeColor(UIColor.yellow.cgColor)
if let landmark = face.landmarks?.leftEyebrow {
for i in 0...landmark.pointCount - 1 { // last point is 0,0
let point = landmark.point(at: i)
if i == 0 {
context?.move(to: CGPoint(x: x + CGFloat(point.x) * w, y: y + CGFloat(point.y) * h))
} else {
context?.addLine(to: CGPoint(x: x + CGFloat(point.x) * w, y: y + CGFloat(point.y) * h))
}
}
}
context?.setLineWidth(8.0)
context?.drawPath(using: .stroke)
context?.saveGState()
// right eyebrow
context?.saveGState()
context?.setStrokeColor(UIColor.yellow.cgColor)
if let landmark = face.landmarks?.rightEyebrow {
for i in 0...landmark.pointCount - 1 { // last point is 0,0
let point = landmark.point(at: i)
if i == 0 {
context?.move(to: CGPoint(x: x + CGFloat(point.x) * w, y: y + CGFloat(point.y) * h))
} else {
context?.addLine(to: CGPoint(x: x + CGFloat(point.x) * w, y: y + CGFloat(point.y) * h))
}
}
}
context?.setLineWidth(8.0)
context?.drawPath(using: .stroke)
context?.saveGState()
// nose
context?.saveGState()
context?.setStrokeColor(UIColor.yellow.cgColor)
if let landmark = face.landmarks?.nose {
for i in 0...landmark.pointCount - 1 { // last point is 0,0
let point = landmark.point(at: i)
if i == 0 {
context?.move(to: CGPoint(x: x + CGFloat(point.x) * w, y: y + CGFloat(point.y) * h))
} else {
context?.addLine(to: CGPoint(x: x + CGFloat(point.x) * w, y: y + CGFloat(point.y) * h))
}
}
}
context?.closePath()
context?.setLineWidth(8.0)
context?.drawPath(using: .stroke)
context?.saveGState()
// nose crest
context?.saveGState()
context?.setStrokeColor(UIColor.yellow.cgColor)
if let landmark = face.landmarks?.noseCrest {
for i in 0...landmark.pointCount - 1 { // last point is 0,0
let point = landmark.point(at: i)
if i == 0 {
context?.move(to: CGPoint(x: x + CGFloat(point.x) * w, y: y + CGFloat(point.y) * h))
} else {
context?.addLine(to: CGPoint(x: x + CGFloat(point.x) * w, y: y + CGFloat(point.y) * h))
}
}
}
context?.setLineWidth(8.0)
context?.drawPath(using: .stroke)
context?.saveGState()
// median line
context?.saveGState()
context?.setStrokeColor(UIColor.yellow.cgColor)
if let landmark = face.landmarks?.medianLine {
for i in 0...landmark.pointCount - 1 { // last point is 0,0
let point = landmark.point(at: i)
if i == 0 {
context?.move(to: CGPoint(x: x + CGFloat(point.x) * w, y: y + CGFloat(point.y) * h))
} else {
context?.addLine(to: CGPoint(x: x + CGFloat(point.x) * w, y: y + CGFloat(point.y) * h))
}
}
}
context?.setLineWidth(8.0)
context?.drawPath(using: .stroke)
context?.saveGState()
// get the final image
let finalImage = UIGraphicsGetImageFromCurrentImageContext()
// end drawing context
UIGraphicsEndImageContext()
imageView.image = finalImage
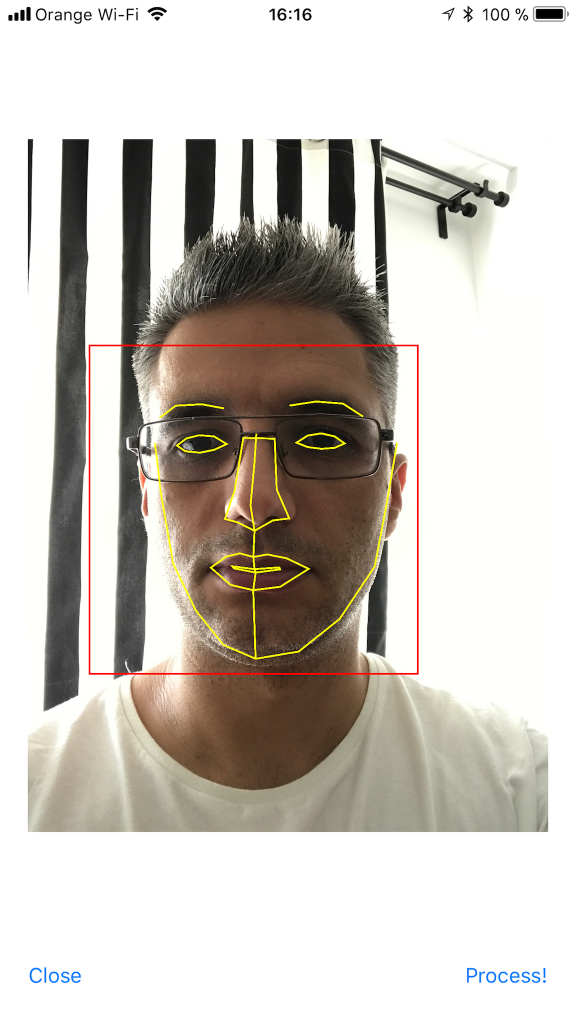
}As you can see we have quite a lot of features that Vision is able to identify: the face contour, the mouth (both inner and outer lips), the eyes together with the pupils and eyebrows, the nose and the nose crest and, finally, the median line of the faces.
You can now run the app and take some unusual selfies of yourself. Here’s mine:
I hope you enjoyed this, please let me know in the comments how did it go and if there are things that can be improved. Also, some pictures taken with the app wouldn’t hurt at all :)
You can get the code from here: https://github.com/intelligentbee/FaceVision
Thanks!

Building a Travel Photo Sharing iOS App
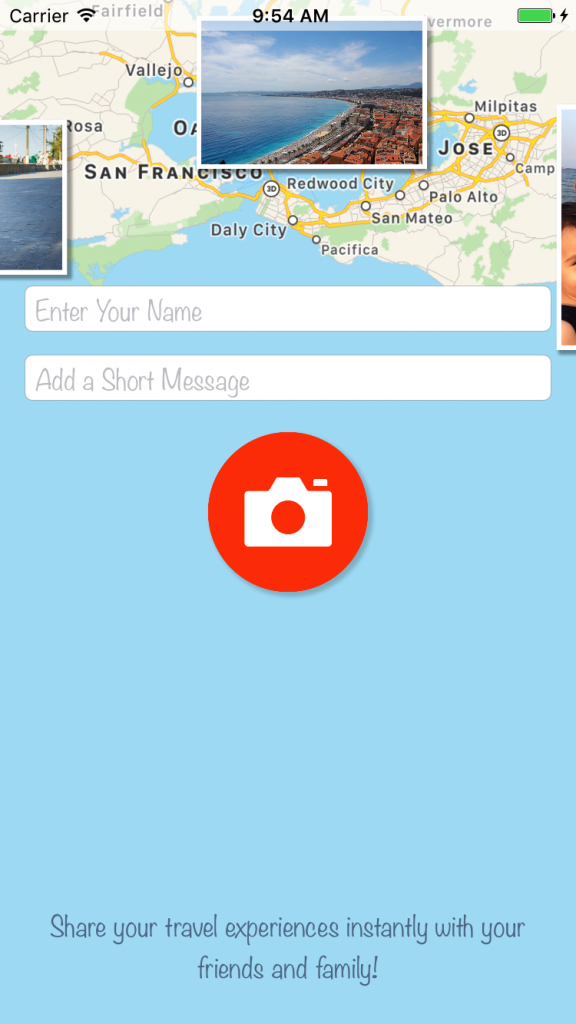
Hello! I want to show you how to build a relative simple photo sharing app with a twist: your images will be placed on a map background of your current location. You will also be able to add a short message and your name, to end up with an image looking like this (so you can brag to your friends with what you visited in the awesome vacation you have):

To follow this tutorial you need an Apple computer with xCode installed and an Apple developer account.
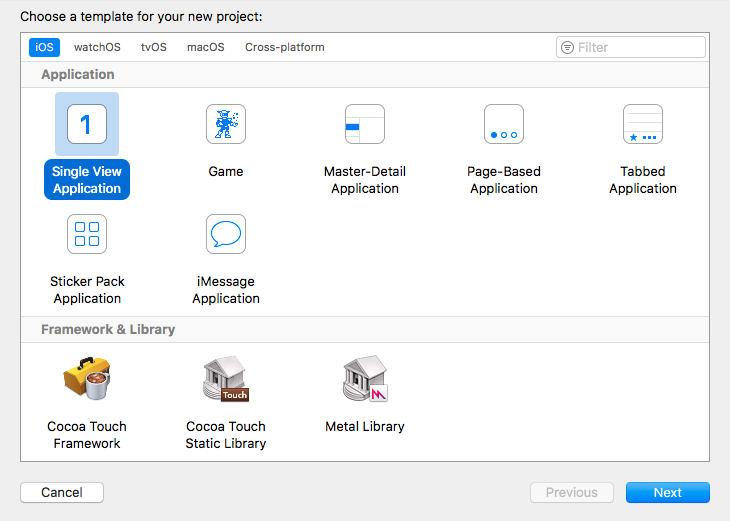
Create the Project
Open xCode and create a new project named PicTravel. Choose the Single View Application template:
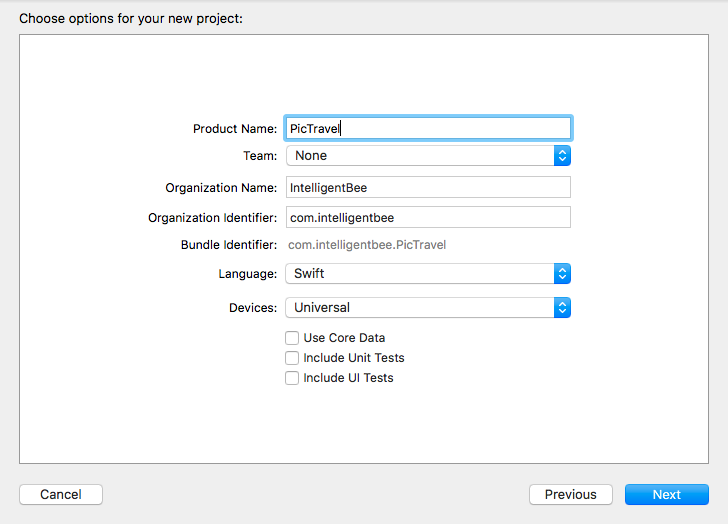
Give the project a name, we chose PicTravel but you ca choose what other name you like. Also fill in the organization name and the organization identifier for your project:
The last step is to save the newly created project in your Developer folder.
Building the Interface
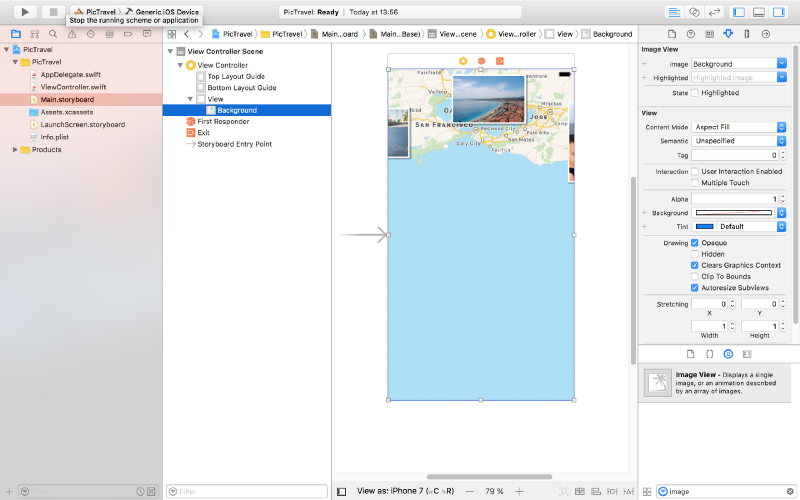
From the left panel, open the Main.storyboard. This is where we will build our app interface.
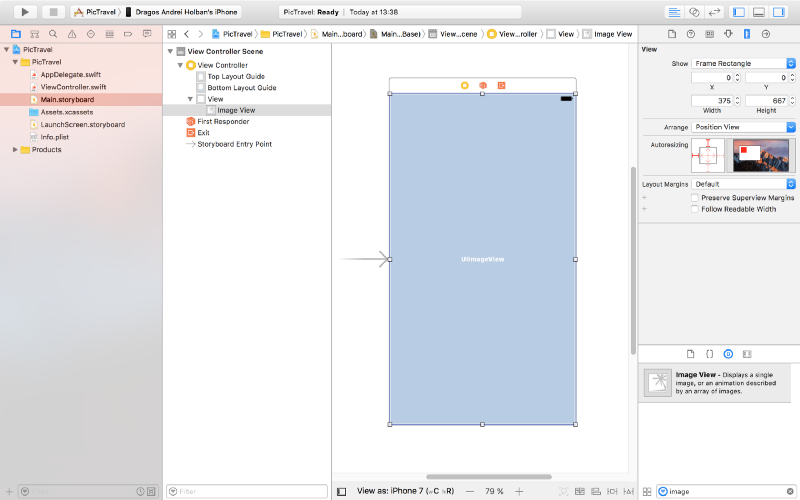
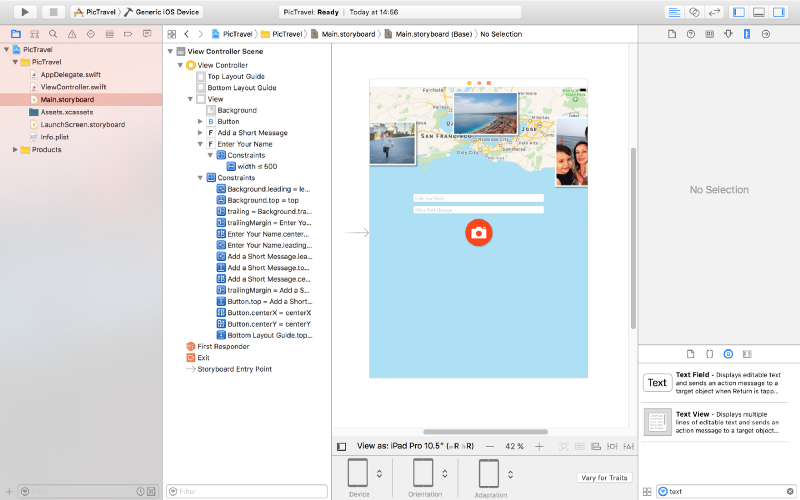
From the right panel, the bottom part, drag an ImageView and place it in the center of the scene. Resize it so it covers everything (snap it to the blue lines that appear).
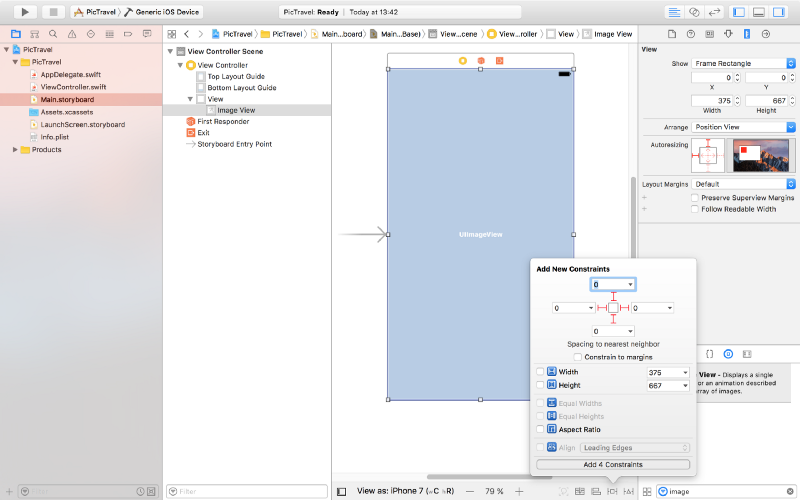
Pin the ImageView to the scene margins using the constraints dialog like you see in the image below:
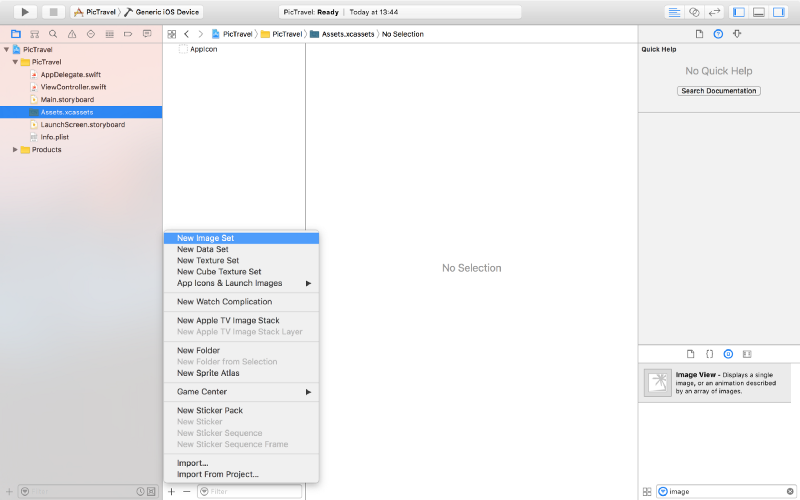
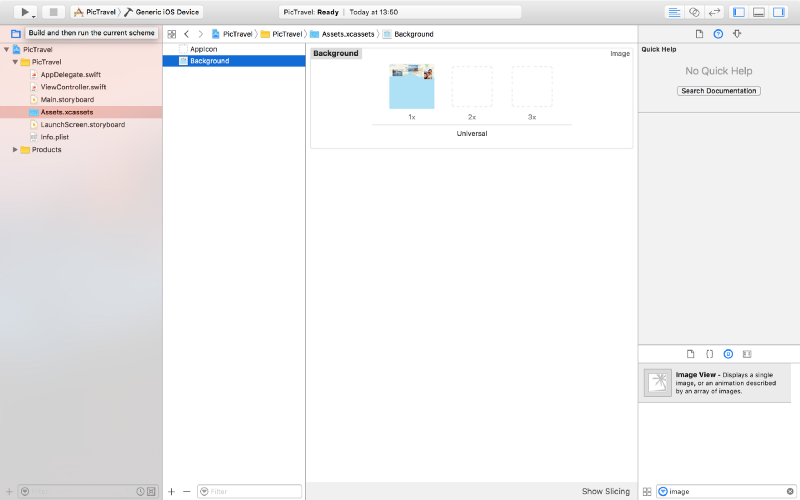
We will use this to put a background image for our app’s main screen. Download the background image from here then open the Assets.xcassets item from the left panel, click on the “+” button from the bottom and add a new image set named Background.
Drag the downloaded image to the “1x” placeholder to end up with something like this (we will not use the “2x” and “3x” placeholder for this tutorial, but you can add bigger resolution images to it if you want).
Now, back to the Main.storyboard, select the ImageView and, from the Attributes Inspector, select the Background image and set the Content Mode to Aspect Fill.
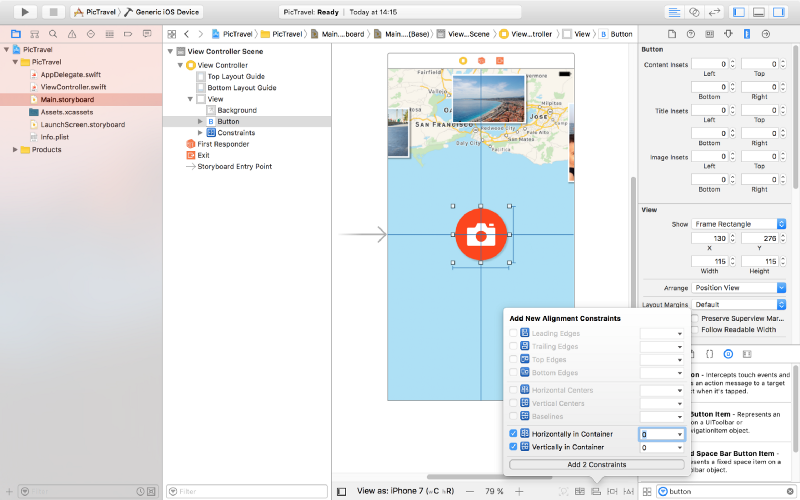
It’s time to add a new image to our assets that we will use for the take a photo button we are about to add. Download the image from here, create a new Image Set named Button in the Assets.xcassets and drag the image into the 1x placeholder like we did earlier with the background.
Next, in the Main.storybord, drag a button to the center of the scene. Set it’s Type to Custom, clear the Title and set the Background to the Button image we just created. From the Size Inspector, set the button with and height to 115.
Add two new constraints for the button’s with and heigh (115 each), then, from the Alignment Constriants, align the button horizontally and vertically in the container.
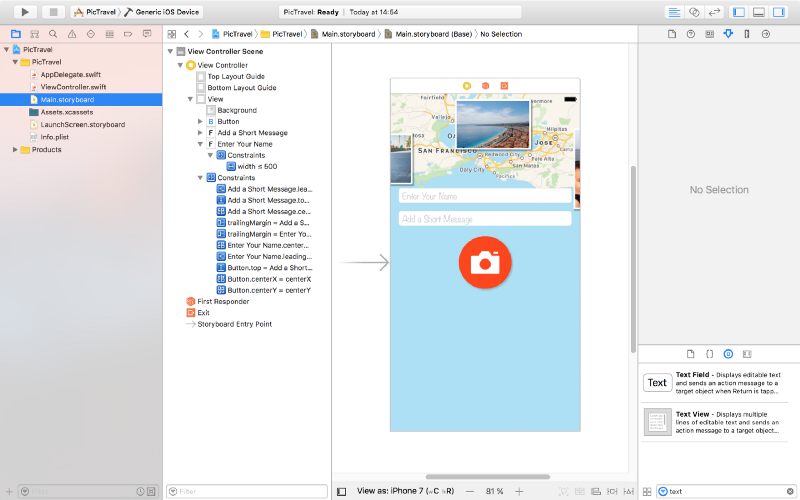
Now let’s add two text fields for the user’s name and message. Place them like in the image below, with the constraints listed below. Don’t forget the blue guides that make the placement easier for you. To create constrains between two elements you can Ctrl+drag from one to another and select the type of constraint you want from the popup that appears.
For the message text field:
- Top Space to the name text field:
15 - Bottom Space to the button:
15 - Width <=
500 - Align Center X to superview
- Trailing Space to superview:
0with a Priority of900- that’s very important as it will keep the text field pinned to the margin on iPhones but on bigger devices the width constraint will be stronger so it will not grow larger than 500. - Leading Space to superview:
0with a Priority of900
For the name field:
- Bottom Space to the message text field:
15 - Width <=
500 - Align Center X to superview
- Trailing Space to superview:
0with a Priority of900 - Leading Space to superview:
0with a Priority of900
Set the placeholders for each of the text fields to “Enter Your Name” and “Add a Short Message” so the user knows what to do. Set the Font to Noteworthy Light with a size of 17 for both.
Also, for the name field set the Capitalization to Words, Correction and SpellChecking, both to No. For the message field set the Capitalization to Sentences.
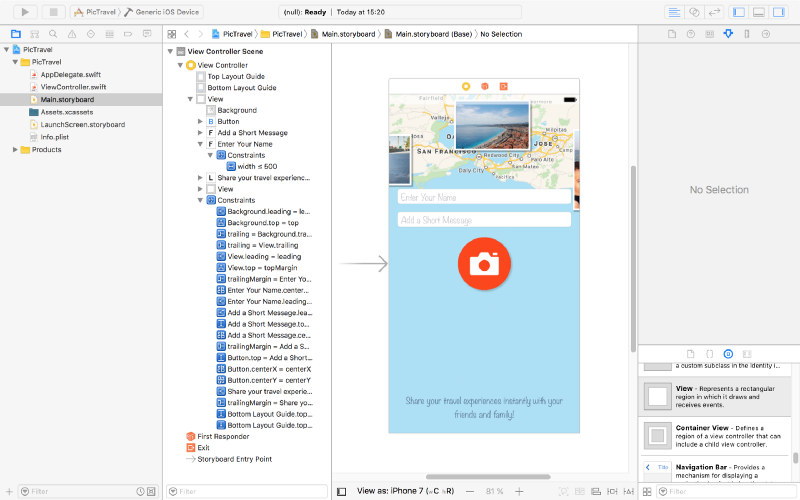
Here’s the result:
And here’s how it looks on an iPad (you can use the bottom bar under the scene to select on what device you want to preview the interface):
There are two more small elements to add and our main screen will be finished.
Add a label at the bottom with the following text: “Share your travel experiences instantly with your friends & family!”. Set it’s Font to Noteworthly Light 17, Alignment to center, Color to #5E7A96 and Lines to 0. Use the following constrains:
- Trailing Space to superview’s margins:
0 - Leading Space to superview’s margins:
0 - Bottom Space to Bottom Layout:
20 - Height:
64
Finally, add a new view at the top, having a white background with a opacity of 60%. Constrains used are:
- Trailing Space to superview:
0 - Leading Space to superview:
0 - Bottom Space to Top Layout:
20 - Height:
20
Here is the final design:
We will use this screen to get the user’s name and message and open the camera or photo library to take a photo. But after we gel all we need from the user, we need a new screen to show the final image and let him share it. So let’s add a new screen to our app.
From the Object Library, drag a new View Controller near the first one:
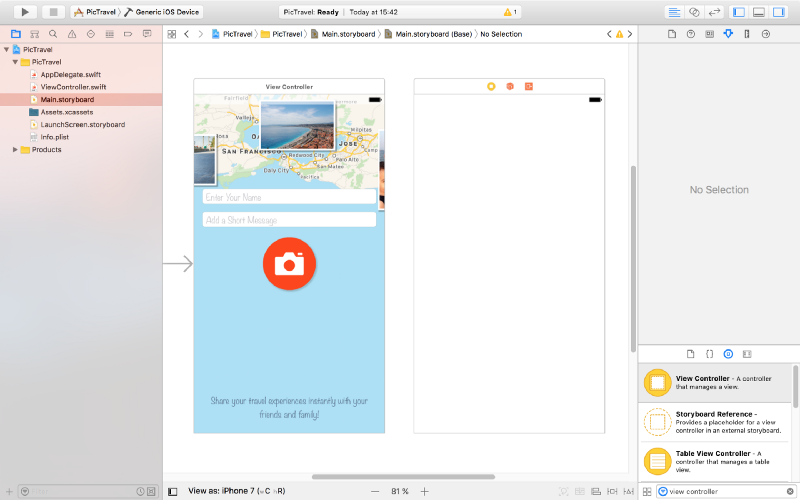
Set the background for the view of this new View Controller to #ACE0F6.
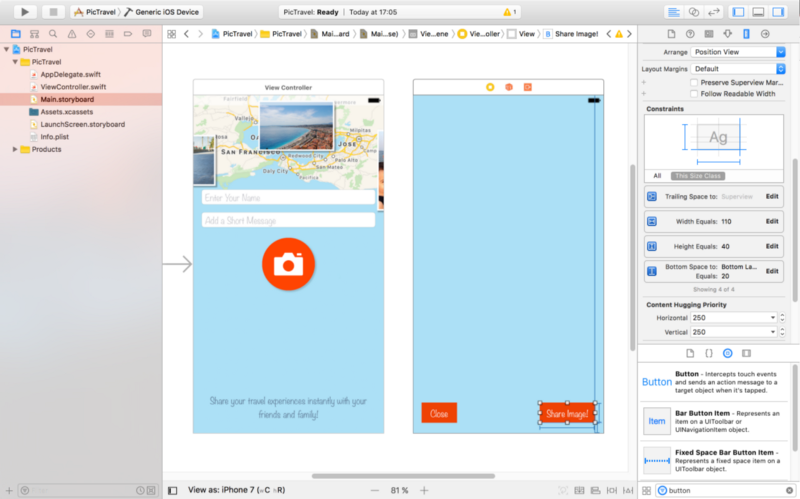
Next, add two buttons like in the image below. Type is custom, background color is #EE4205, font Noteworthy Light 17. Height 40, width 70 and 110. They are pinned to the bottom layout + 20, left or right of the container and also have constraints on with and height.
At the top, add a label to show the current status of the app to the user. Pin it to the top, left and right margins using constrains with a height of 40. Set the font to Noteworthy Light 19 and color to #EE4205. The initial text will be “Generating your image…” center aligned.
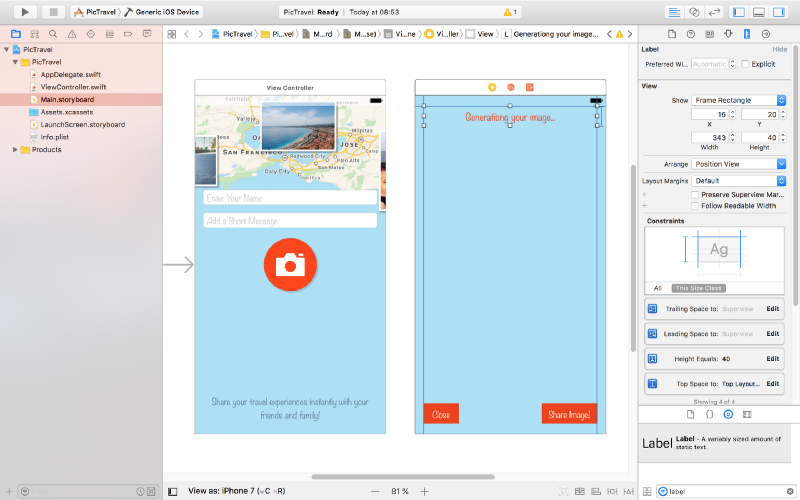
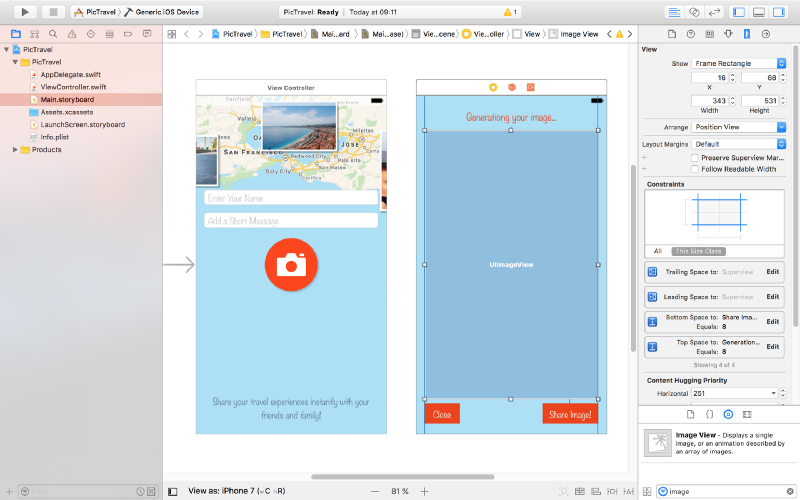
To show the generated image we need an Image View. Drag it to the center of the second screen and create the following constraints for it:
- Top Space to “Generating your image…” label:
8 - Bottom Space to “Share Image!” button:
8 - Leading Space to superview margin:
0 - Trailing Space to superview margin:
0
Also set it’s Content Mode to Aspect Fit
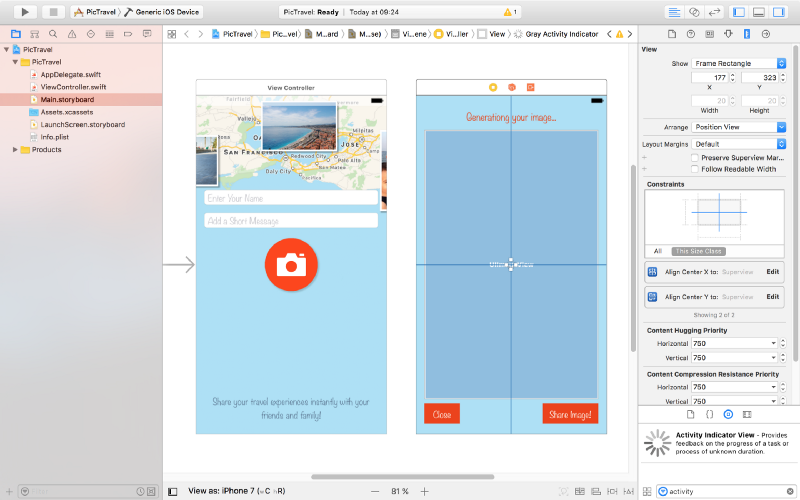
The last piece of the puzzle is an Activity Indicator View that we will use to visually inform the user that something happens behind the scenes (final image generation) and he has to wait for a few seconds.
Drag it from the Object Library and place it in the middle of the screen. Add constraints to center it horizontally and vertically in the container and set its Behavior to Animating and Hides When Stopped.
That’s it, our app’s interface is done. Run the app in the simulator to see how it looks.
Now it’s time to write some code.
Taking a Photo
With the main.storyboard still open, select the button from the first screen then open the Assistant editor and be sure you have the ViewController.swit file open on the right side. Use the manual mode if you have in case the Assistant editor has a problem figuring this out.
Now, Ctrl+drag from the button to the code to create a new action (be sure to select Action as the Connection , set the Name to selectPhotoClicked and the Type to UIButton):
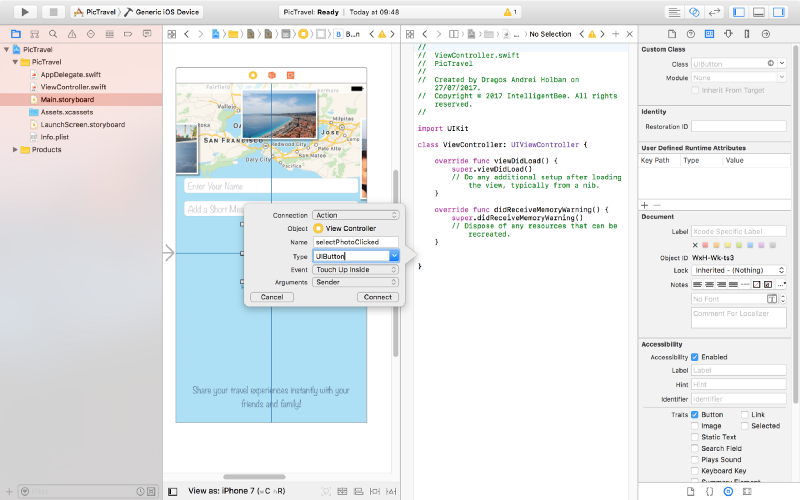
@IBAction func selectPhotoClicked(_ sender: UIButton) {

}
Also Ctrl+drag from the two text fields and the button to the code and create three outlets:
@IBOutlet weak var name: UITextField!
@IBOutlet weak var message: UITextField!
@IBOutlet weak var selectPhotoButton: UIButton!
Now let’s start with the most interesting part, choosing a photo. The user will be given a choice to take a photo using the camera or to choose one from the photo library. For this we will use an action sheet.
Edit the selectPhotoClicked method to add the code for this:
@IBAction func selectPhotoClicked(_ sender: UIButton) {
    let picker = UIImagePickerController()
    picker.delegate = self
    let alert = UIAlertController(title: nil, message: nil, preferredStyle: .actionSheet)
    alert.addAction(UIAlertAction(title: "Camera", style: .default, handler: {action in
        picker.sourceType = .camera
        self.present(picker, animated: true, completion: nil)
    }))
    alert.addAction(UIAlertAction(title: "Photo Library", style: .default, handler: { action in
        picker.sourceType = .photoLibrary
        self.present(picker, animated: true, completion: nil)
    }))
    alert.addAction(UIAlertAction(title: "Cancel", style: .cancel, handler: nil))
    self.present(alert, animated: true, completion: nil)
}
To make this code work we need to make our ViewController a delegate for both UIImagePickerControllerDelegate and UINavigationControllerDelegate. To do this change the line defining the ViewController class to the following:
class ViewController: UIViewController, UIImagePickerControllerDelegate, UINavigationControllerDelegate {If you test now the app will crash with an error like “This app has crashed because it attempted to access privacy-sensitive data without a usage description…”. That’s because the app has to ask the user’s permission to access the photo library or the camera and we have to provide a reason for this, reason that will be presented to the user. To do this open the Info.plist file and add a two new items:
Privacy - Photo Library Usage Descriptionwith a string value ofAccess to the photo library is needed in order to be able to choose a photo to be shared by the app.Privacy - Camera Usage Descriptionwith a string value ofAccess to the camera is needed in order to be able to take a photo to be shared by the app.
Also, if you try to choose the “camera” option in the simulator, the app will crash again because the simulator has no camera (“Source type 1 not available”). We need to add a test for this and only present the option if the camera is available:
if UIImagePickerController.isSourceTypeAvailable(.camera) {
    alert.addAction(UIAlertAction(title: "Camera", style: .default, handler: {action in
        picker.sourceType = .camera
        self.present(picker, animated: true, completion: nil)
    }))
}
One more thing to fix before we start handling the actual images: try to run the app on an iPad (in the simulator or on a real device). The app crashes one more time :(
Your application has presented a UIAlertController of style UIAlertControllerStyleActionSheet. The modalPresentationStyle of a UIAlertController with this style is UIModalPresentationPopover. You must provide location information for this popover through the alert controller’s popoverPresentationController. You must provide either a sourceView and sourceRect or a barButtonItem. If this information is not known when you present the alert controller, you may provide it in the UIPopoverPresentationControllerDelegate method -prepareForPopoverPresentation.
That’s because the UIAlertController on an iPad is presented like a popover (UIModalPresentationPopover) and it needs a position to be shown at. To do this we will have to test if we have a popoverPresentationController in the alert and, if true, set it’s sourceView and sourceRect (we are using an Swift optional for this, as the code after the question mark will be executed only if the popoverPresentationController is not nil):
alert.addAction(UIAlertAction(title: "Cancel", style: .cancel, handler: nil))
// on iPad this is a popover
alert.popoverPresentationController?.sourceView = self.view
alert.popoverPresentationController?.sourceRect = selectPhotoButton.frame
self.present(alert, animated: true, completion: nil)
We also need to make the photo selection from the library to be shown as a popover on an iPad:
alert.addAction(UIAlertAction(title: "Photo Library", style: .default, handler: { action in
    picker.sourceType = .photoLibrary
    // on iPad we are required to present this as a popover
    if UIDevice.current.userInterfaceIdiom == .pad {
        picker.modalPresentationStyle = .popover
        picker.popoverPresentationController?.sourceView = self.view
        picker.popoverPresentationController?.sourceRect = self.selectPhotoButton.frame
    }
    self.present(picker, animated: true, completion: nil)
}))
Now everything should be fine. Let’s see how to handle the image the user chooses.
We already added a View Controller in the Main.storyboard to show the final image to the user but we need an associated view controller class for it so we have a place to write the code involved in the process.
From the File menu select New -> File… then choose the Cocoa Touch Class option and click Next. Name the new class ShareViewController and be sure to set it as a subclass of UIViewController, no XIB, Swift language.
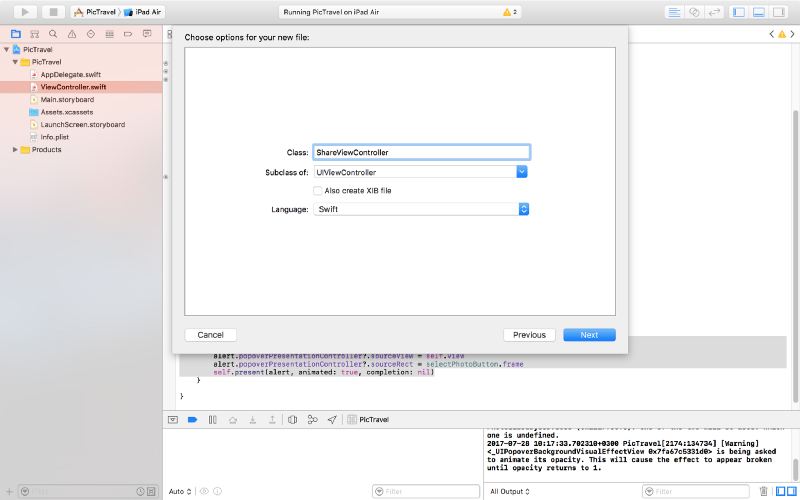
Click Next one more time and be sure to have the PicTravel Group selected and PicTravel target checked. Then Create the file.
Go back to the Main.storyboard and select the second view controller and set it’s class to the new ShareViewController we just created (you can do this from the Identity inspector, the Class dropdown).
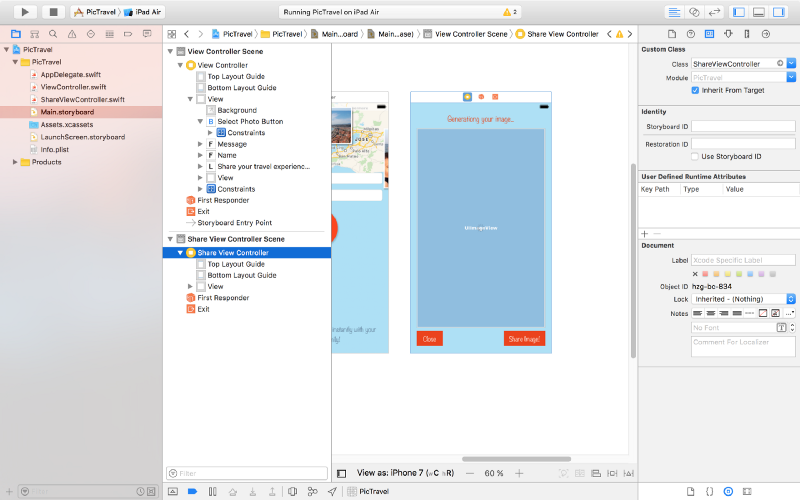
Now, with the view controller still selected, open the assistant editor and make sure it is set to automatically open the associated file. This should be the ShareViewController class. Ctrl+drag from the Image View, Activity Indicator and the Label to the class to create outlets for them:
@IBOutlet weak var imageView: UIImageView!
@IBOutlet weak var activityIndicator: UIActivityIndicatorView!
@IBOutlet weak var titleLabel: UILabel!

Also add some new variables for the user’s image, name and message:
var image: UIImage!
var name: String!
var message: String!
So, here’s what we will do next: when the user chooses an image, we instantiate the ShareViewController, set its image, name and message properties to the user’s data then present the ShareViewController.
To do this we need to create a segue (transition). Close the assistant editor then, in the Main.storyboard, Ctrl+drag from the first “View Controller” (click on the yellow symbol from the top-right) to the “Share View Controller” and define a “Present Modally” segue. then click on the created segue and set it’s identifier to showImageSegue (we will need this later in the code to identify this specific segue).
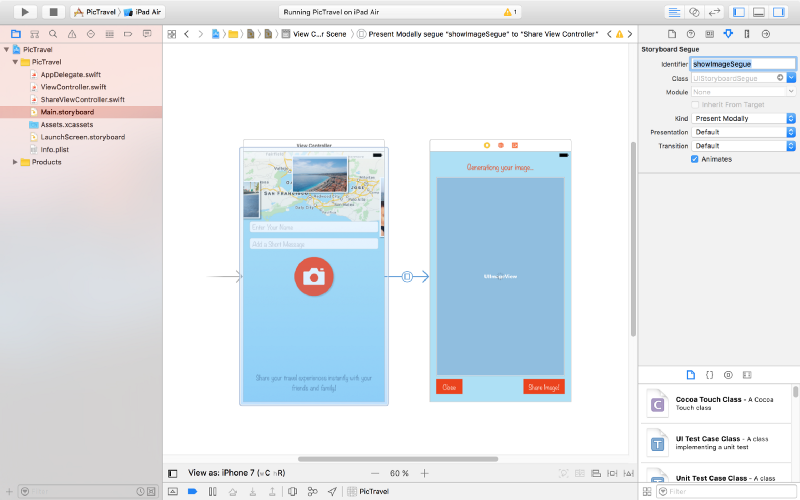
Now open our ViewController class. Add a new method to be called when the user selects an image (this is part of the UIImagePickerControllerDelegate):
func imagePickerController(_ picker: UIImagePickerController, didFinishPickingMediaWithInfo info: [String : Any]) {
    dismiss(animated: true, completion: nil)
    image = info[UIImagePickerControllerOriginalImage] as! UIImage
    performSegue(withIdentifier: "showImageSegue", sender: self)
}
Here’s what this method does:
- dismiss the image picker controller
- get the image in a class variable
- present the ShareViewController by performing the
showImageSeguesegue
For this we need a new image variable to be defined in our ViewController class:
var image: UIImage!
To send the data to the ShareViewController, we will use a method that is called just before the segue to the new view controller happens:
override func prepare(for segue: UIStoryboardSegue, sender: Any?) {
    if segue.identifier == "showImageSegue" {
        if let shareViewController = segue.destination as? ShareViewController {
            shareViewController.image = self.image
            shareViewController.name = name.text ?? ""
            shareViewController.message = message.text ?? ""
        }
    }
}
Now run the app. After the user selects an image, the second view controller should be presented to the user. But… we have no way to close it. Let’s do this next.
Still in the ViewController, create an action that will be called when the ShareViewController will exit (here we will also set the image to nil to free the memory because we don’t need it anymore):
@IBAction func exit(unwindSegue: UIStoryboardSegue) {
    image = nil
}
Back to the Main.storyboard, Ctrl+drag from the Close button to the exit symbol from the top-right of the ShareViewController and select the exit method when prompted.
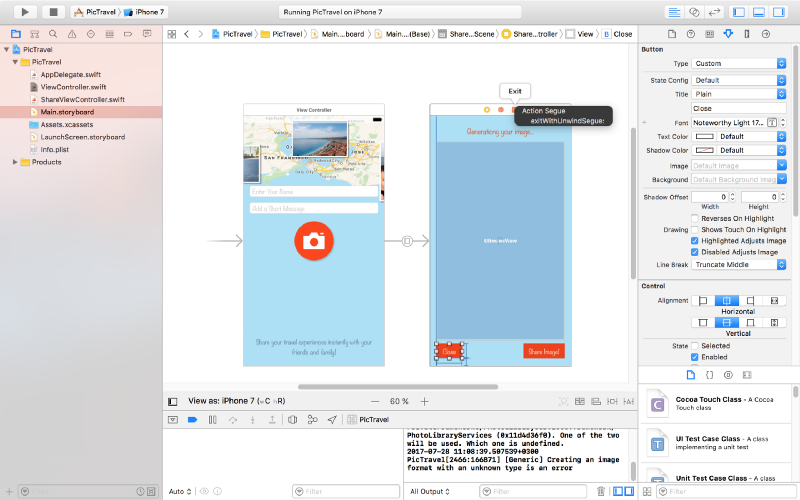
This should solve our problem of closing the second screen.
Let’s get now to the main objective of our app: get the user’s location, generate a map image and put the photo the user selected on top of it together with the name, location and message.
To continue, add some constants to the ShareViewController class that will be used in the code that follows:
// some constants used to generate the final image
let finalImageMaxDimension: CGFloat = 2048
let finalImageBorderWidth: CGFloat = 4
let userImageMaxDimension: CGFloat = 1200
let userImageBorderWidth: CGFloat = 20
let userImageX: CGFloat = 100
let userImageY: CGFloat = 160
let mapRegionDistance: CLLocationDistance = 600
let rotateContentByDegrees: CGFloat = -4
let userMessageMaxLength = 100
let textMargin: CGFloat = 280
let userMessageTopMargin: CGFloat = 60
let userNameTopMargin: CGFloat = 80
let userNameHeight: CGFloat = 120
Getting Current User Location
First we need to add a new key to Info.plist, Privacy - Location When In Use Usage Description with the value of Current location is needed to generate a map image of your location.
Now we need to import CoreLocation into our ShareViewController:
import UIKit
import CoreLocation
Declare a new locationManager variable:
var locationManager:CLLocationManager!
Add a new method that will start the process of finding the user location:
func getCurrentLocation() {
    locationManager = CLLocationManager()
    locationManager.delegate = self
    locationManager.desiredAccuracy = kCLLocationAccuracyNearestTenMeters
    locationManager.requestWhenInUseAuthorization()
    if (CLLocationManager.authorizationStatus() == .denied) {
        showError(title: "Location Access Denied", message: "The location permission was not authorized. Please enable it in Privacy Settings to allow the app to get your location and generate a map image based on that.")
    }

    if CLLocationManager.locationServicesEnabled() {
        locationManager.startUpdatingLocation()
    }
}
For this to work we need to implement the CLLocationManagerDelegate protocol:
class ShareViewController: UIViewController, CLLocationManagerDelegate {We also need to define the showError function:
func showError(title: String, message: String)
{
    let alert = UIAlertController(title: title, message: message, preferredStyle: .alert)
    let action = UIAlertAction(title: "OK", style: .default, handler: { _ in
        self.dismiss(animated: true, completion: nil)
    })
    alert.addAction(action)

    present(alert, animated: true, completion: nil)
}
Now implement the method of the CLLocationManagerDelegate protocol that is called when we get a location update:
func locationManager(_ manager: CLLocationManager, didUpdateLocations locations: [CLLocation]) {
    let location = locations[0]
    manager.stopUpdatingLocation()

    // get city & country name
    let geocoder = CLGeocoder()
    geocoder.reverseGeocodeLocation(location, completionHandler: { placemarks, error in
        if error != nil {
            self.showError(title: "Whoops...", message: error!.localizedDescription)
        } else {
            let placemark = placemarks?[0]
            self.locationString = (placemark?.administrativeArea ?? "") + ", " + (placemark?.country ?? "")
            self.generateMapImage(location: location)
        }
    })
}
This method will receive the user’s location, stop the location updates (because we don’t need them anymore) and calls a generateMapImage function (that we’ll define later) with the retrieved location as an argument. It also uses the Apple’s geocoder service to find out the city and country name for the retrieved location and puts them in a new class variable locationString:
var locationString = ""
Generate the Map Image
To generate the map image we will use the following function:
func generateMapImage(location userLocation: CLLocation) {
    let mapSnapshotOptions = MKMapSnapshotOptions()

    // Set the region of the map that is rendered.
    let location = CLLocationCoordinate2DMake(userLocation.coordinate.latitude, userLocation.coordinate.longitude)
    let region = MKCoordinateRegionMakeWithDistance(location, mapRegionDistance, mapRegionDistance)
    mapSnapshotOptions.region = region

    // Set the size of the image output.
    mapSnapshotOptions.size = calculateMapImageSize(image: self.image)

    let snapShotter = MKMapSnapshotter(options: mapSnapshotOptions)
    snapShotter.start(completionHandler: { snapShot, error in
        if error != nil {
            self.showError(title: "Whoops1...", message: error!.localizedDescription)
        } else {
            self.mapImage = snapShot?.image
            self.activityIndicator.stopAnimating()
            self.generateFinalImage()
        }
    })
}
You need to import MapKit into ShareViewController:
import MapKit
Also a new class variable is used:
var mapImage: UIImage!
To calculate the map size we used another function, calculateMapImageSize that returns a CGSize object to be used when generating the map image:
func calculateMapImageSize() -> CGSize  {
    let maxSize = finalImageMaxDimension - 2 * finalImageBorderWidth
    if image.size.width > image.size.height {
        return CGSize(width: maxSize, height: round(maxSize * image.size.height / image.size.width))
    } else {
        return CGSize(width: round(maxSize * image.size.width / image.size.height), height: maxSize)
    }
}
Building the Final Image
The last thing we need to do is to generate the final image with all the pieces put together:
func generateFinalImage() {
    let size = CGSize(width: mapImage.size.width + 2 * finalImageBorderWidth, height: mapImage.size.height + 2 * finalImageBorderWidth)
    let userImageSize = calculateUserImageFinalSize()

    // start drawing context
    UIGraphicsBeginImageContextWithOptions(size, true, 0.0)
    let context = UIGraphicsGetCurrentContext()

    // draw the white background
    let bgRectangle = CGRect(x: 0, y: 0, width: mapImage.size.width + 2 * finalImageBorderWidth, height: mapImage.size.height + 2 * finalImageBorderWidth)
    context!.saveGState()
    context!.setFillColor(UIColor.white.cgColor)
    context!.addRect(bgRectangle)
    context!.drawPath(using: .fill)
    context!.restoreGState()

    // draw the map
    mapImage.draw(in: CGRect(x: finalImageBorderWidth, y: finalImageBorderWidth, width: mapImage.size.width, height: mapImage.size.height))

    // draw a semitransparent white rectage over the  map to dim it
    let transparentRectangle = CGRect(x: finalImageBorderWidth, y: finalImageBorderWidth, width: mapImage.size.width, height: mapImage.size.height)
    context!.saveGState()
    context!.setFillColor(UIColor(colorLiteralRed: 255, green: 255, blue: 255, alpha: 0.3).cgColor)
    context!.addRect(transparentRectangle)
    context!.drawPath(using: .fill)
    context!.restoreGState()

    // rotate the context
    context!.rotate(by: (rotateContentByDegrees * CGFloat.pi / 180))

    // draw white rectangle
    let rectangle = CGRect(x: userImageX, y: userImageY, width: userImageSize.width + 2 * userImageBorderWidth, height: userImageSize.height + 2 * userImageBorderWidth)
    context!.saveGState()
    context!.setFillColor(UIColor.white.cgColor)
    context!.setShadow(offset: CGSize(width: userImageBorderWidth, height: userImageBorderWidth), blur: 8.0)
    context!.addRect(rectangle)
    context!.drawPath(using: .fill)
    context!.restoreGState()

    // draw user image
    image.draw(in: CGRect(x: userImageX + userImageBorderWidth, y: userImageY + userImageBorderWidth, width: userImageSize.width, height: userImageSize.height))

    // draw message
    var truncatedMessage = message
    if (message.distance(from: message.startIndex, to: message.endIndex) > userMessageMaxLength) {
        truncatedMessage = message.substring(to: message.index(message.startIndex, offsetBy: userMessageMaxLength))
    }
    let messageFont = UIFont(name: "Noteworthy-Bold", size: 80)!
    let messageFontAttributes = [
        NSFontAttributeName: messageFont,
        NSForegroundColorAttributeName: UIColor.black,
        ] as [String : Any]
    let messageSize = sizeOfString(string: truncatedMessage!, constrainedToWidth: Double(size.width - textMargin), attributes: messageFontAttributes)
    truncatedMessage!.draw(in: CGRect(x: userImageX + userImageBorderWidth, y: userImageY + userImageBorderWidth + userImageSize.height + userMessageTopMargin, width: size.width - textMargin, height: messageSize.height), withAttributes: messageFontAttributes)

    // draw name, location & date
    let nameFont = UIFont(name: "Noteworthy", size: 58)!
    let nameFontAttributes = [
        NSFontAttributeName: nameFont,
        NSForegroundColorAttributeName: UIColor.black,
        ] as [String : Any]
    let dateFormatter = DateFormatter()
    dateFormatter.dateStyle = .long
    dateFormatter.timeStyle = .none

    var nameString = ""
    if(name != "") {
        nameString = name + " - " + dateFormatter.string(from: Date()) + ", " + locationString
    } else {
        nameString = dateFormatter.string(from: Date()) + ", " + locationString
    }
    nameString.draw(in: CGRect(x: userImageX + userImageBorderWidth, y: userImageY + userImageBorderWidth + userImageSize.height + messageSize.height + userNameTopMargin, width: size.width - textMargin, height: userNameHeight), withAttributes: nameFontAttributes)

    // get final image
    let finalImage = UIGraphicsGetImageFromCurrentImageContext()

    // end drawing context
    UIGraphicsEndImageContext()

    // show the final image to the user & update tha status label
    imageView.image = finalImage
    titleLabel.text = "You can now share your image."
}
Here we used two helper methods, calculateUserImageFinalSize and sizeOfString. The last one deserves a little attention because it will return a CGSize object with the dimensions needed to draw a text with specific attributes.
func calculateUserImageFinalSize() -> CGSize  {
    if image.size.width > image.size.height {
        return CGSize(width: userImageMaxDimension, height: round(userImageMaxDimension * image.size.height / image.size.width))
    } else {
        return CGSize(width: round(userImageMaxDimension * image.size.width / image.size.height), height: userImageMaxDimension)
    }
}

func sizeOfString (string: String, constrainedToWidth width: Double, attributes: [String: Any]) -> CGSize {
    let attString = NSAttributedString(string: string,attributes: attributes)
    let framesetter = CTFramesetterCreateWithAttributedString(attString)

    return CTFramesetterSuggestFrameSizeWithConstraints(framesetter, CFRange(location: 0,length: 0), nil, CGSize(width: width, height: .greatestFiniteMagnitude), nil)
}
Now that we have everything in place, we need to start the whole process when the ShareViewController is loaded and presented to the user:
override func viewDidAppear(_ animated: Bool) {
    super.viewDidAppear(animated)
    getCurrentLocation()
}
Test the app. Enter your name, a short message and select a photo. You should get the following result:
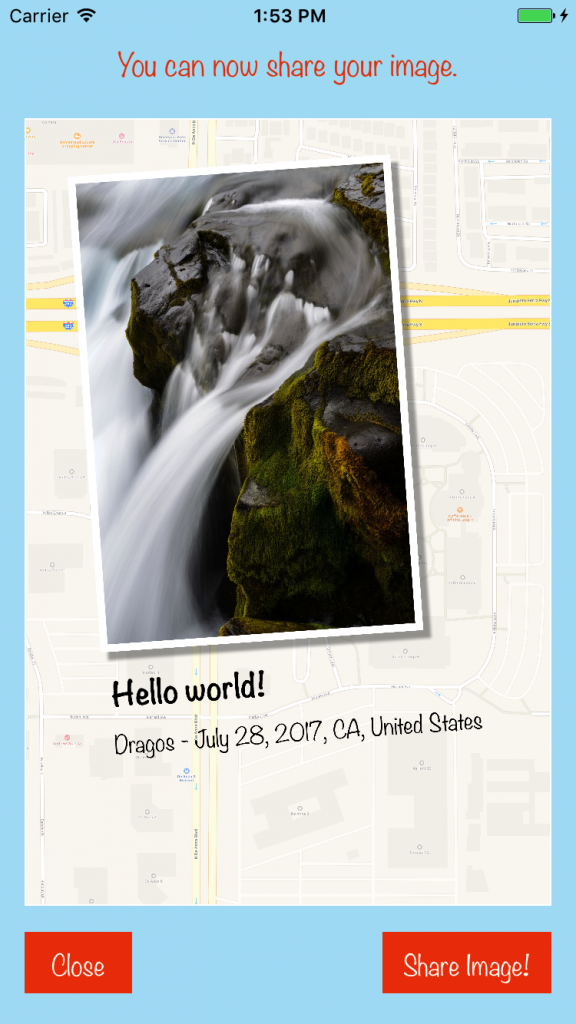
Sharing the Final Image
Ok, now let’s see how do we share the resulted image. To do this we will use an UIActivityViewController.
Add a new shareImage action for the Share Image! button using Ctrl+drag into the ShareViewController like we did earlier for the photo button:
@IBAction func shareImage(_ sender: UIButton) {
}
The code for the actual sharing is pretty simple:
@IBAction func shareImage(_ sender: UIButton) {
    let activityViewController = UIActivityViewController(activityItems: [image], applicationActivities: nil)
    activityViewController.popoverPresentationController?.sourceView = self.view
    present(activityViewController, animated: true, completion: nil)
}
Try it! Now you can save the image or share it with your friends & family using the installed apps on your device.
Final Touches
To finish the app we need to do two more things:
- add an app icon
- make the startup screen look good
To add an app icon, first download the images from here, then open the Assets.xcassets from the left panel, select the AppIcon item and drag&drop downloaded images to their respective placeholders.
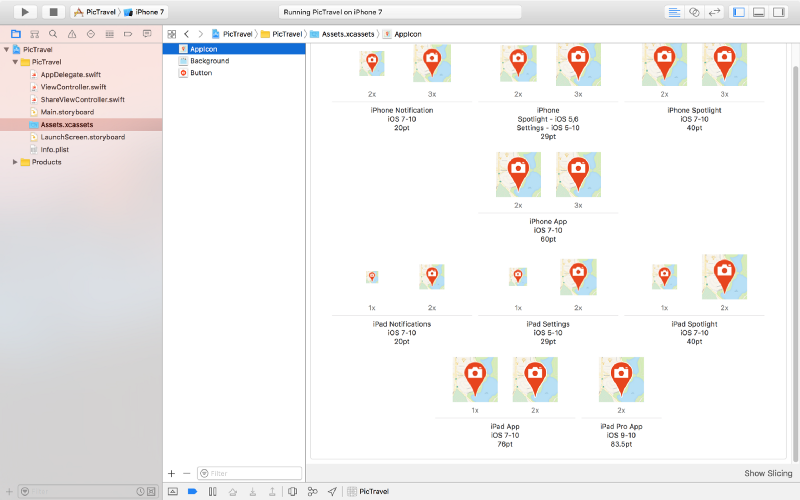
To change the startup screen , which is white right now, open the LaunchScreen.storyboard from the left panel and drag an Image View to it. Add constraints so it covers the entire screen, select the Background Image and set the Content Mode to Aspect Fill (it will look exactly like our main app's screen background).
That’s it! You can now run the app and even install it on your device to take it out in the wild.
The code for this app is available on github: https://github.com/intelligentbee/PicTravel
You can also download the final app from the App Store: https://itunes.apple.com/us/app/pictravel/id1263495901?mt=8